Grow, the best training partner you've ever had.

Grow User Guide.
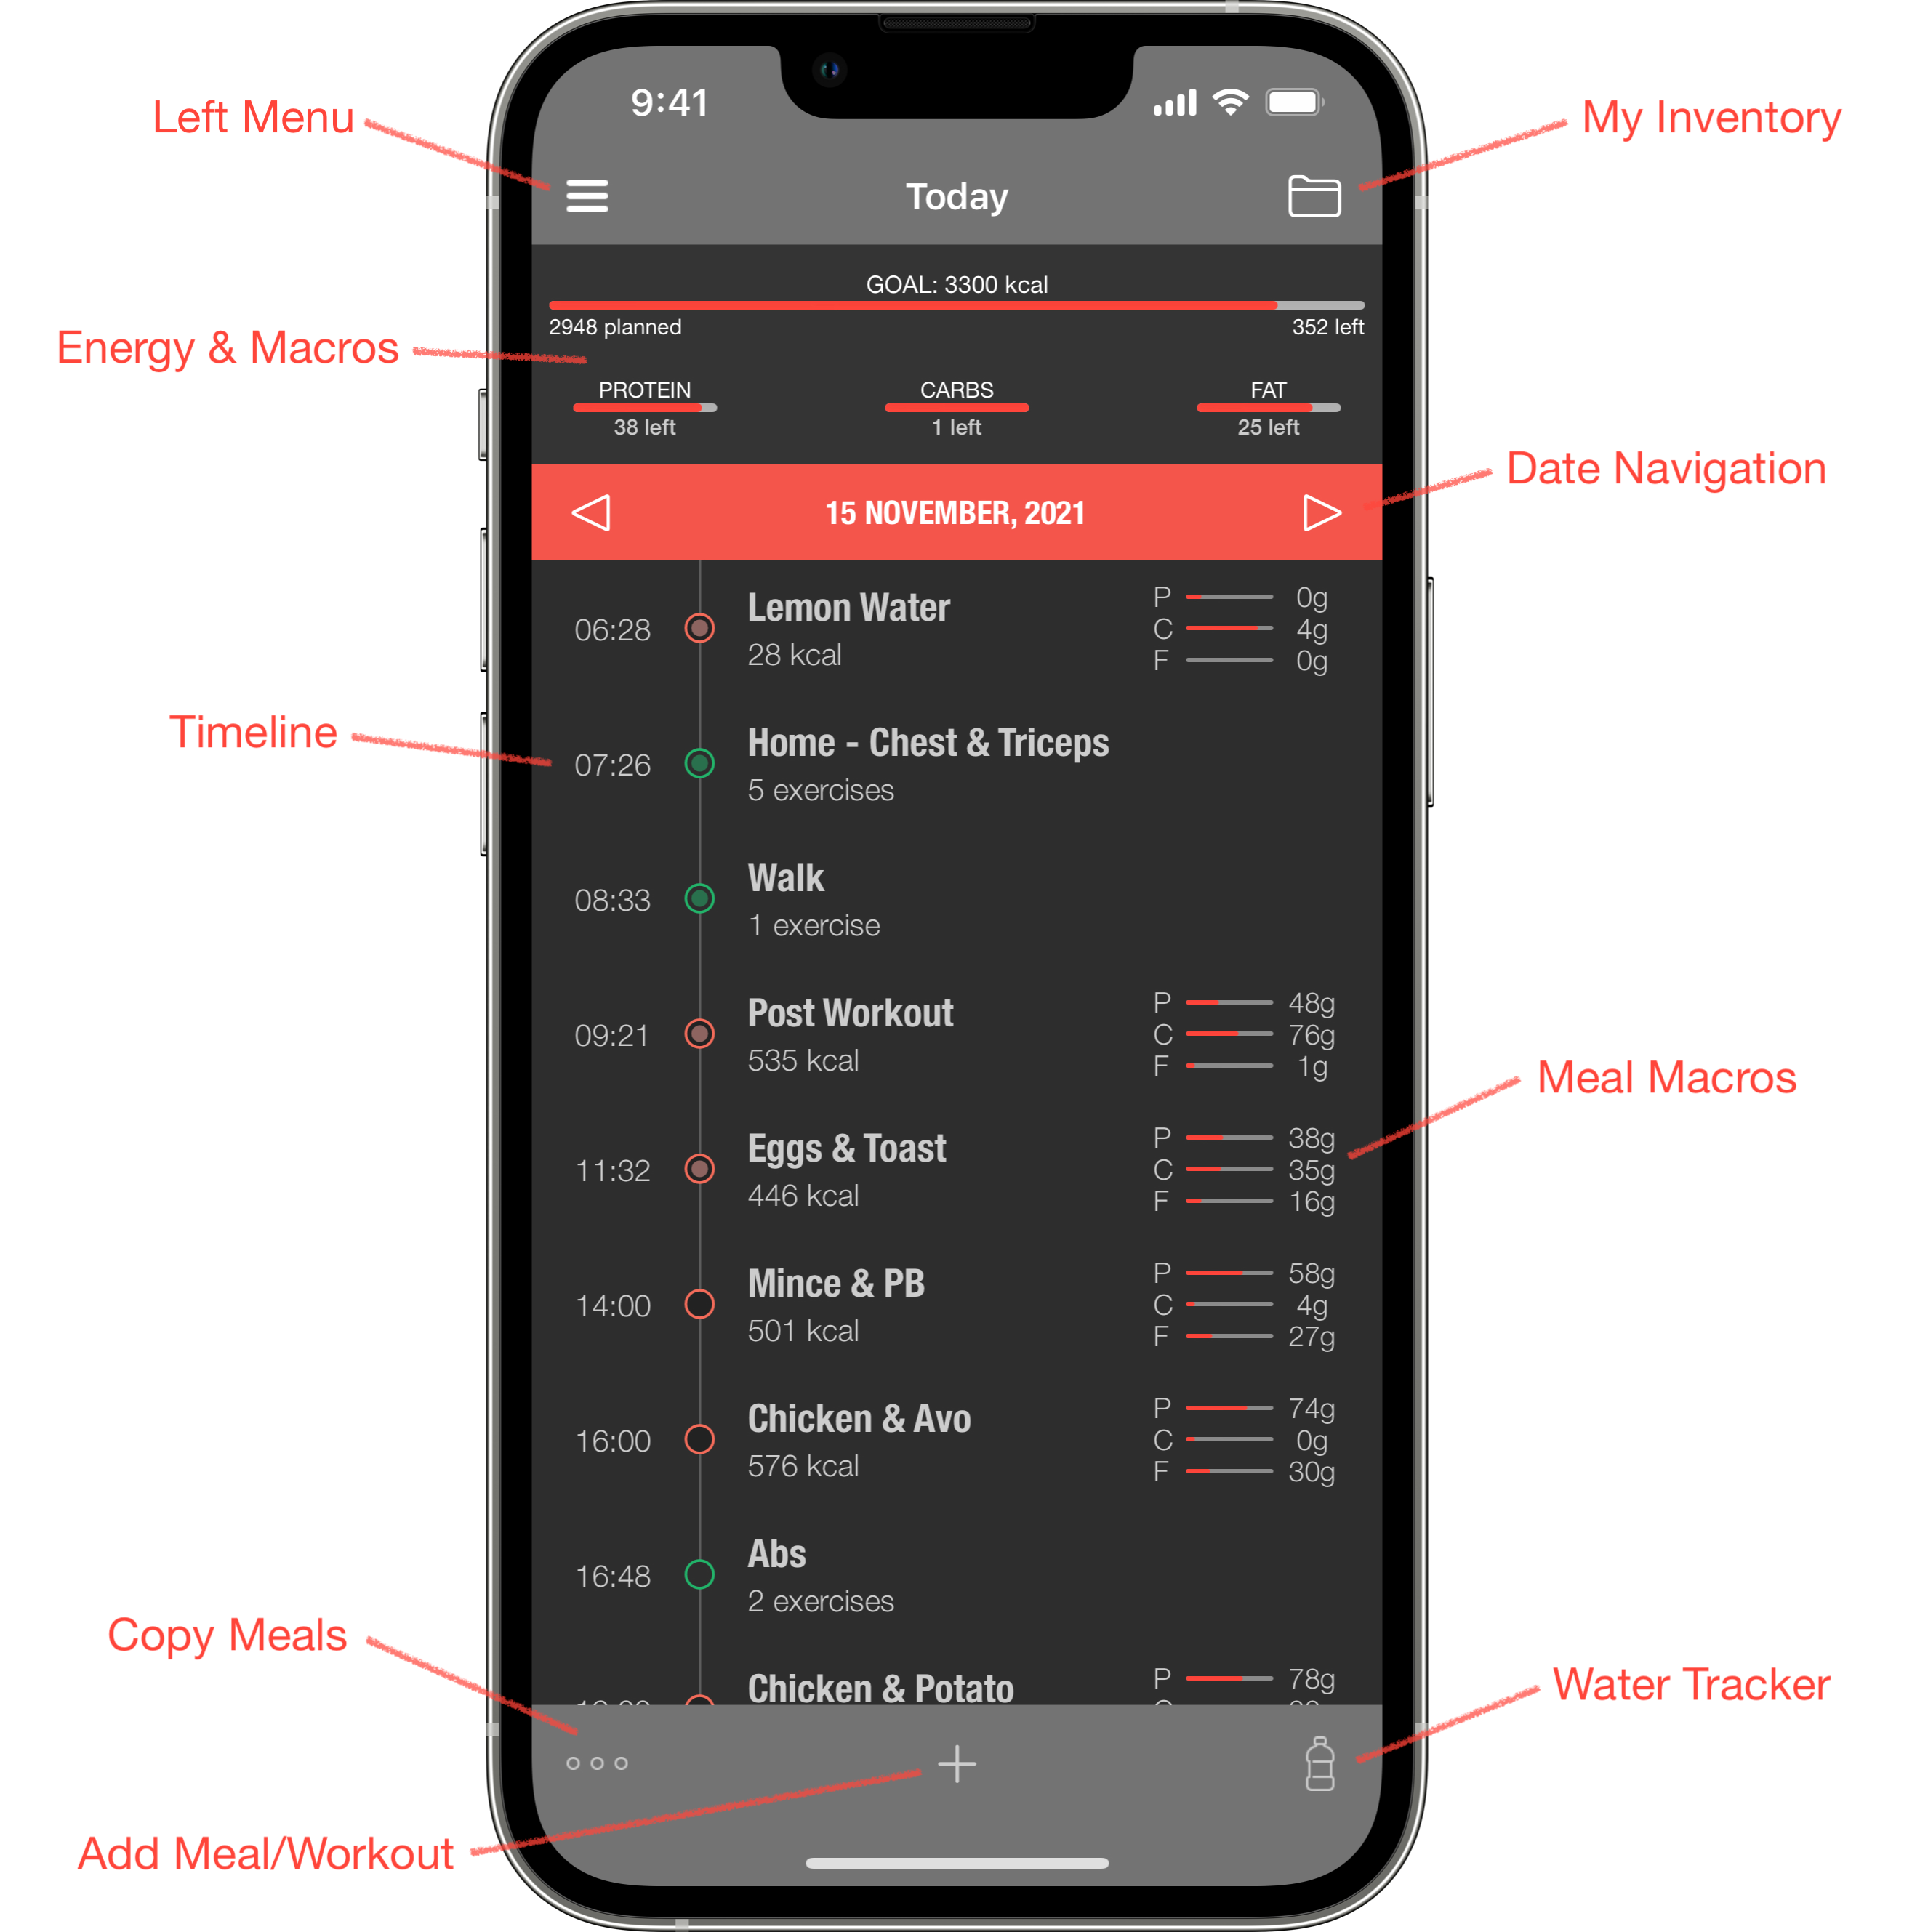
- Left Menu - The hamburger icon top left opens your navigation menu. This lets you swap between your dashboard and timeline and access other areas like check-ins, your profile and settings.
- My Inventory - The folder icon top right opens My Inventory. This is where you store your foods, meals, exercises and workouts. It's basically a database of all the things you need that you can reuse whenever you want.
- Energy and Macros - Just below the navigation bar is the nutrition breakdown for your day. This lists the food energy (calories or kilojoules depending on your settings) and your macro breadowns: protein, carbohydrates and fat. Based on the goals you have set for energy and macros, you will see what you have planned and if you have met your goals, still have more to eat, or gone past your goals. By default it shows what you have left, that is, how far off you are from your goals. If you have gone over it will tell you how far over you have gone. If you tap anywhere in this area it will switch to tell you the total macros you have planned. Tap again to go back to how far off your plans you are. This will help you plan your days and make sure your meals are in line with your energy and macro goals.
- Date Navigation - Below the energy and macros view is your date navigation bar. It will tell you the current date you are looking at. Anytime you launch Grow it will open on today's date. Use the arrows to go back and forward days to let you plan and look at your plans. If you want to return to Today from any other date, just tap the date in the middle.
- Timeline - The timeline itself lists all your planned meals and workouts, ordered by the times you have set for each. Meals will list ther name and the energy content of all the foods in that meal below the name. At the right of the meal is the protein, carbohydrates and fat breakdown for the meal, in grams. If you don't want the macro breakdown in your timeline you can turn it off in your settings. Each workouts lists how many exercises are planned if the workout has not been completed, or how many exercises you completed if the workout is over. You can swipe left to delete a meal or workout, or swipe right to mark a meal eaten or a workout complete. When marking a meal as eaten, you will get the option to mark it eaten at the planned time, or "now". This makes it easy to set the time it was eaten when you don't eat it at exactly the time you had it plannned.
- Copy Meals Between Days - At the bottom left is an elipsis icon. This lets you copy meals between days. This will make your life SO easy. As people into bodybuilding, lifting, cardio, fitness, sports or just the gym in general, we tend to eat the same meals each day or with small variations. By using this button you can copy some or all meals from one day to the next. So if you plan to eat the same meals tomorrow, in a couple of touches you can copy everything to tomorrow and you have your day planned. Personally my meals rarely change except dinner each night with the family, so i copy every meal between days and the only meal i have to setup is dinner, and most of these are saved in My Inventory so its 2 seconds to pull that into my timeline.
- Add to Timeline - The plus icon in the centre of the toolbar lets you add meals or workouts to your timeline. "Create a New Meal" will let you create a meal from scratch which will then be added to your timeline. "Add a Saved Meal" will open My Inventory and you can add a saved meal to your timeline by swiping left on the meal. "Add a Workout" will open your workout list letting you create a new workout, add a recent workout or add a saved workout to your timeline.
- Water Tracking - The water bottle bottom right lets you track water intake. Once your water goal is setup you can mark off each bottle/glass you drink. You can set custom bottle sizes in your settings making it easy to mark off each bottle you drink based on the size of the bottle you have.
The Dashboard helps you keep your goals front and centre, keep you motivated and is a quick way to run your day. Once you have your day planned in your timeline, you can run your day from the dashboard. The dashboard provides information about your goals and also your next meal and when its due, and your next workout and when its due.
Read through the below descriptions and you will see how easy it is to run your entire program from here. Once evevrything is planned in your timeline, the dashboard lets you see when your next meal is, mark each meal as you eat them, and launch and run your workouts when they are due.
Let's take a look at all the functions and how they work.
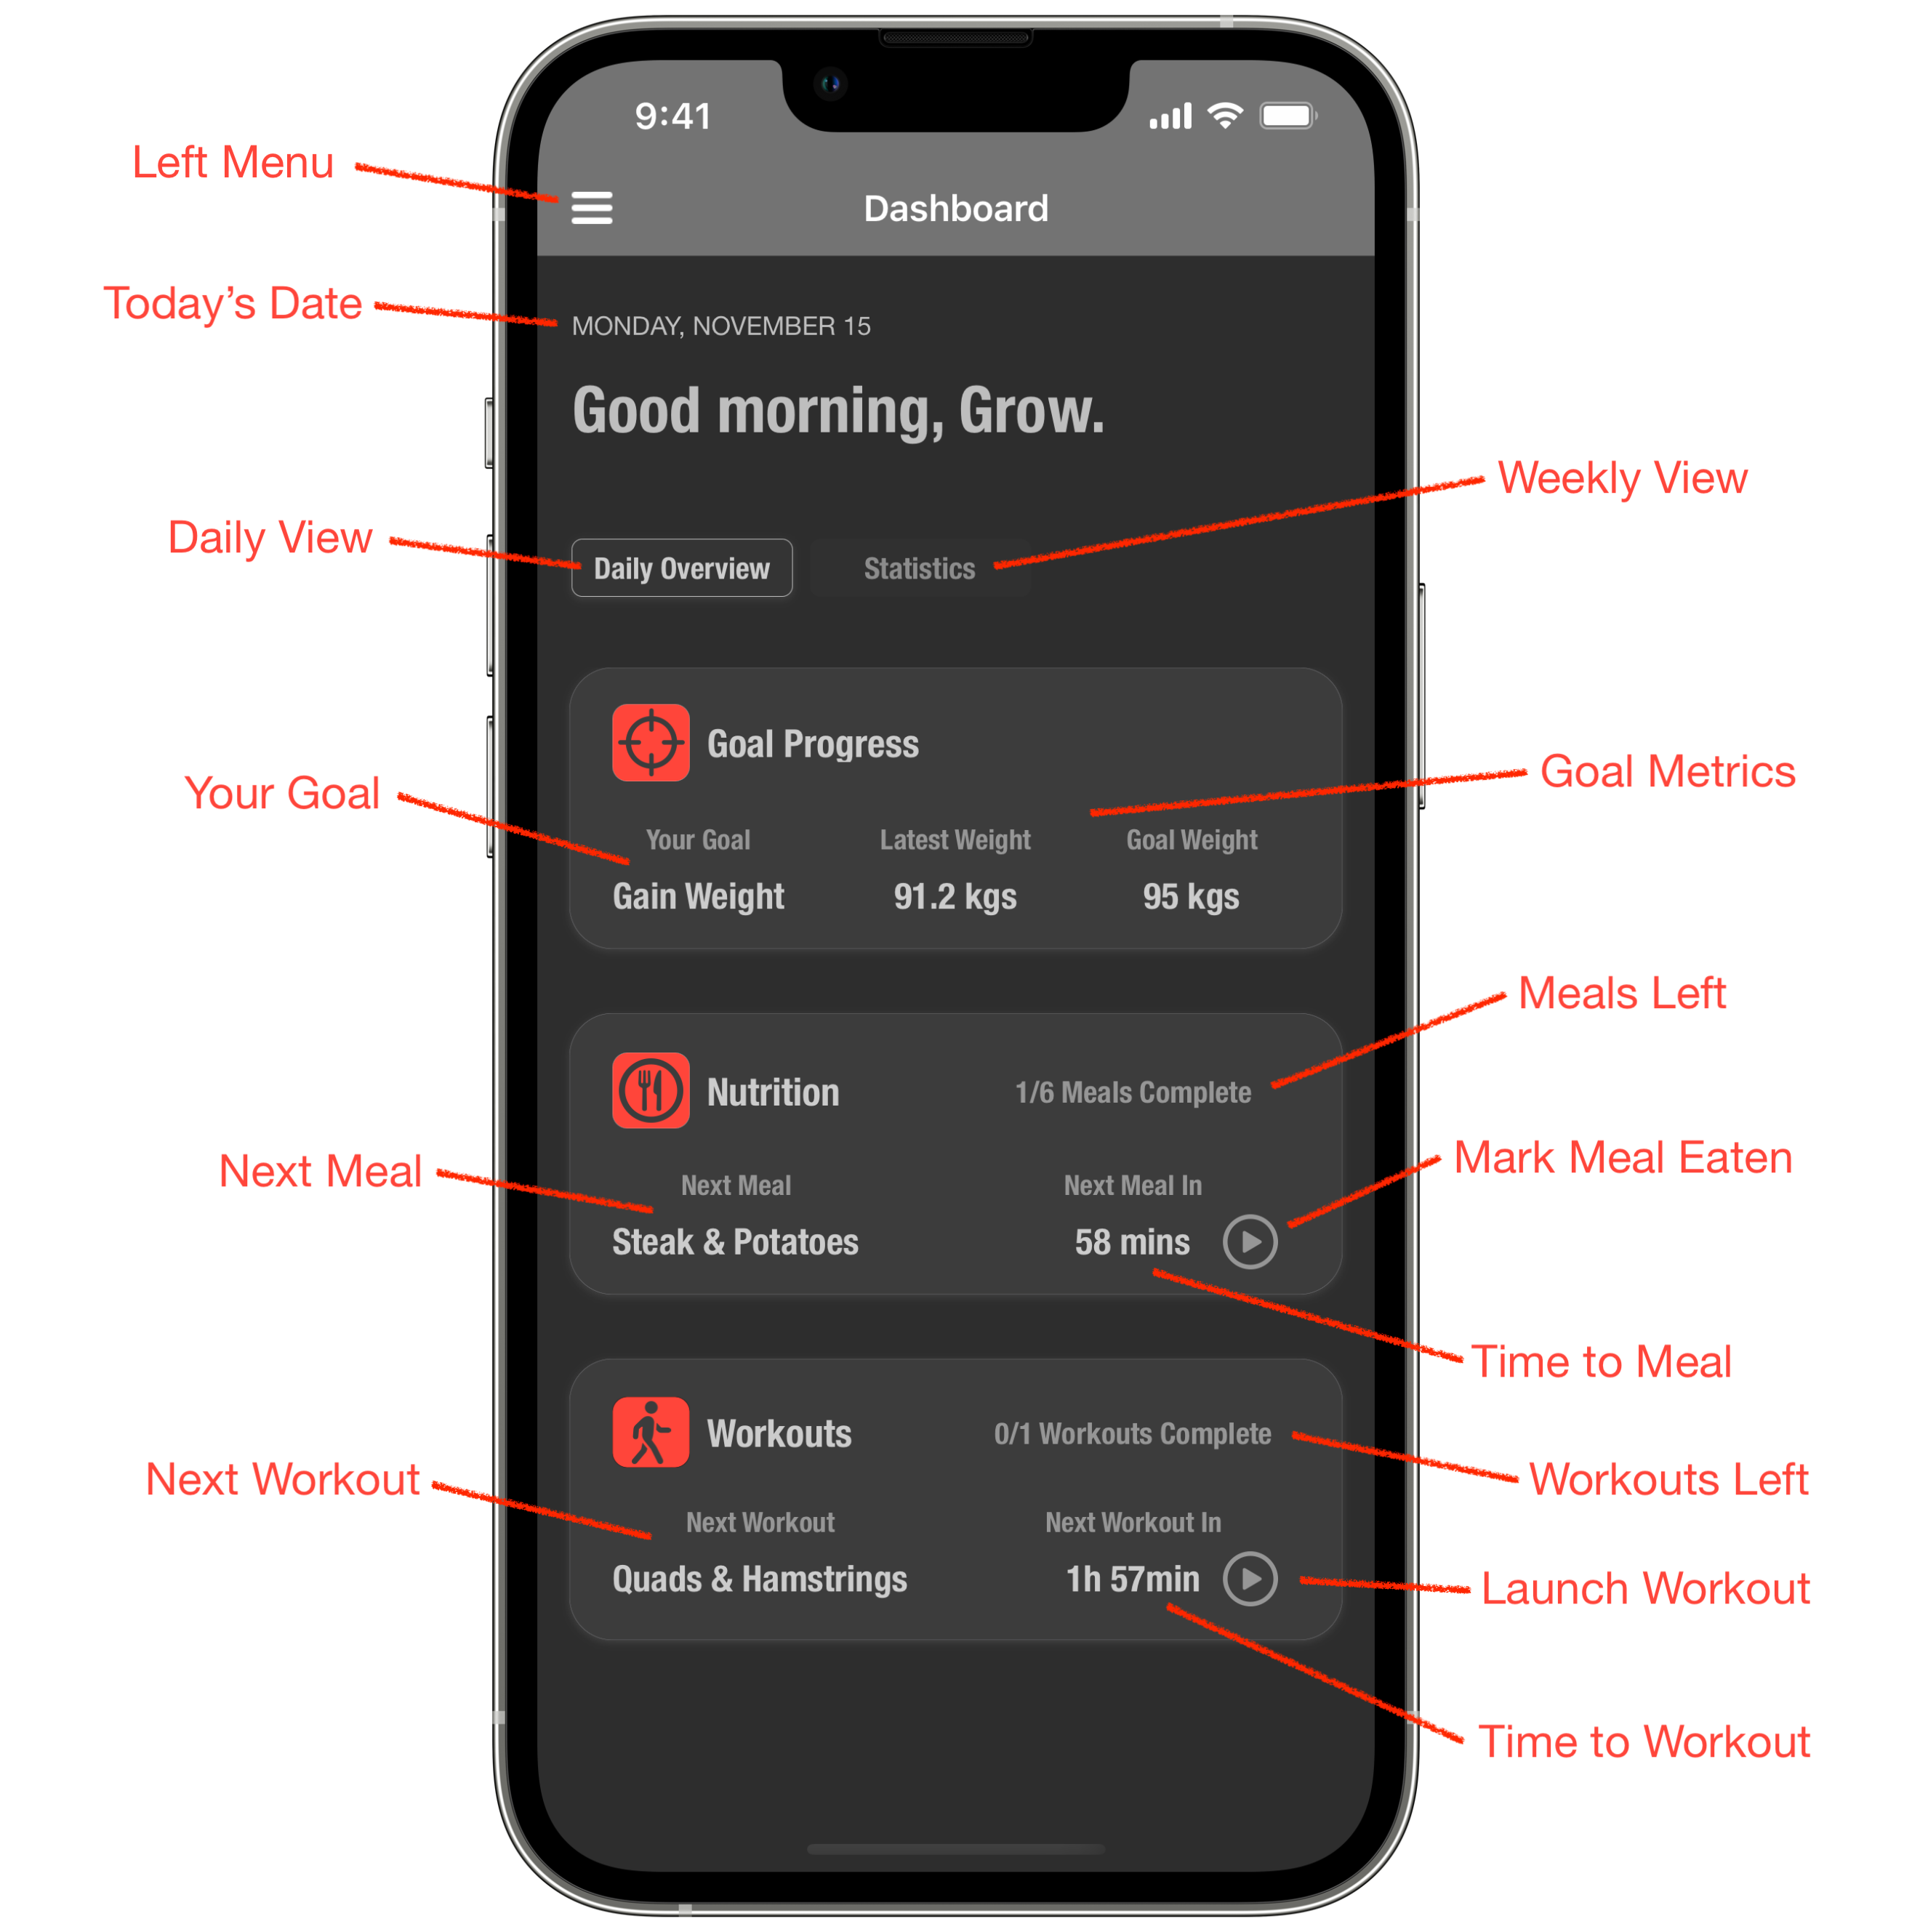
- Left Menu - The hamburger icon top left opens your navigation menu. This lets you swap between your dashboard and timeline and access other areas like check-ins, your profile and settings.
- Today's Date - Always lists Today's date. The dashboard is for keeping track of today (with some statistical data) so the date is fixed, unlike the timeline.
- Daily View Button - The Dashboard always defaults to the daily view. This provides information about what you have planned today and today's goal metrics.
- Weekly View Button - The weekly view shows stats for either this week so far, starting Monday, or for the last 7 days from today. You can change between "This Week" and "Last 7 Days" in Settings. Statistics never include the current day, they start from yesterday. This is so your stats aren't skewed depending on the time of day. For example, in the morning you haven't eaten most meals yet so if we included average calories consumed it would be incorrect as one day has no calories consumed (yet).
- Your Goal - Your Goal shows the goal you chose during onboarding or set in your Profile. These can be gaining weight, losing weight, maintaining weight, fitness, prep for a competition or prep for a photo shoot. These should cover most goals. If you think there are more that i've missed, please contact me!
- Goal Metrics - Depending on your goal choice you will have different metrics, such as current and target weight for weight type goals, or a day countdown for a competition goal.
- Next Meal - Lists the name of your next meal.
- Meals Left/Eaten - Shows how many meals have been eaten versus how many meals total you have planned for the day.
- Time to Next Meal - Shows how many hours and/or minutes until your next meal is due. If you have gone past the planned time this will be red and lets you know how far past your planned meal you are.
- Mark Meal Eaten - The play style button lets you mark the planned meal as eaten. Same as from the timeline or in the meal itself, you can mark it eaten at the planned time of whatever the current time is when you press the button.
- Next Workout - Lists the name of the next workout.
- Workouts Left/Complete - Shows how many workouts have been completed versus how many you have planned for the day.
- Time to Next Workout - Shows how many hours and/or minutes until your next workout is due. If you have gone past the planned time this will be red and lets you know how far past your planned workout you are.
- Launch Workout - The play style button lets you launch the planned workout.
My Inventory is your personal database of foods, meals, exercises and workouts. When you first install Grow, My Inventory is empty and then populated by you during onboarding and when you need something new. The reason I did this was every other app out there I've used was full of things I would never use. You spend half your time scrolling through endless exercises and foods you never use. Most have foods uploaded by other users which leads to the wrong calories and macros being entered which would lead to my nutrition plans being wrong and impacting progress. Grow comes with a built in database of foods, smaller than other apps out there with only around 400 foods, but i've added all the foods common to those into bodybuilding and fitness. Every food has been entered manually from reputable sources or direct from food packaging and is 100% correct. It may not be everything you need but it's a great start and will ensure your plans are accurate. You can then just add foods as needed, very easily.
During onboarding you will be asked if you want to import foods. You will be provided with a list of all the foods built into Grow and you can either import them all or select the foods that are relevant for you. You can also import machine, free weight and cardio exercises. Again there's no need to end up with an inventory of hundreds of foods and exercises you don't need. You can go back to Settings at any time and import more foods or exercises if you realise you need some more. Just go to "Settings > Import Data" from the Left Menu. You can also import direct from My Inventory's import button.
When in My Inventory you can create items, delete items, view items or add them to your timeline. Only Meals and Workouts can be added direct to your timeline. Foods must be part of a meal and exercises must be part of a workout. They can't be added directly to the timeline. To add a meal or workout to your timeline, swipe right and touch the green add to timeline icon. To delete an item swipe left and touch the red trash icon.
Let's take a look at the different ways to use My Inventory.
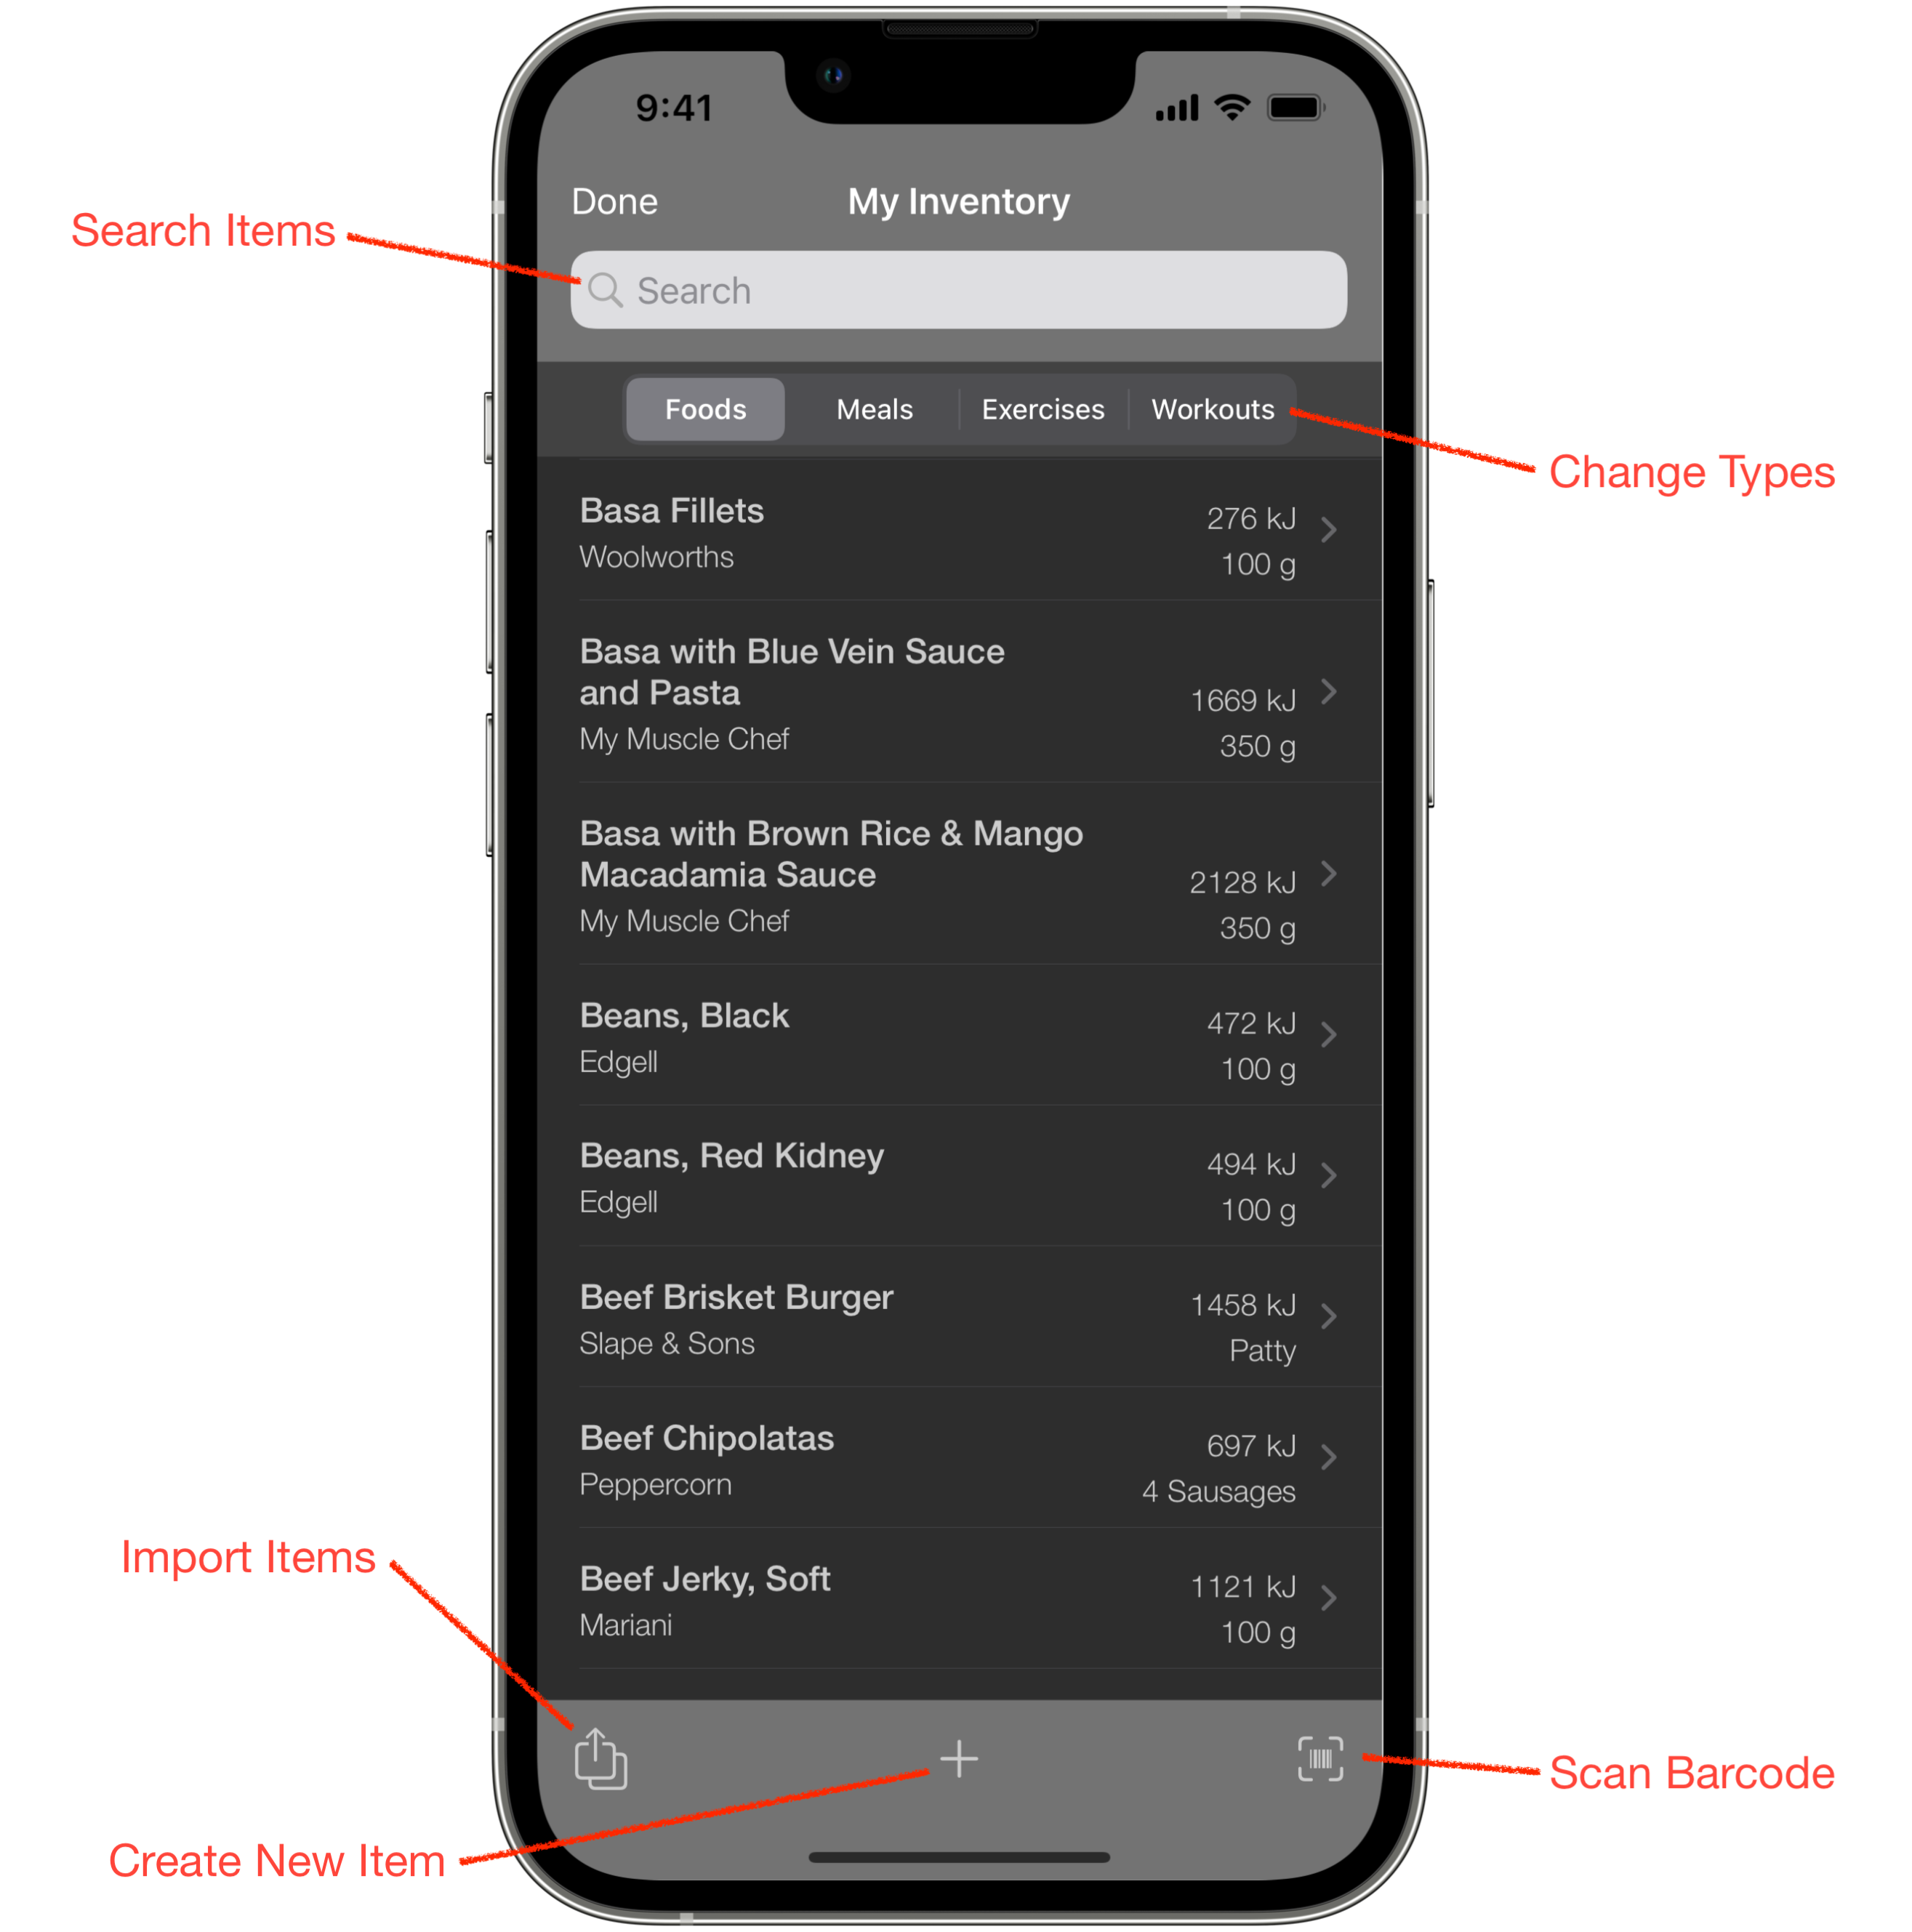
- Search Items - At the top of My Inventory is a search bar. Use it to quickly find the item you are looking for. As soon as you touch in the search bar field you will get different scope buttons which will filter searches depending on the item you are searching for. Foods can be filtered by name, brand or category, for example "Meat". Meals can be searched by name or food it contains, for example "chicken". Exercise can be filtered by name, bodypart, if its a weighted exercise, if its a cardio exercise, and by gym name. Workouts can be filtered by name or an exercise it contains.
- Change Types - Below the search bar is a scope bar to choose between foods, meals, exercises and workouts. Touch the one you want to just view those types of items.
- Import Items - The import items button bottom left takes you to the import data page. This is the same page you can access at "Settings > Import Data". Here you can import the built in foods and exercise data, or import your own data from CSV files.
- Create New Item - The plus icon bottom centre lets you create a new food, meal, exercise or workout.
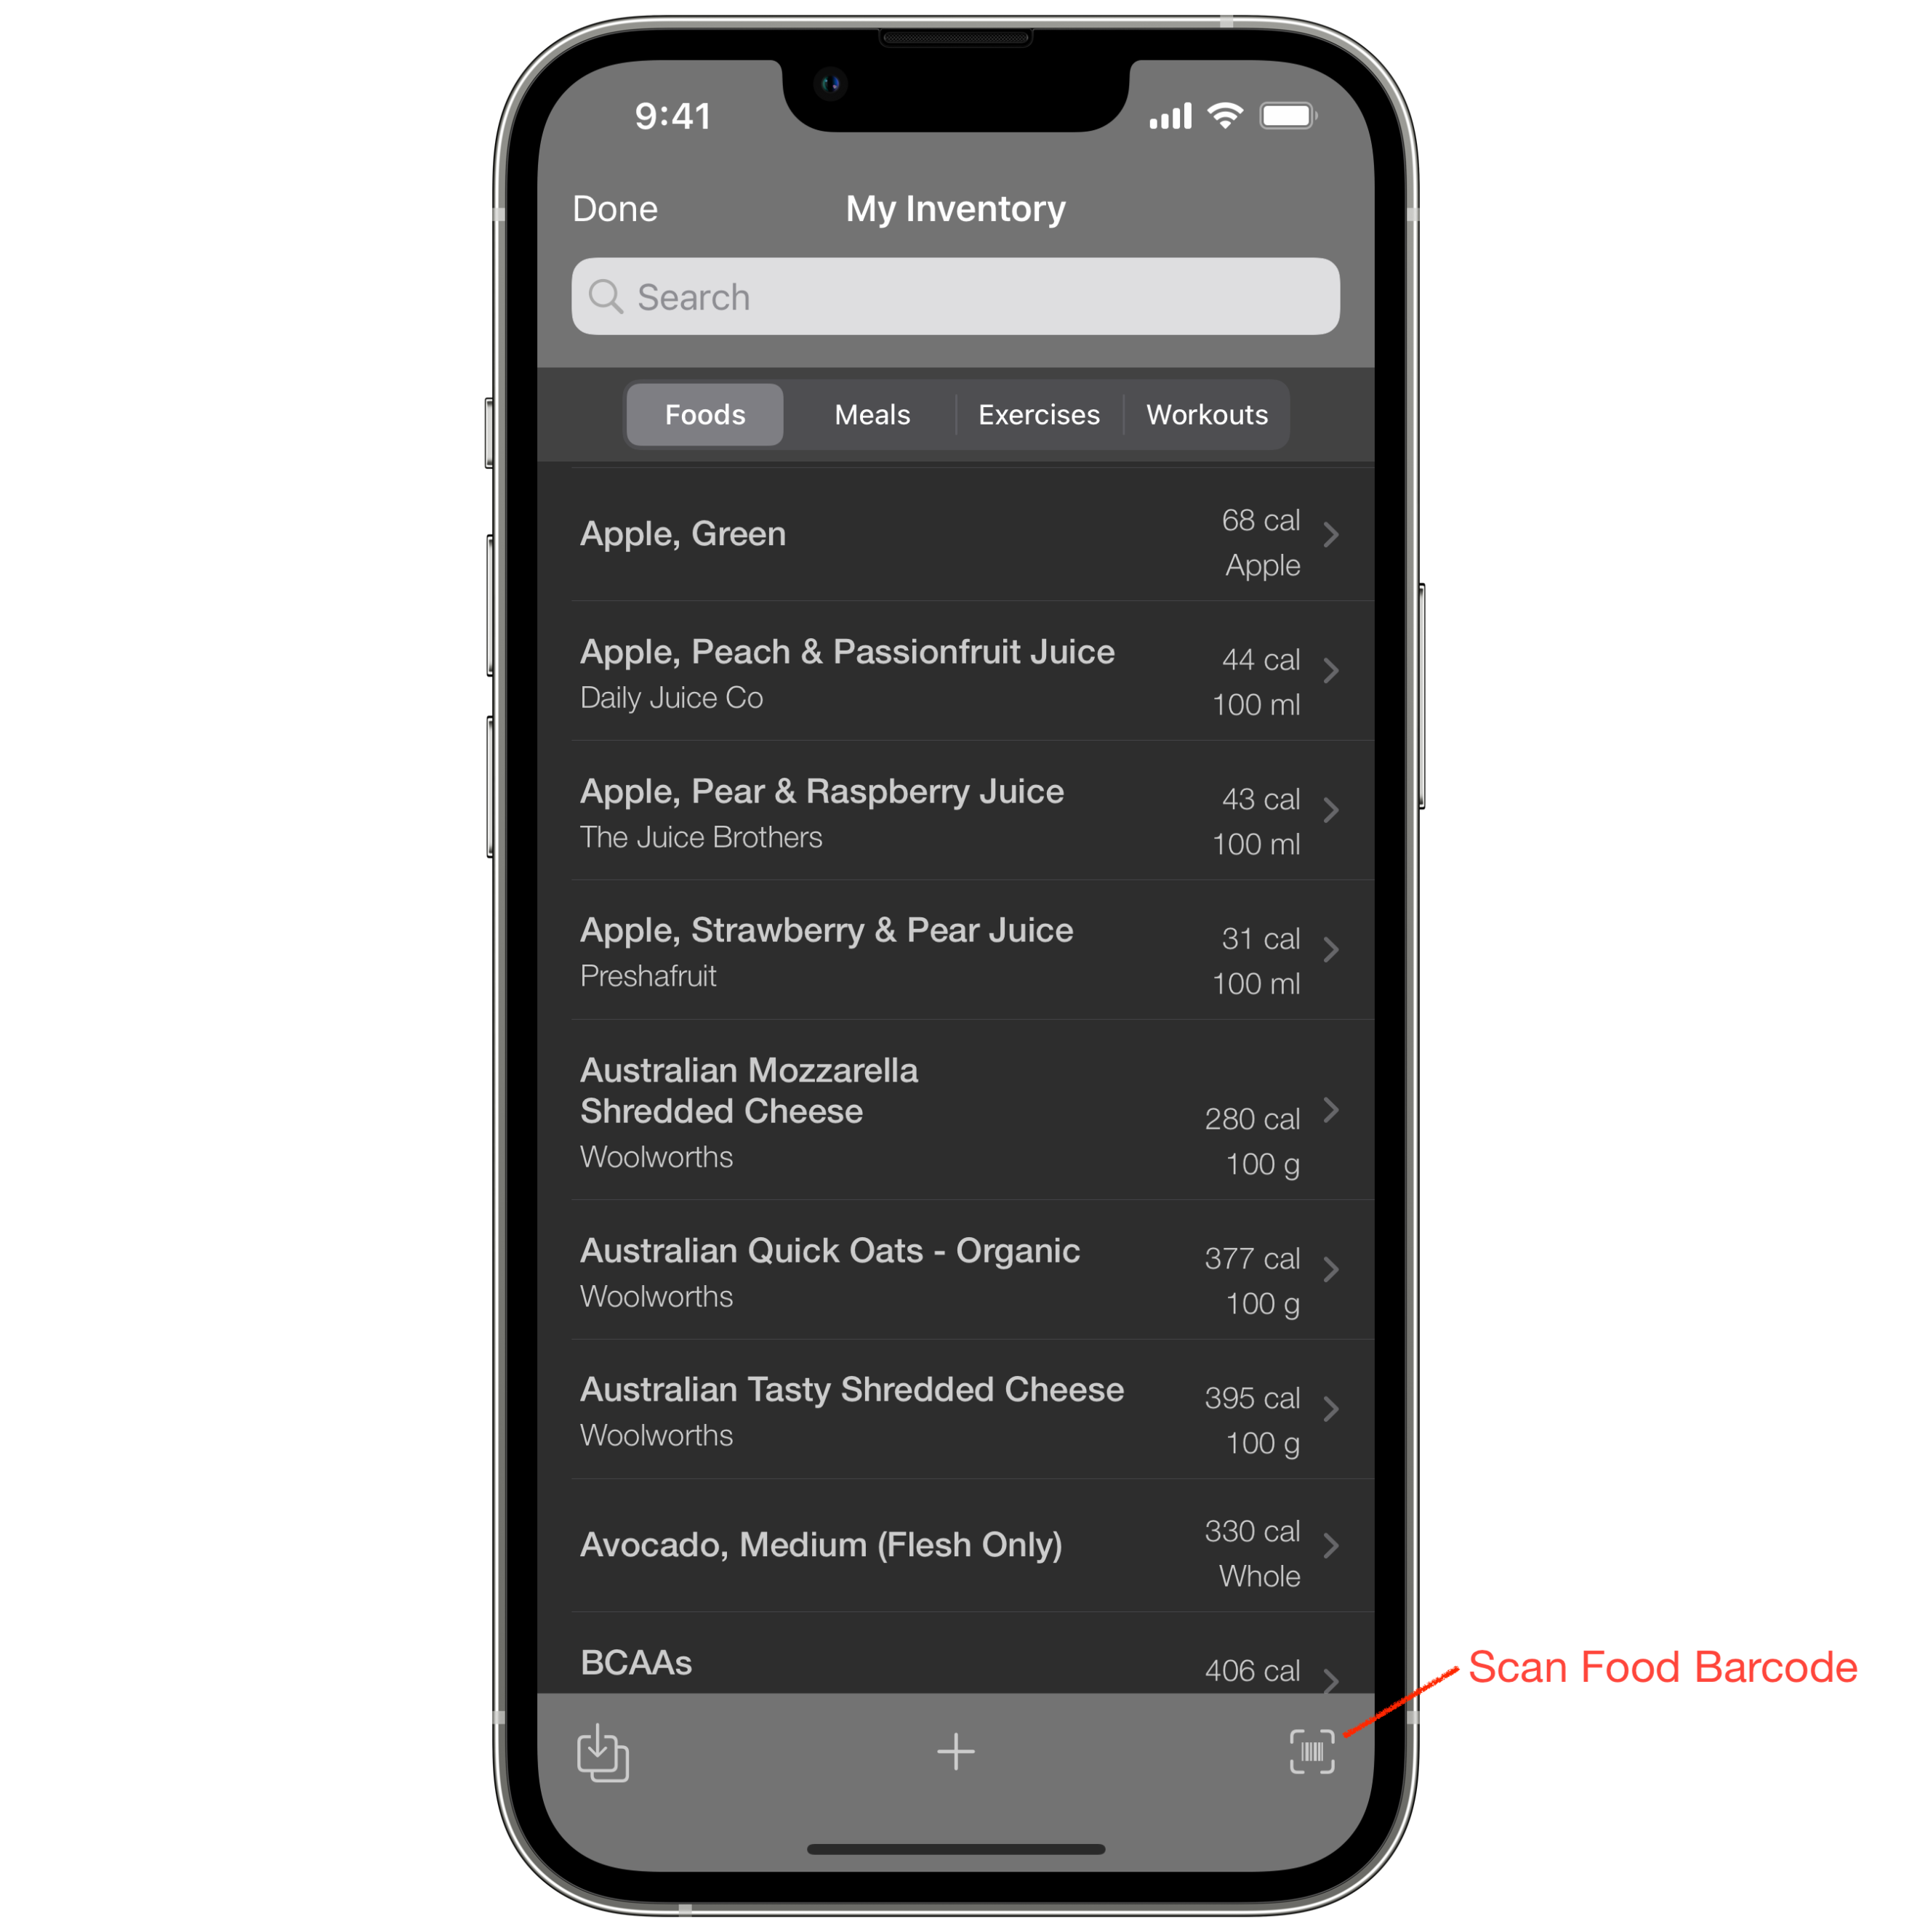
- Scan Barcode - The scan barcode item bottom right lets you scan a food in from its barcode. This uses the open source OpenFoodFacts database. It contains a lot of foods but not everything. Like every other user contributed database, it does have foods with missing or incorrect data. If found, Grow will create a new food, populate it with the data from OpenFoodFacts and then present this to you to check. I highly advise you look at the data compared to the package you are scanning and check that its correct. This will ensure the data in your inventory is correct and your goals aren't impacted by incorrect data.
Tracking body composition and body measurements is critical to progress, whether its just keeping track of weight or waist size to make sure you are on track for your goals, through to someone that wants to track every point of their body. For some, keeping track of bodyweight is critical when your plan is losing or gaining weight. For others it might just be putting that extra inch on their biceps. For others its tracking both sides of their body to ensure symmetry. For me, I just track two measurements, bodyweight and waist. It lets me know where I'm at with gaining or losing weight and makes sure im not packing on bad weight on my midsection.
Body tracking records are completely configurable based on what your specific needs are. The settings button lets you choose exactly what you want to track, from body weight, bodyfat, and 13 other body sites like waist down to individual calf sizes.
When you create your first body tracking record nothing is selected. Press the Settings button discussed below to set what you want to track. After this it uses your last record to set what to track.
You can set body weight to imperial or metric (pounds or kilograms) and you can set body measurements to imperial or metric (inches or centimetres) as well. I did this intentionally as the bodybuilding world is a huge mix of different measurement units, and a lot of us mix them up. I'm in Australia where we are purely metric, but I track my weight in kilograms and my body measurements in inches.
When you create a new record, body measurements from your last body tracking record will be pulled in and copied to this record to save you time. As it takes time to grow and shrink body parts, they tend to stay close to static each week, so you can just change the ones that have changed. Saves you a bunch of time especially if you are tracking a lot of parts.
Lastly, to make your life easier, body tracking will try and use any data you have in Apple Health first, saving you time. So if for example you use smart scales to weigh yourself, and this data goes into Apple Health, if you have given Grow permission to access Apple Health data it will pull in body weight data and use this. So if you weighed yourself this morning on your smartscales and create a new body tracking record, it will pull in that data. Just be wary that many apps don't sync their data to Apple Health until you open their app. So if you don't see data get pulled in, open your other app, make sure its pushed its data into Apple Health, then go back to Grow and create the record.
Let's look at the different parts of the body tracking record.- Record Date - The date of the body record. This can be changed to any date at any time though if you have already added measurements, when you change the date Grow will search for mesurements already imported for that date so will remove the numbers entered. If you plan to create a body record for a past date, create the record then change the date first before entering data. This will also save you time as data from Apple Health will be used if it exists.
- Body Composition Fields - Body composition fields will show body weight and bodyfat fields, if they have been selected in the record settings.
- Body Measurement Fields - Body measurement fields will show all selected body measurement places, such as waist or right bicep. You can select the measurements you wish to record by pressing the Settings button.
- Imported Data Note - If Grow finds body composution data for the chosen date, it will be included automatically. If found it will be noted under the body composition section as per the screenshot above.
- Settings - Settings lets you choose exactly what you want to record. You have the choice of body weight, bodyfat and 13 other body sites. You can also select whether your weight is in kilograms or pounds and if body measurements are centimetres or inches.
- Create Check-In - The icon bottom right lets you create a new check-in directly from this body tracking record. The check-in will be linked with this record. Makes it easy if you do your measurements first thing then want to do your check-in later in the day.
To delete a body tracking record, swipe left and touch the red trash icon. If the body tracking record is part of a check-in, you will be told you cannot delete it. This is to ensure your check-ins have all their information as a historical record. If you really want to delete the record, you will need to delete the check-in first.
If you are using a coach or personal trainer, you will have regular check-ins so they can keep on top of your progress and make adjustments. It's a critical part of the process. To keep making progress your coach needs accurate data so they can make the right changes to diet and training programs. Most of us have a list of info we need to provide our coach each week, from body measurements, progress photos, questions they may have about how we are feeling, meals we missed, and other data about calories, macros and workouts. It can be a time consuming task compiling the info and sending off to your coach.
To make this whole process easier and provide more accurate data to your coach, Grow has implemented Check-Ins. No more copying data from spreadsheets to emails, writing things out of other fitness, workout and nutrition apps. Grow has all your data so use it and get some time back in your life.
Grow's check-ins have five components, each optional depending on the data you want to provide to your coach:
- Body Tracking Measurements - Information about body weight, bodyfat and 13 other optional body part measurements.
- Questions - These are questions your coach may want you to answer each week. You can add these once then just submit your answers each check-in.
- Progress Photos - Attach progress photos directly from your iPhone Photos app. They get copied in and saved to Grow as well so you always have a history of your progress.
- Nutrition Data - The last 7 days of nutrition info, listing energy intake, protein, carbohydrates and fat for each day. If you missed any planned meals it shows the actual intake versus your planned intake and brands it red so its easy for your coach to pick up on.
- Workout Data - The last 7 days of workouts listing the workout name, volume, number of sets completed and workout length. Any cardio completed also includes length of cardio.
Once you have entered your check-in data, you can then send the data in an email, with progress photos attached, or within a PDF attached to an email. There is also the option to save as a PDF to iCloud or another cloud service. This allows you to save the history of your check-ins or if you are paranoid about sending your information over email, you can send the PDF using some other more secure method.
Let's run through the different check-in screens.
Check-In List
The check-in list shows all your saved check-ins. This is your historical record of check-ins and contains all your data for each. You can view them, send them via email or save them as PDF's at any time.
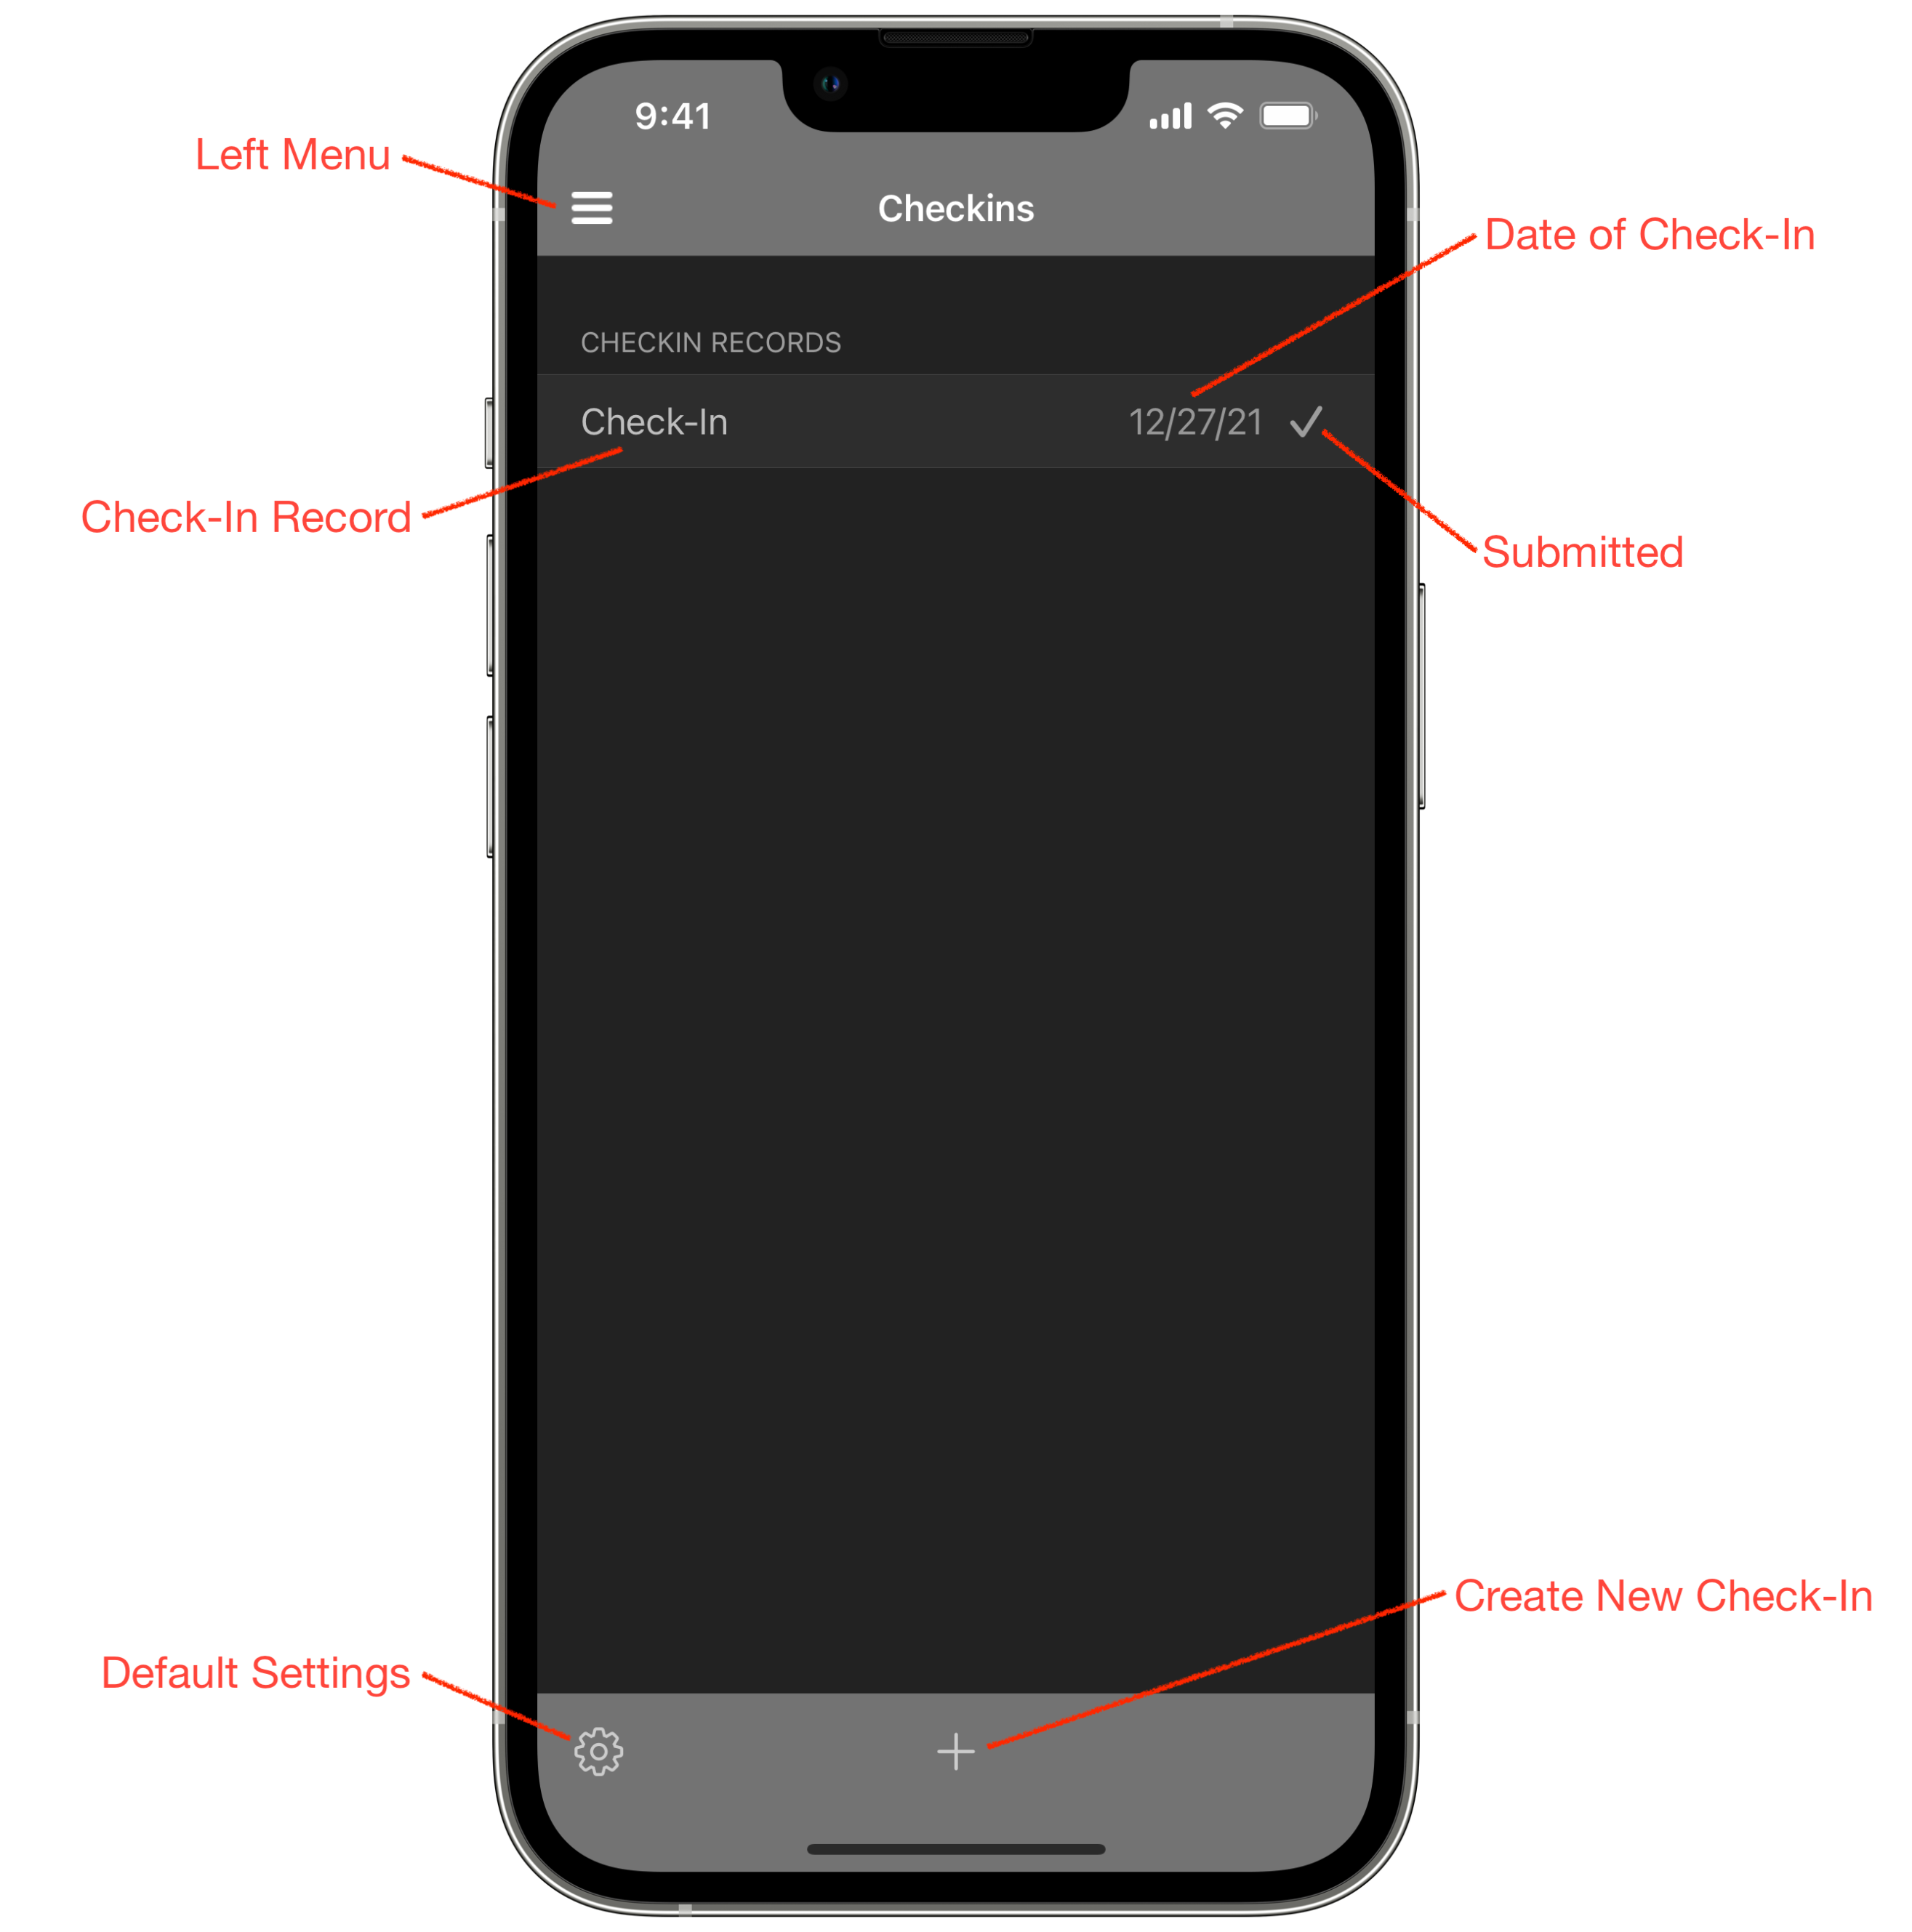
- Left Menu - The hamburger icon top left opens your navigation menu. This lets you swap between your dashboard and timeline and access other areas like check-ins, your profile and settings.
- Check-In Record - This view shows a list of check-ins you have created. Touch any check-in to view its details.
- Date of Check-In - Lists the date of the check-in. The list is ordered with the most recent check-in first.
- Submitted Checkmark - If the check-in has a tick next to the date it has been marked as submitted to your coach/PT. If not marked as submitted, it will show the standard disclosure triangle ie. ">"
- Default Settings - The gear icon bottom left will open check-in default settings. There are two types of settings for check-ins. The default settings are what is applied to a new check-in that is not created from the last check-in, and there are settings for each individual check-in, available when you view the check-in details. The first time you open this check-in list touch the gear icon and set your default settings. The individual check-in settings are there incase you want to add or remove specific information for that check-in. For example, maybe your coach asked for a particular measurement this week, or you only send progress pics once a month but check-in every week, so you could turn on progress pics on every 4th check-in.
- Create New Check-In - The plus icon creates a new check-in. If there are no previous check-ins, one will be created from scratch using the default settings. If you have a previous check-in, you will be asked if you want to create a new check-in or create a check-in from the last check-in. If you create a check-in from the last check-in, it will copy measurements, questions and answers from the last check-in, making it faster for you to update. Most times you will want to create a check-in from your last one to save yourself some time.
To delete a check-in, swipe left and touch the red trash icon. If you wish to mark a check-in as submitted or unmark it, swipe right and touch the checkmark or cross icon. Check-ins are marked as submitted automatically when sent to your coach, but you can manually change them this way if required.
Settings
Check-in settings allows you to configure what information you want to record and what information goes to your coach. Every aspect of the check-in is configurable as every coach has different requirements and each person is comfortable sending different types of data.
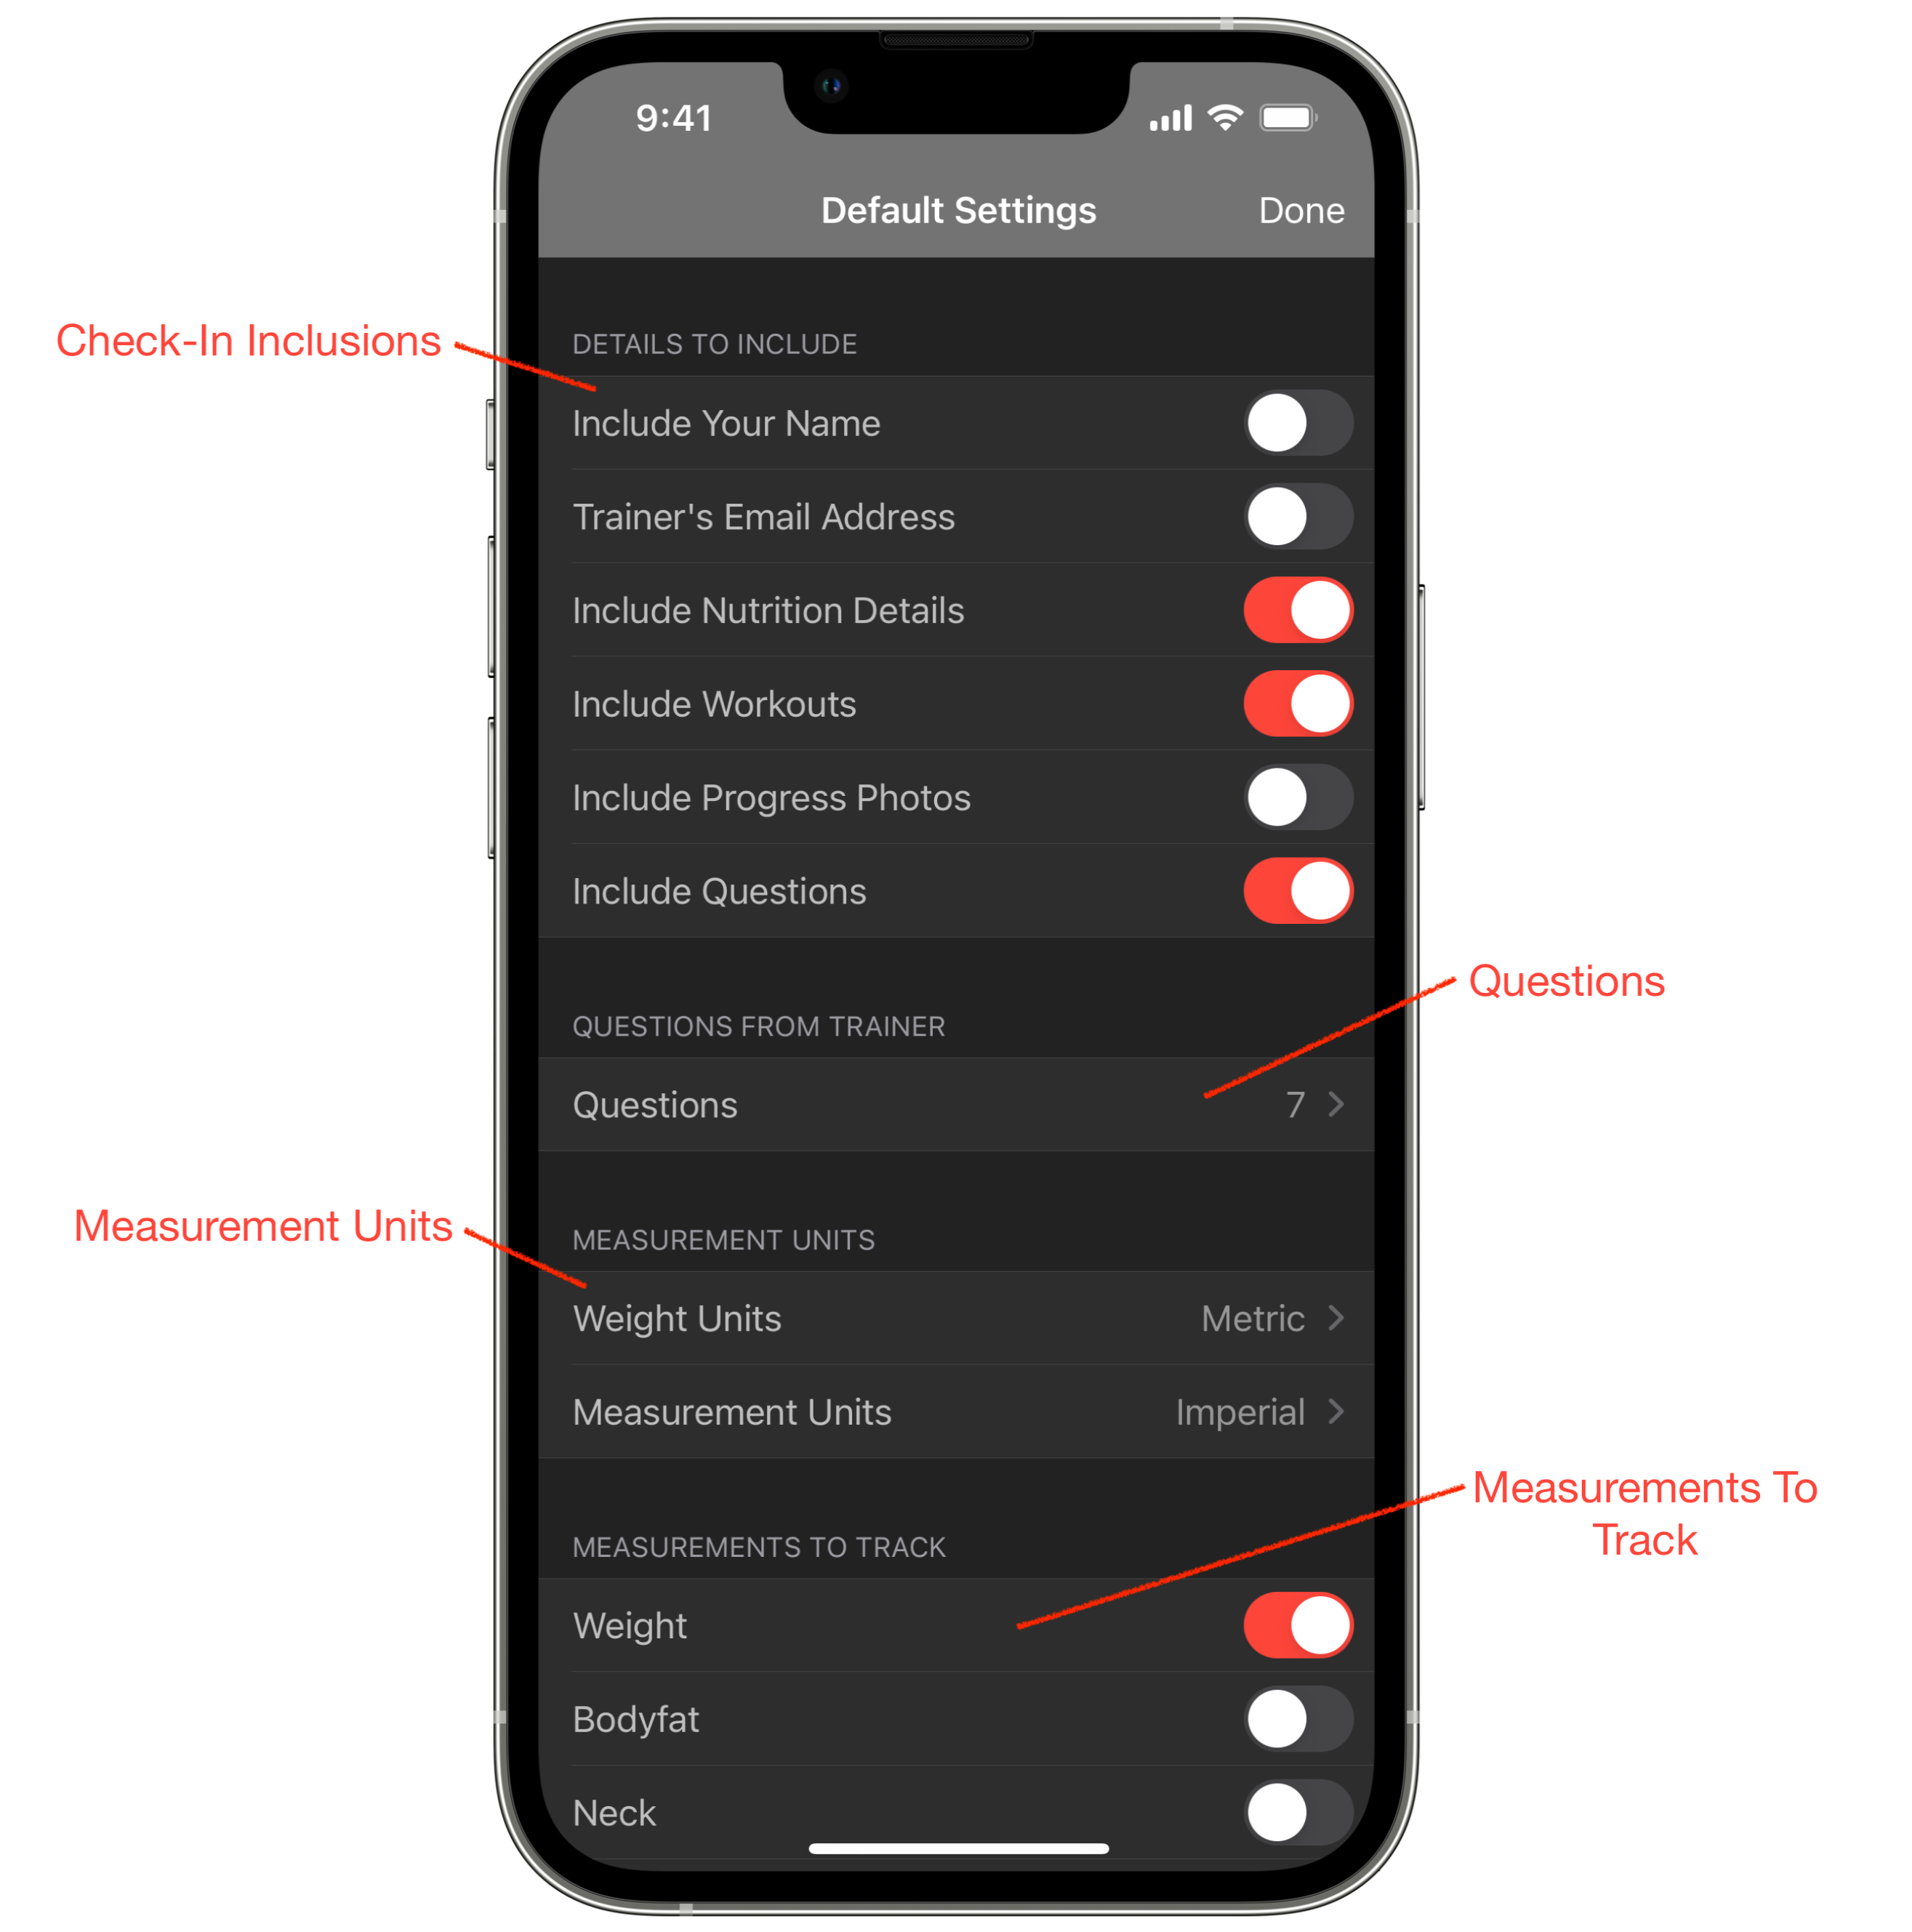
- Check-In Inclusions - The details to include section allows you to turn on or off what data is included in your check-in.
- Include Your Name - Adds your name to your check-in information. Most beneficial if you are sending or saving your check-in as a PDF so your coach knows who it is. The name is also added to the filename of the PDF.
- Trainer's Email Address - Is the email address you want to send your check-in to. You can add or change this in the email when submitting but adding it here means one less thing to do as its automatically added to the email.
- Include Nutrition Details - Includes nutrition data from the last 7 days.
- Include Workouts - Includes workout data from the last 7 days.
- Include Progress Photos - Lets you add progress photos from your iPhone Photos app. These are attached to your check-in email.
- Include Questions - Allows you to add questions you have from your coach that you need to answer each check-in.
- Questions - This lets you add and remove questions you want included in your check-in. The number to the right tells you how many questions you have configured.
- Measurement Units - You can set body weight to imperial or metric (pounds or kilograms) and you can set body measurements to imperial or metric (inches or centimetres) as well. I did this intentionally as the bodybuilding world is a huge mix of different measurement units, and a lot of us mix them up. I'm in Australia where we are purely metric, but I track my weight in kilograms and my body measurements in inches.
- Measurements to Track - Allows you to configure which measurements you want to track and include. This is body weight, bodyfat and 13 other body parts.
Body Record
The body record is identical to the body tracking record discussed earlier. It contains body weight, body fat and body part measurements. It is configurable to what you want to keep track of. Grow will automatically search for any body composition records for the day, so if you have smart scales and it saves to your Apple Health app, your weight and bodyfat should be automatically pulled in.

- Check-In Date - Shows the date of the check-in. Touch to change to a different date if needed. If changing the date, Grow will search for body weight and bodyfat measurements saved on that day and populate the check-in with them if found.
- Check-In Settings - These are the settings for the individual check-in. Changes to these settings only affects this check-in.
- Body Composition Fields - Body composition fields will show body weight and bodyfat fields, if they have been selected in the record settings.
- Body Measurement Fields - Body measurement fields will show all selected body measurement places, such as waist or right bicep. You can select the measurements you wish to record by pressing the Settings button.
Questions
Most coaches and PT's have specific questions they need you to answer each week. These might be about how you are feeling, strength levels, if you've struggled with meals or workouts or if you've strayed from your diet. The question section lets you respond to these questions. Questions can be added in the default settings section accessed from your check-in list, or individually from each check-in's settings section.
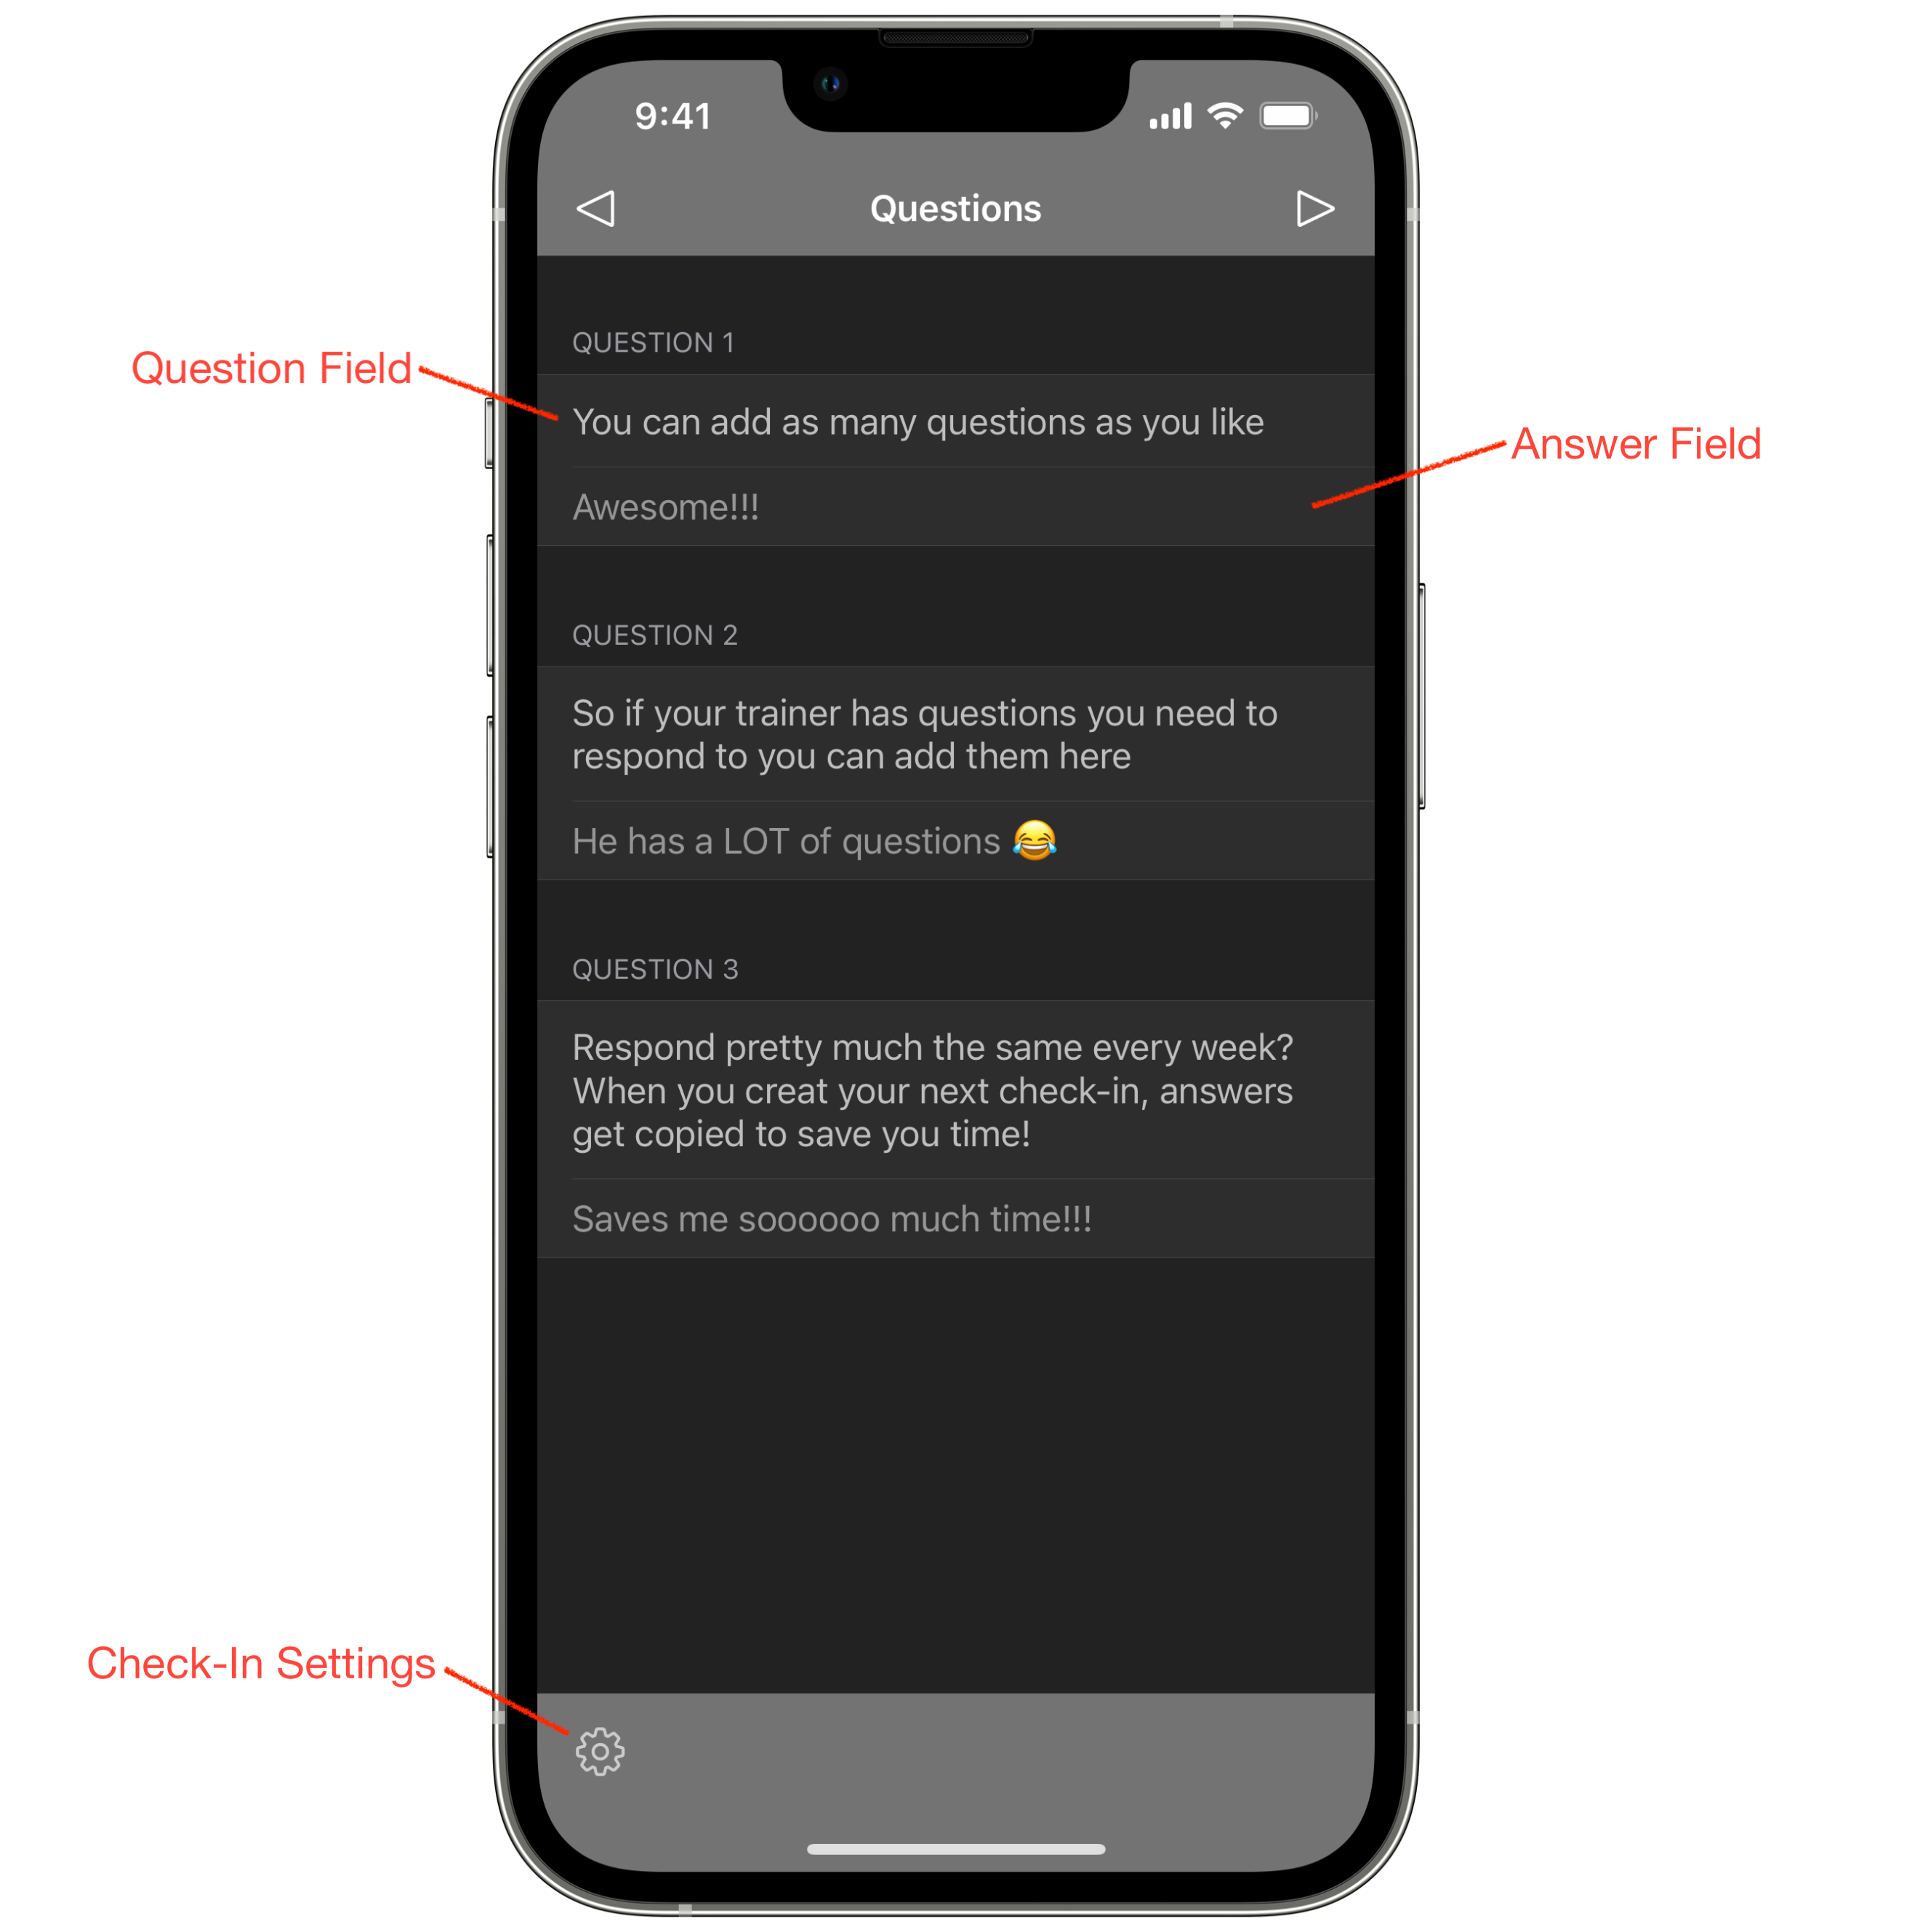
- Question Field - The top row in each question shows the question text you create in your check-in settings. If you need to change a question, use the check-in settings button to change it. The text is not editable from this screen.
- Answer Field - The second row in each section is the answer field for the question. Just tap in the row to start typing.
- Check-In Settings - These are the settings for the individual check-in. Changes to these settings only affects this check-in. You can edit your questions here if needed.
Check-In Photos
If you coach wants you to send them progress photos, you can add them here. The maximum number of photos is set to 10. If you find you need more than this, contact me and let me know and I can look at changing Grow. Photos are added from your iPhone Photos library. Grow will request access the first time you try and add a photo. Chosen photos will be copied into Grow and saved in the app. This is so you always have a record of your progress even if you delete the picture from your album. As per Grow's privacy policy, no data is saved by the developer and none of your data, including photos, ever leaves the Grow app. The only time data leaves your phone is if YOU send data to your coach and this is performed via your own email.
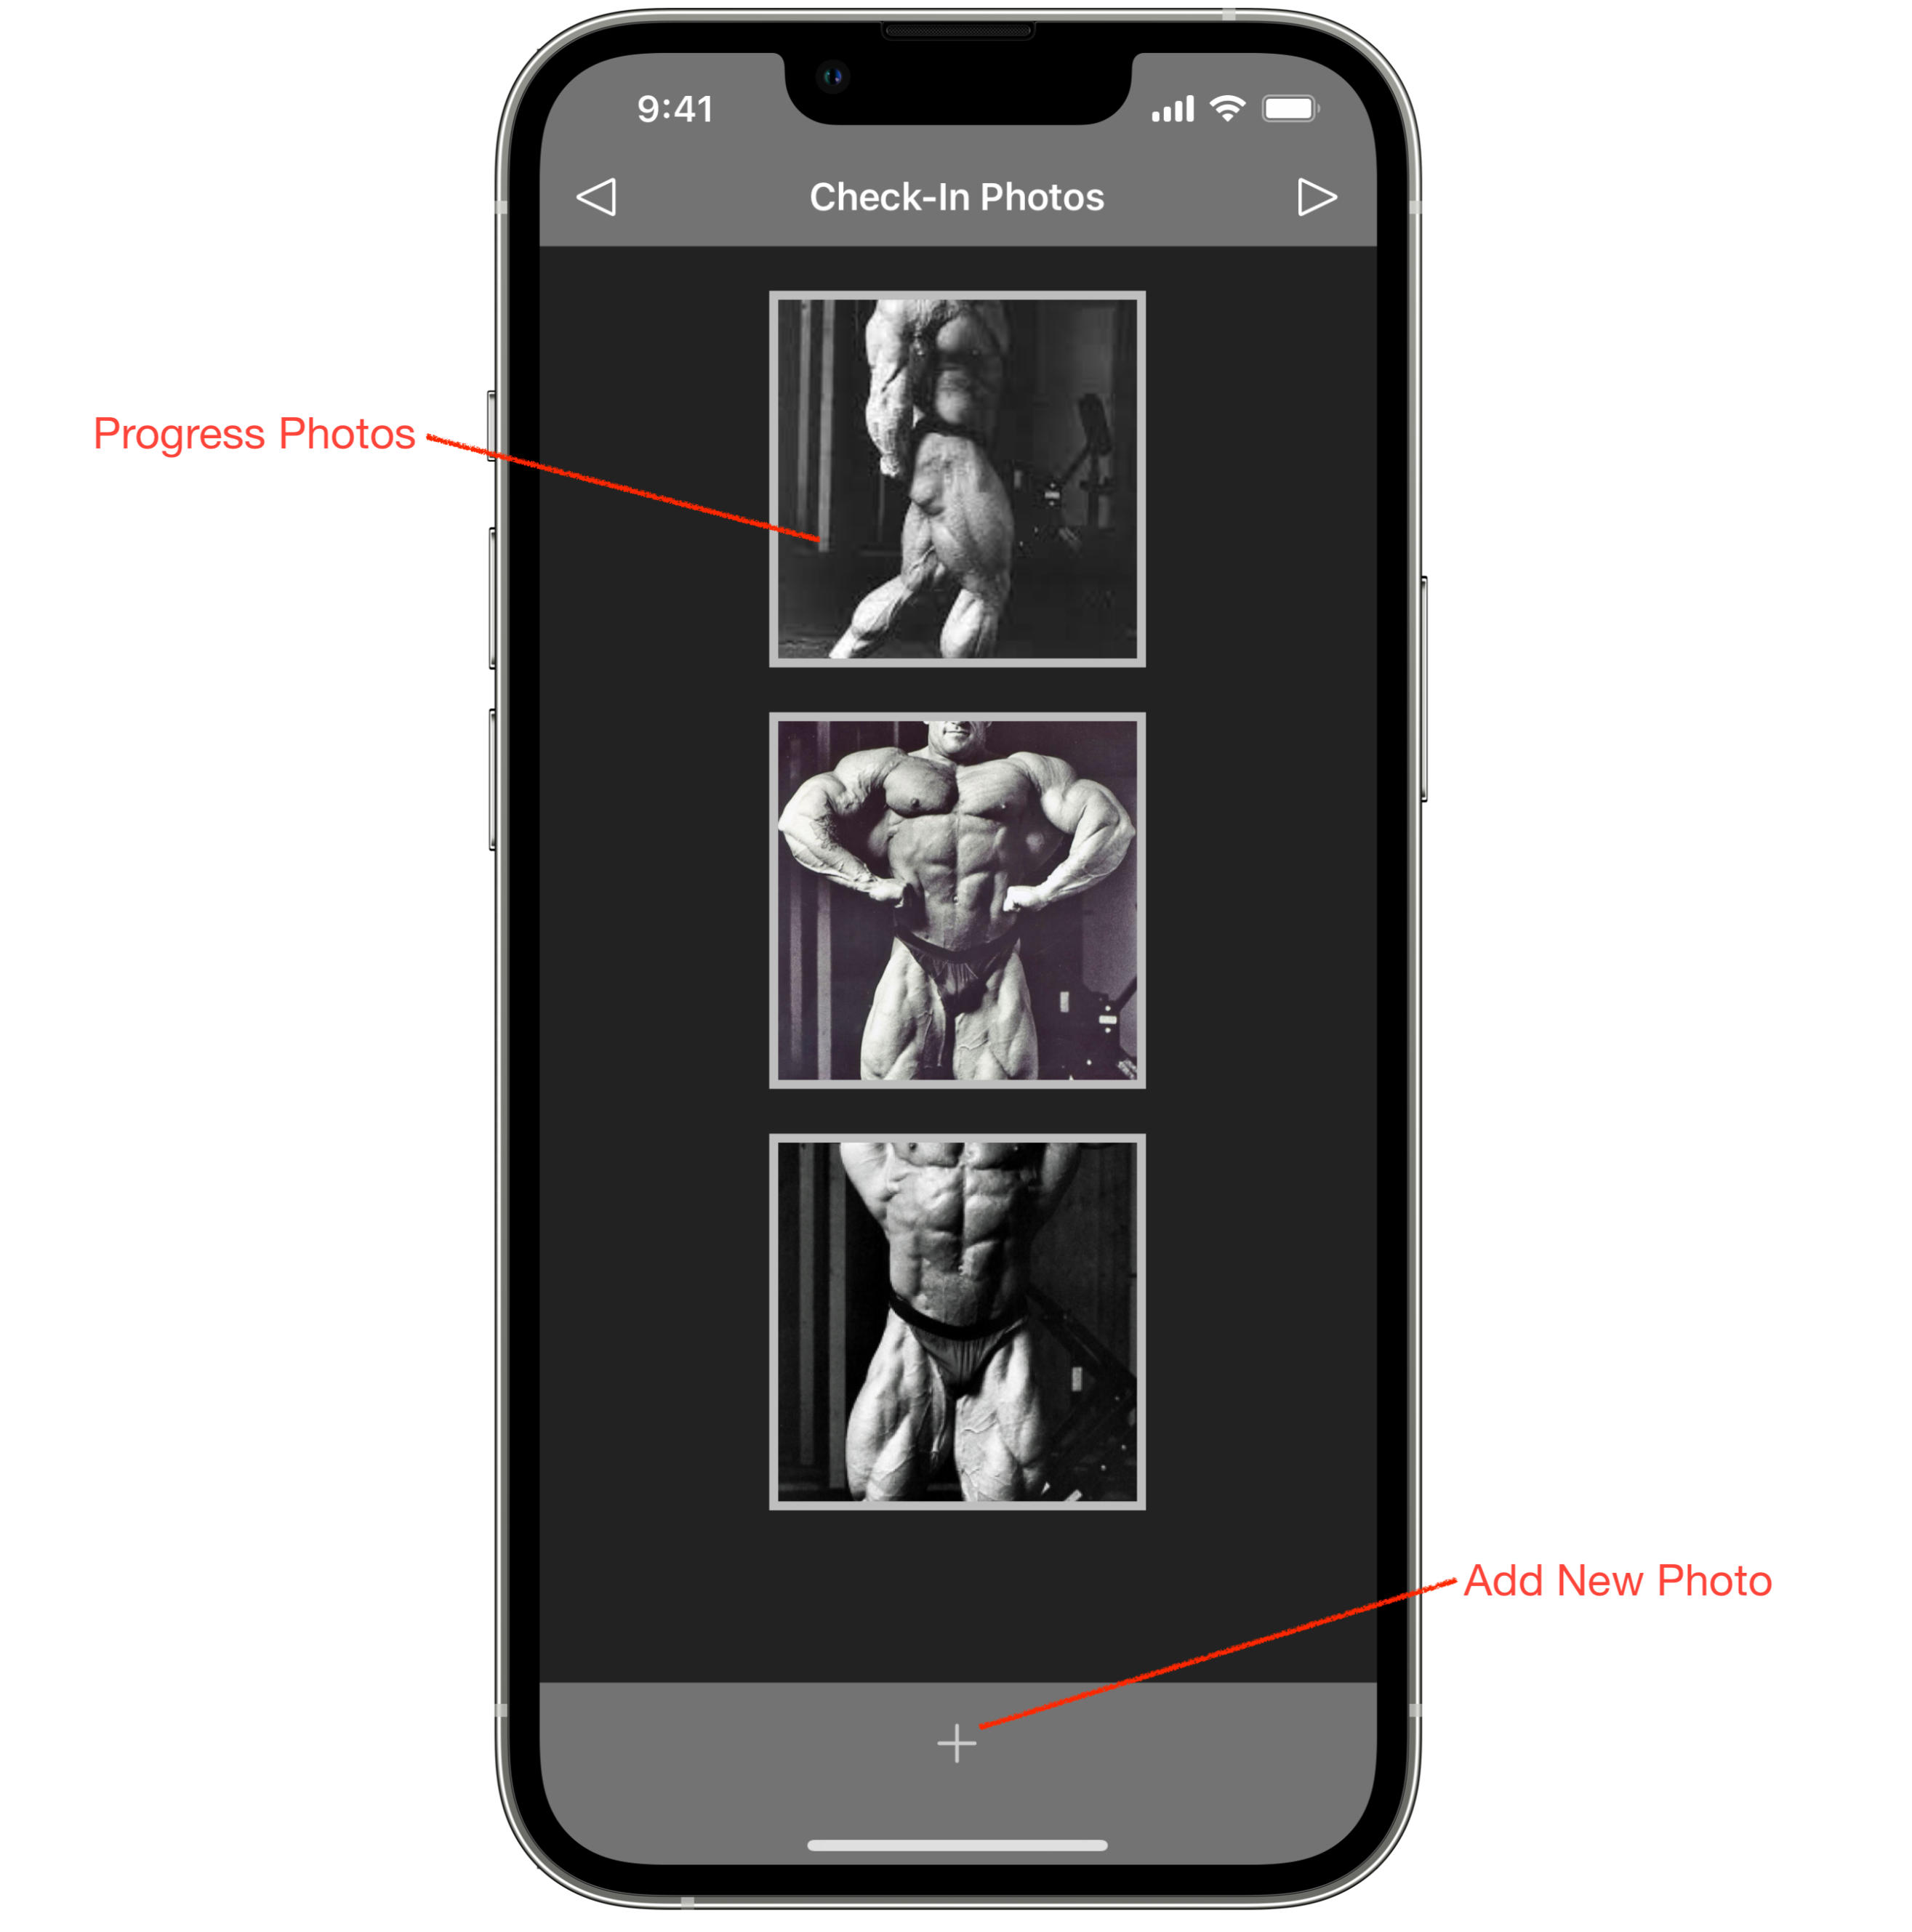
- Progress Photos - Once photos have been added, you will see thumbnails of each photo. Touch a photo to see full screen. When open in full screen you can also delete the photo.
- Add New Photo - Touch the plus icon to open your Photos app and select up to 10 photos to include in your check-in.
Check-In Overview
The check-in overview is the last view that pulls together all the data you have chosen to include in your check-in. This is the final data that will be sent to your coach, along with any progress photos you selected. Read through the check-in to make sure it's complete and accurate and then submit to your coach.
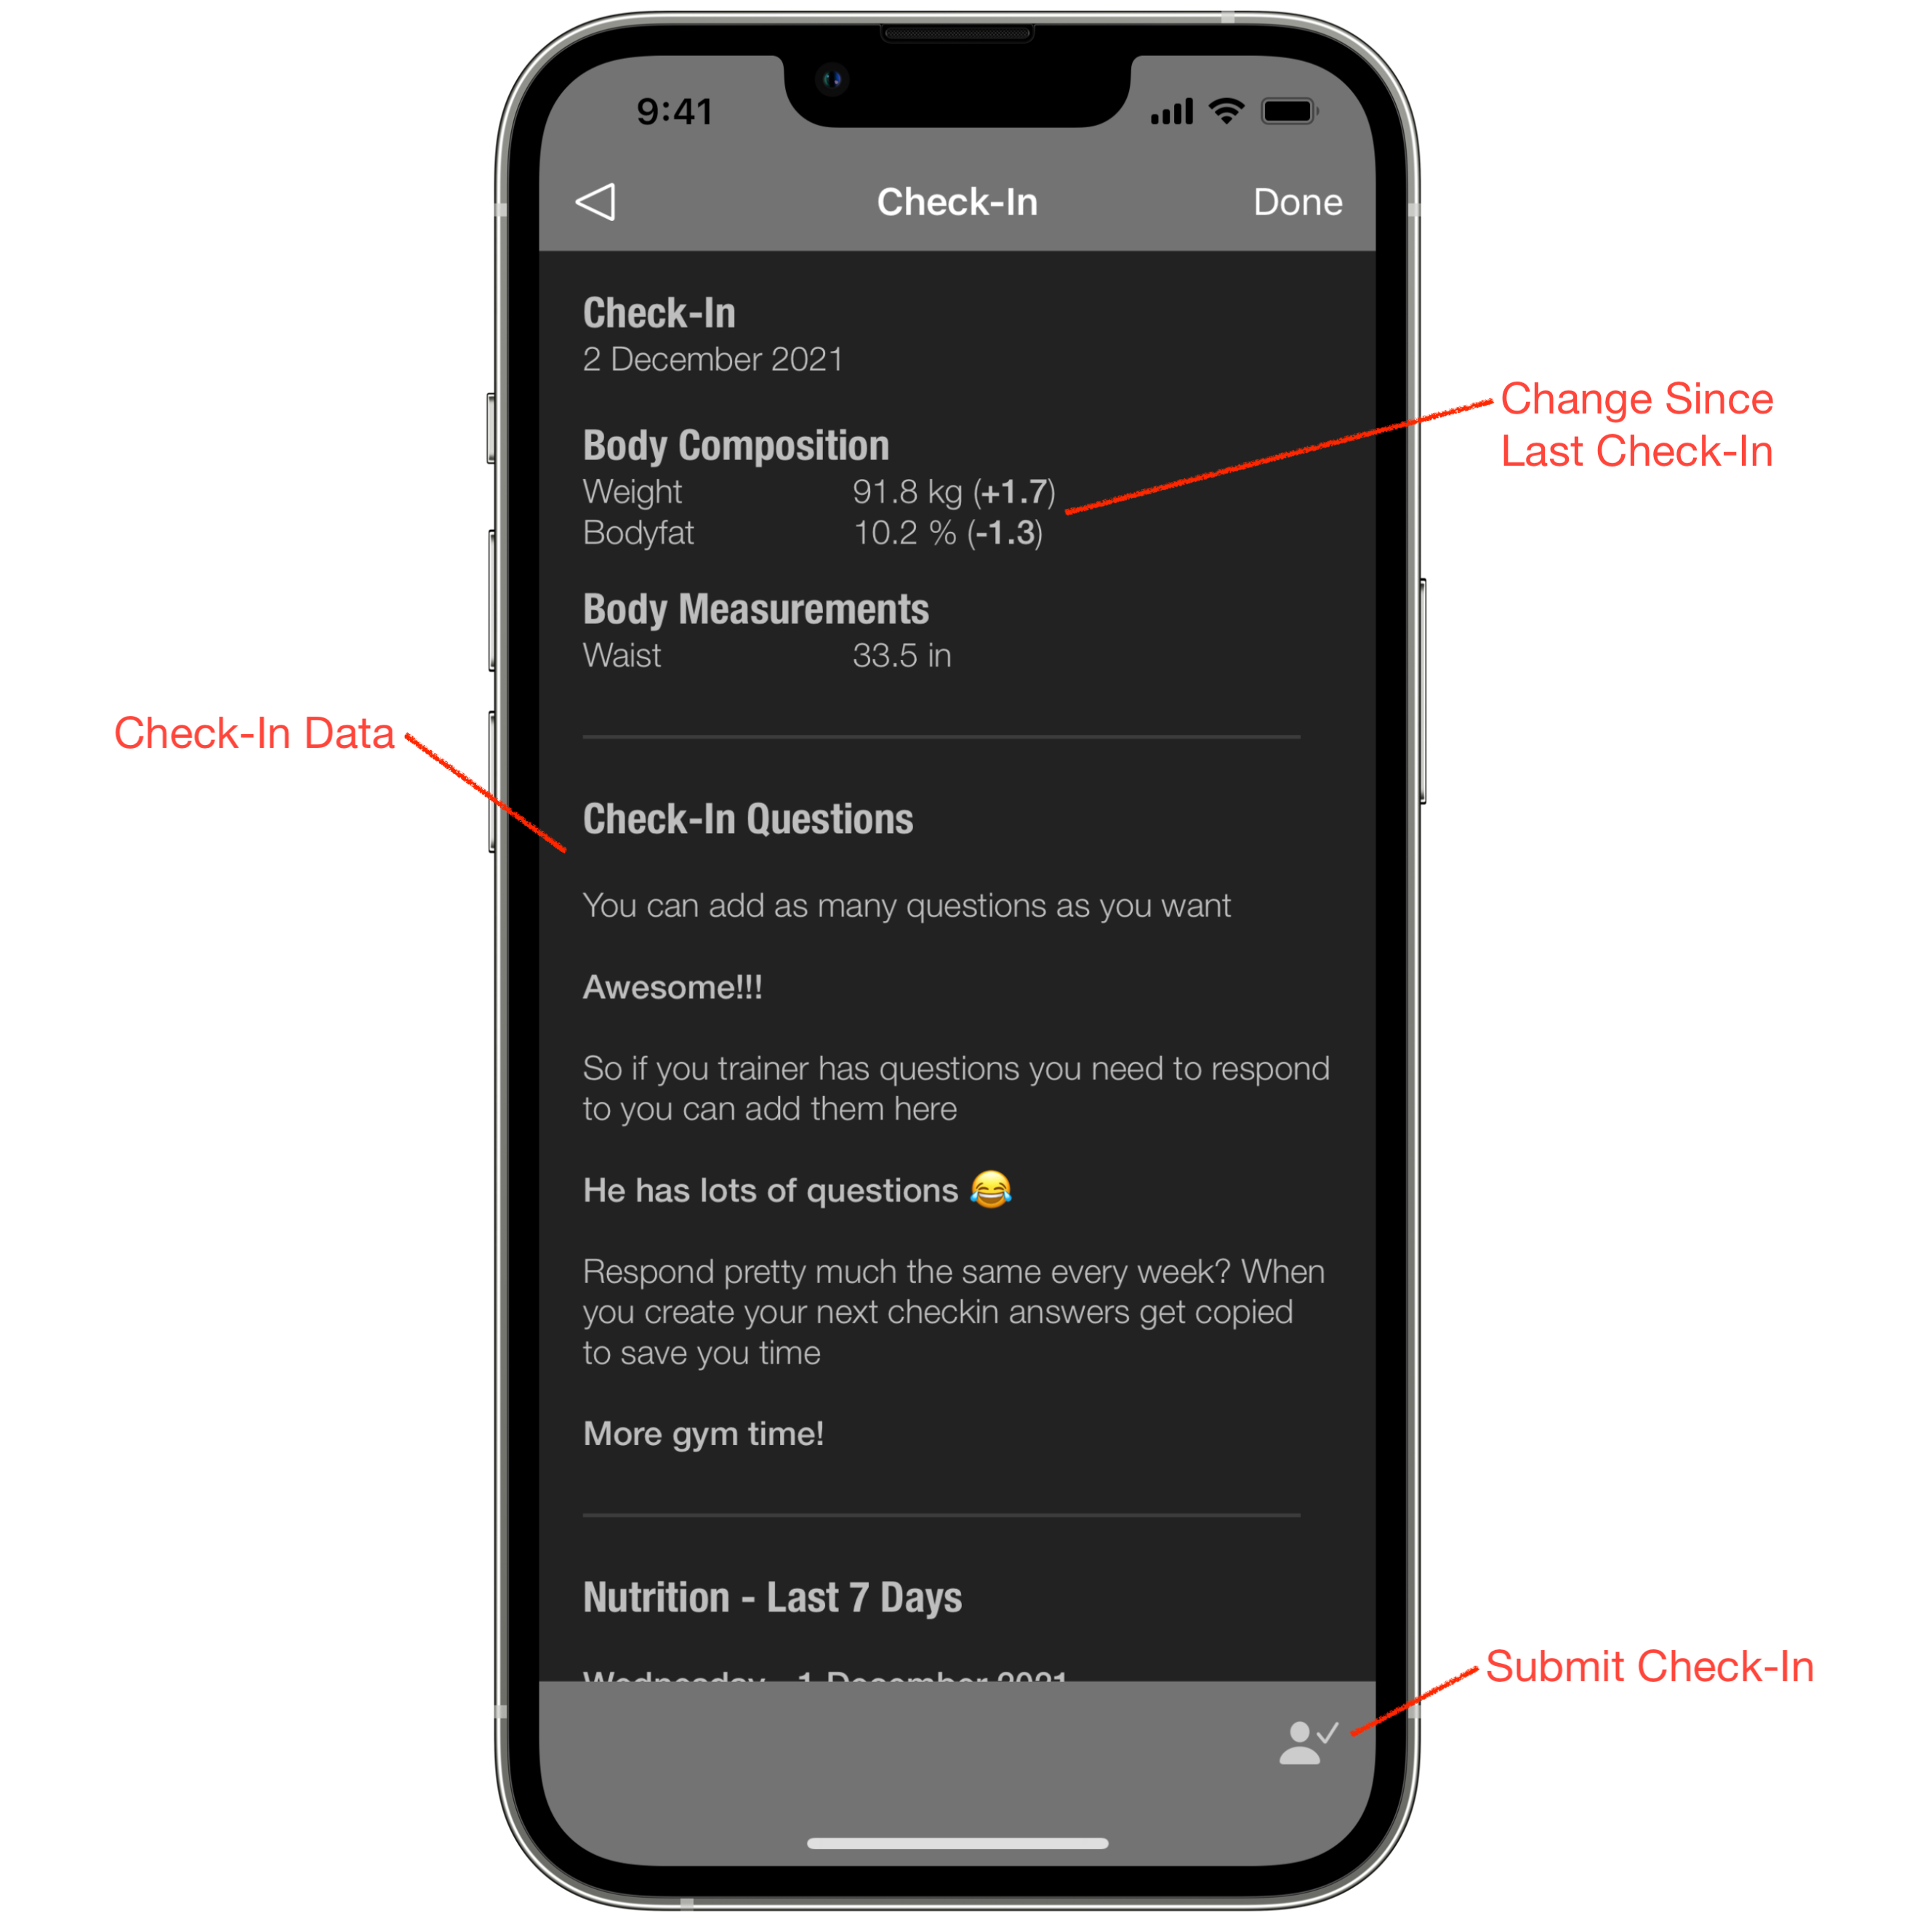
- Change Since Last Check-In - If there is a previous check-in, body composution and body measurements will have a number in brackets next to them listing the change since last check-in. For example, in the screenshot above current weight is 91.8 kg which is up 1.7 kg from last check-in.
- Check-In Data - The main body of the check-in contains the data you have requested included in the check-in settings. This includes coach questions, nutrition data and workout data.
- Submit Check-In - The submit check-in button bottom right will send your check-in data to your coach. You have the option of sending in an email, attached as a PDF to an email, or save a PDF to a cloud account where you can send some other way or just save for your own records. Once submitted, the check-in is marked as submitted and will show a checkmark in the check-in list so you know you've completed your check-in.
The Analysis section in Grow provides detailed statistics on various apects of your training and nutrition program. Grow was designed as a one stop app to allow assessment of progress and make the tweaks you need to keep progressing towards your goals. This is something that becomes a lot harder when you have your data split across multiple apps. Grow's statistics section will be expanded over time to provide better cross correlation of data so you can work out what has improved your progress or what has hindered it, so you can make the relevant changes. If you have suggestions or stats you want to see, please contact us. At this time Grow provides statistics on:
- Energy Intake - Calories or kilojoules consumed.
- Energy Expenditure - Calories or kilojoules burnt (requires an external device like an Apple Watch that tracks active and resting energy).
- Workout Volume - The amount of kilograms or pounds moved within workouts.
- Cardio Volume - Number of hours and minutes performing cardio.
- Weight Tracking - Tracks body mass changes.
- Body Fat Tracking - Tracks body fat changes.
If you allow Grow access to Apple's Health app on your iPhone, you can also use the Health app for analysis as Grow will sync all data with the Health app.
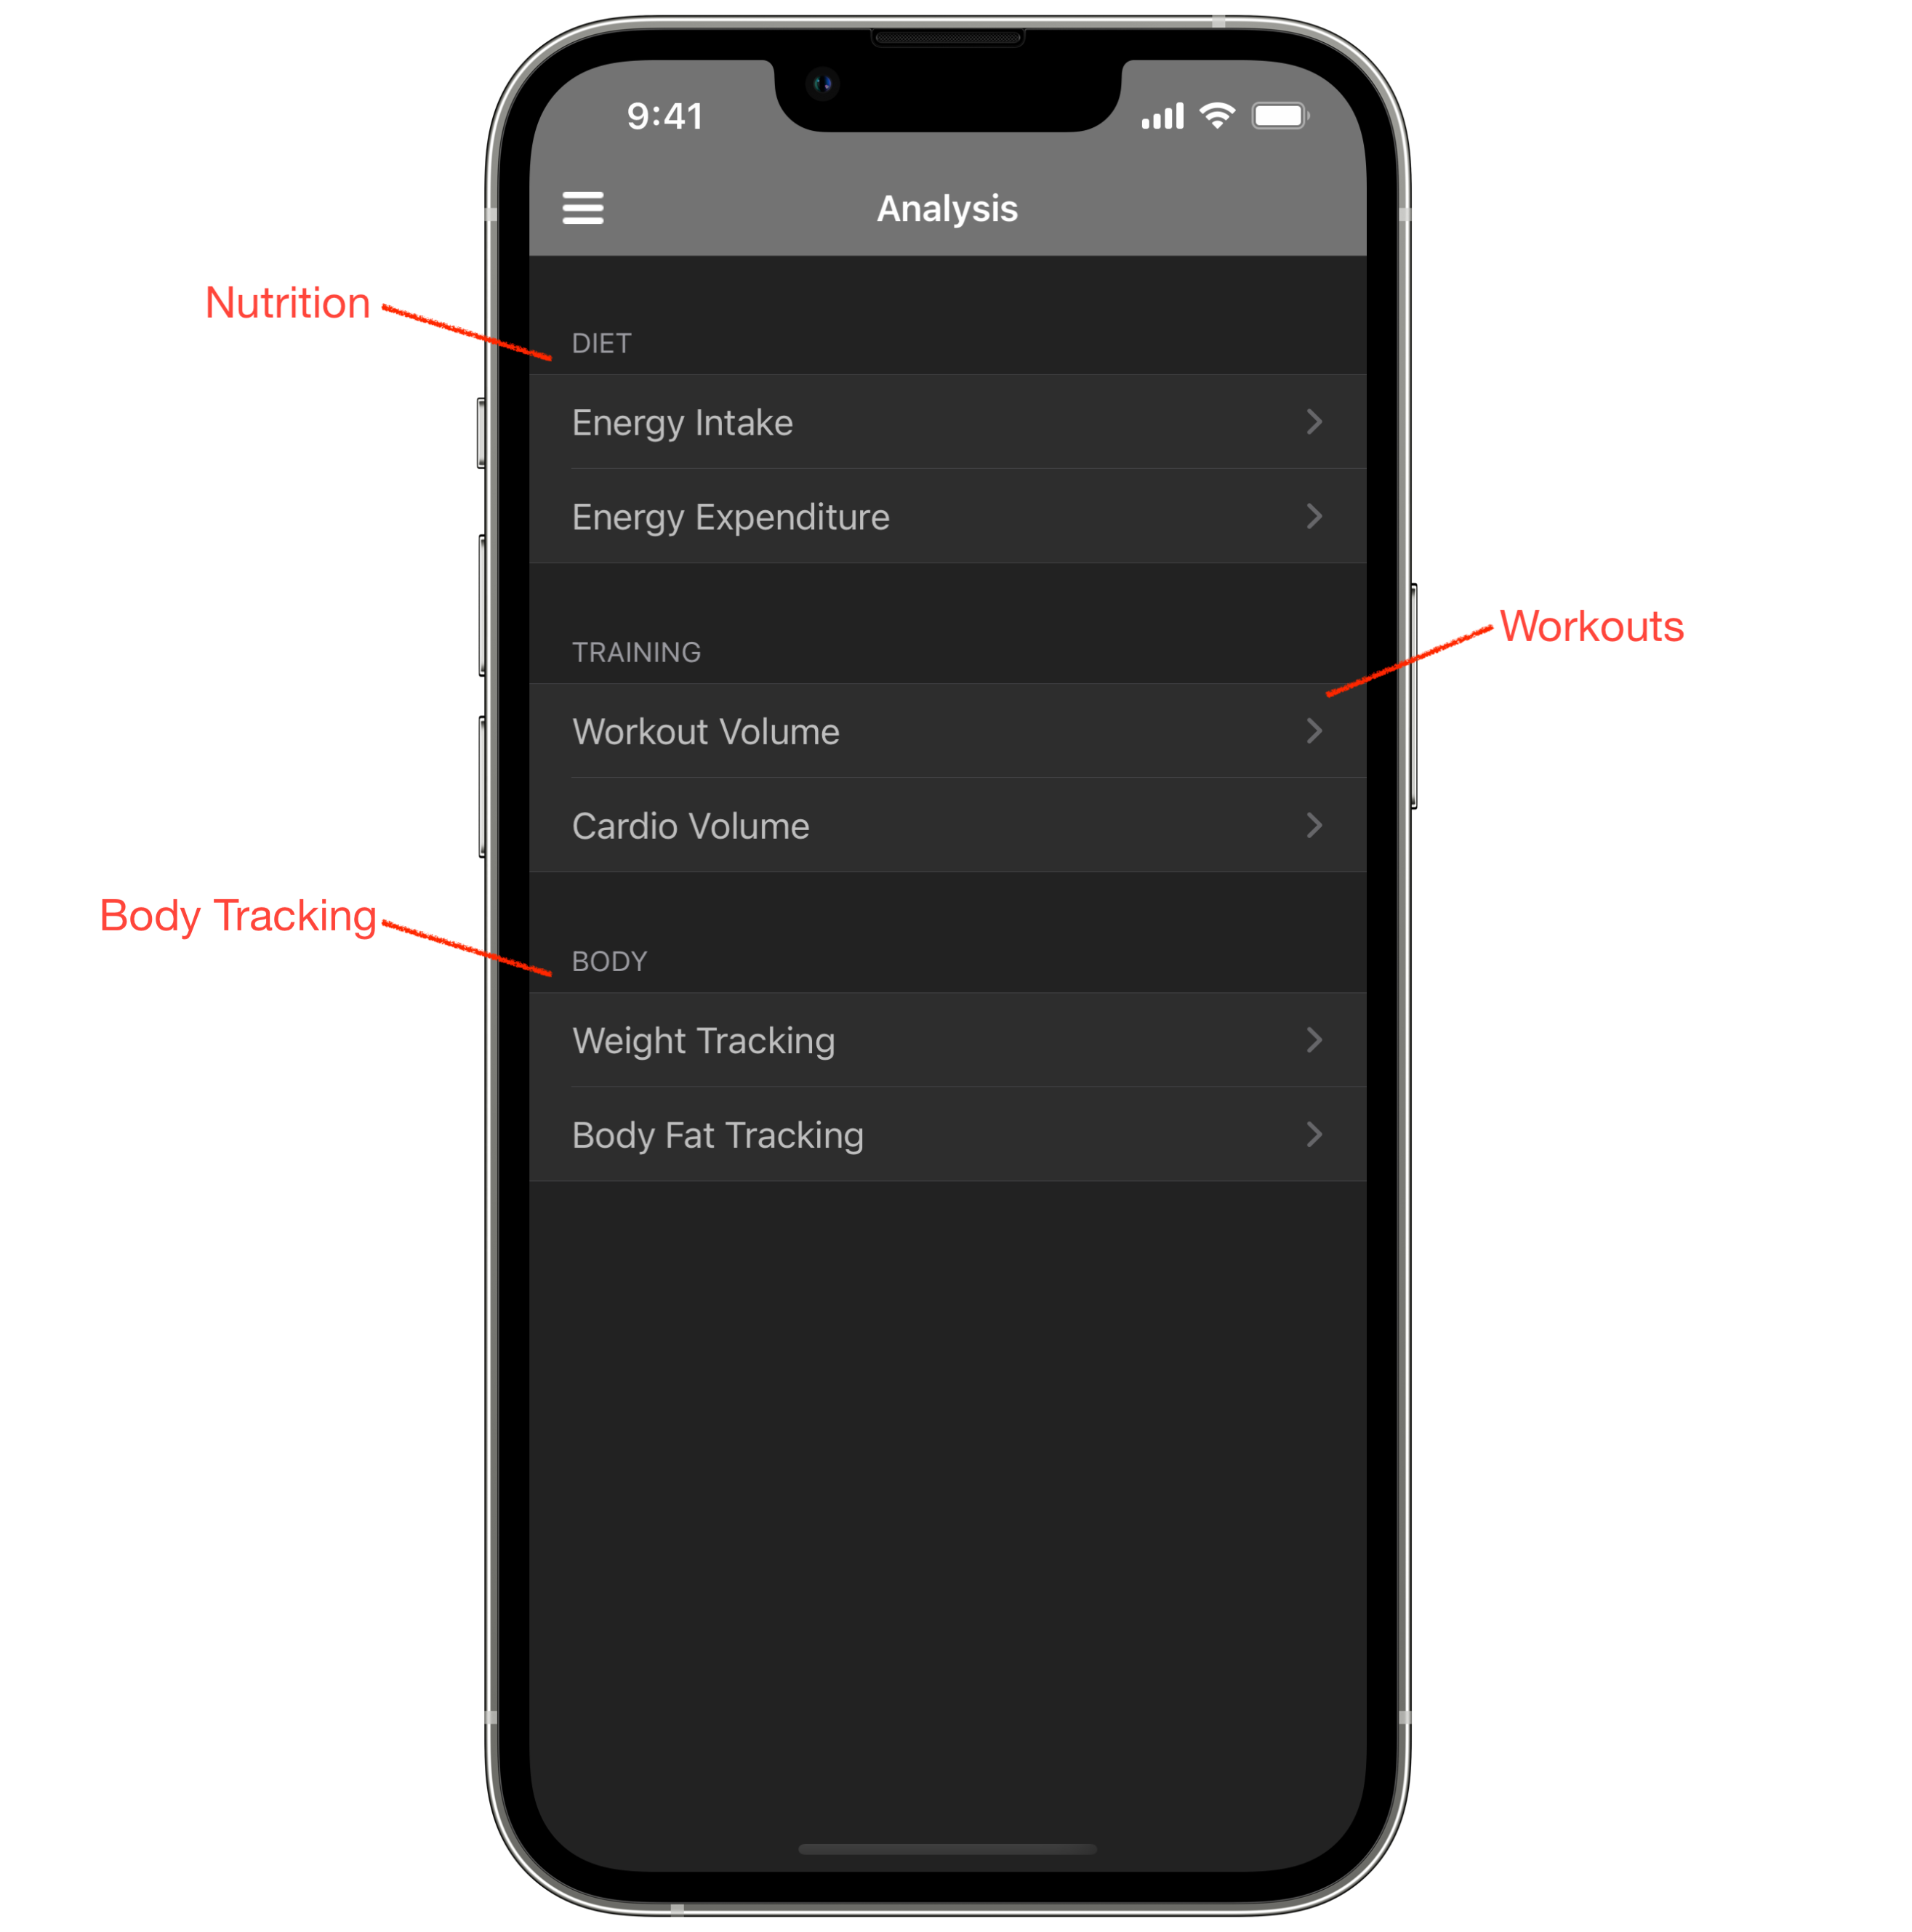
- Nutrition - The diet section holds statistics for nutrition information, such as energy intake and expenditure.
- Workouts - The training section holds statistics related to your workouts. At this time it is workout volume and amount of cardio performed.
- Body Tracking - The body section tracks changes in bodymass and bodyfat. This is data either entered by you or pulled in from Apple's Health app if you use smartscales or track your body changes in another app.
Analysis Graphs
Each tracking point provides a graph allowing you to easily see changes over time. Graphs can be adjusted to show daily, weekly, monthly, quarterly and yearly changes, depending on type of data.
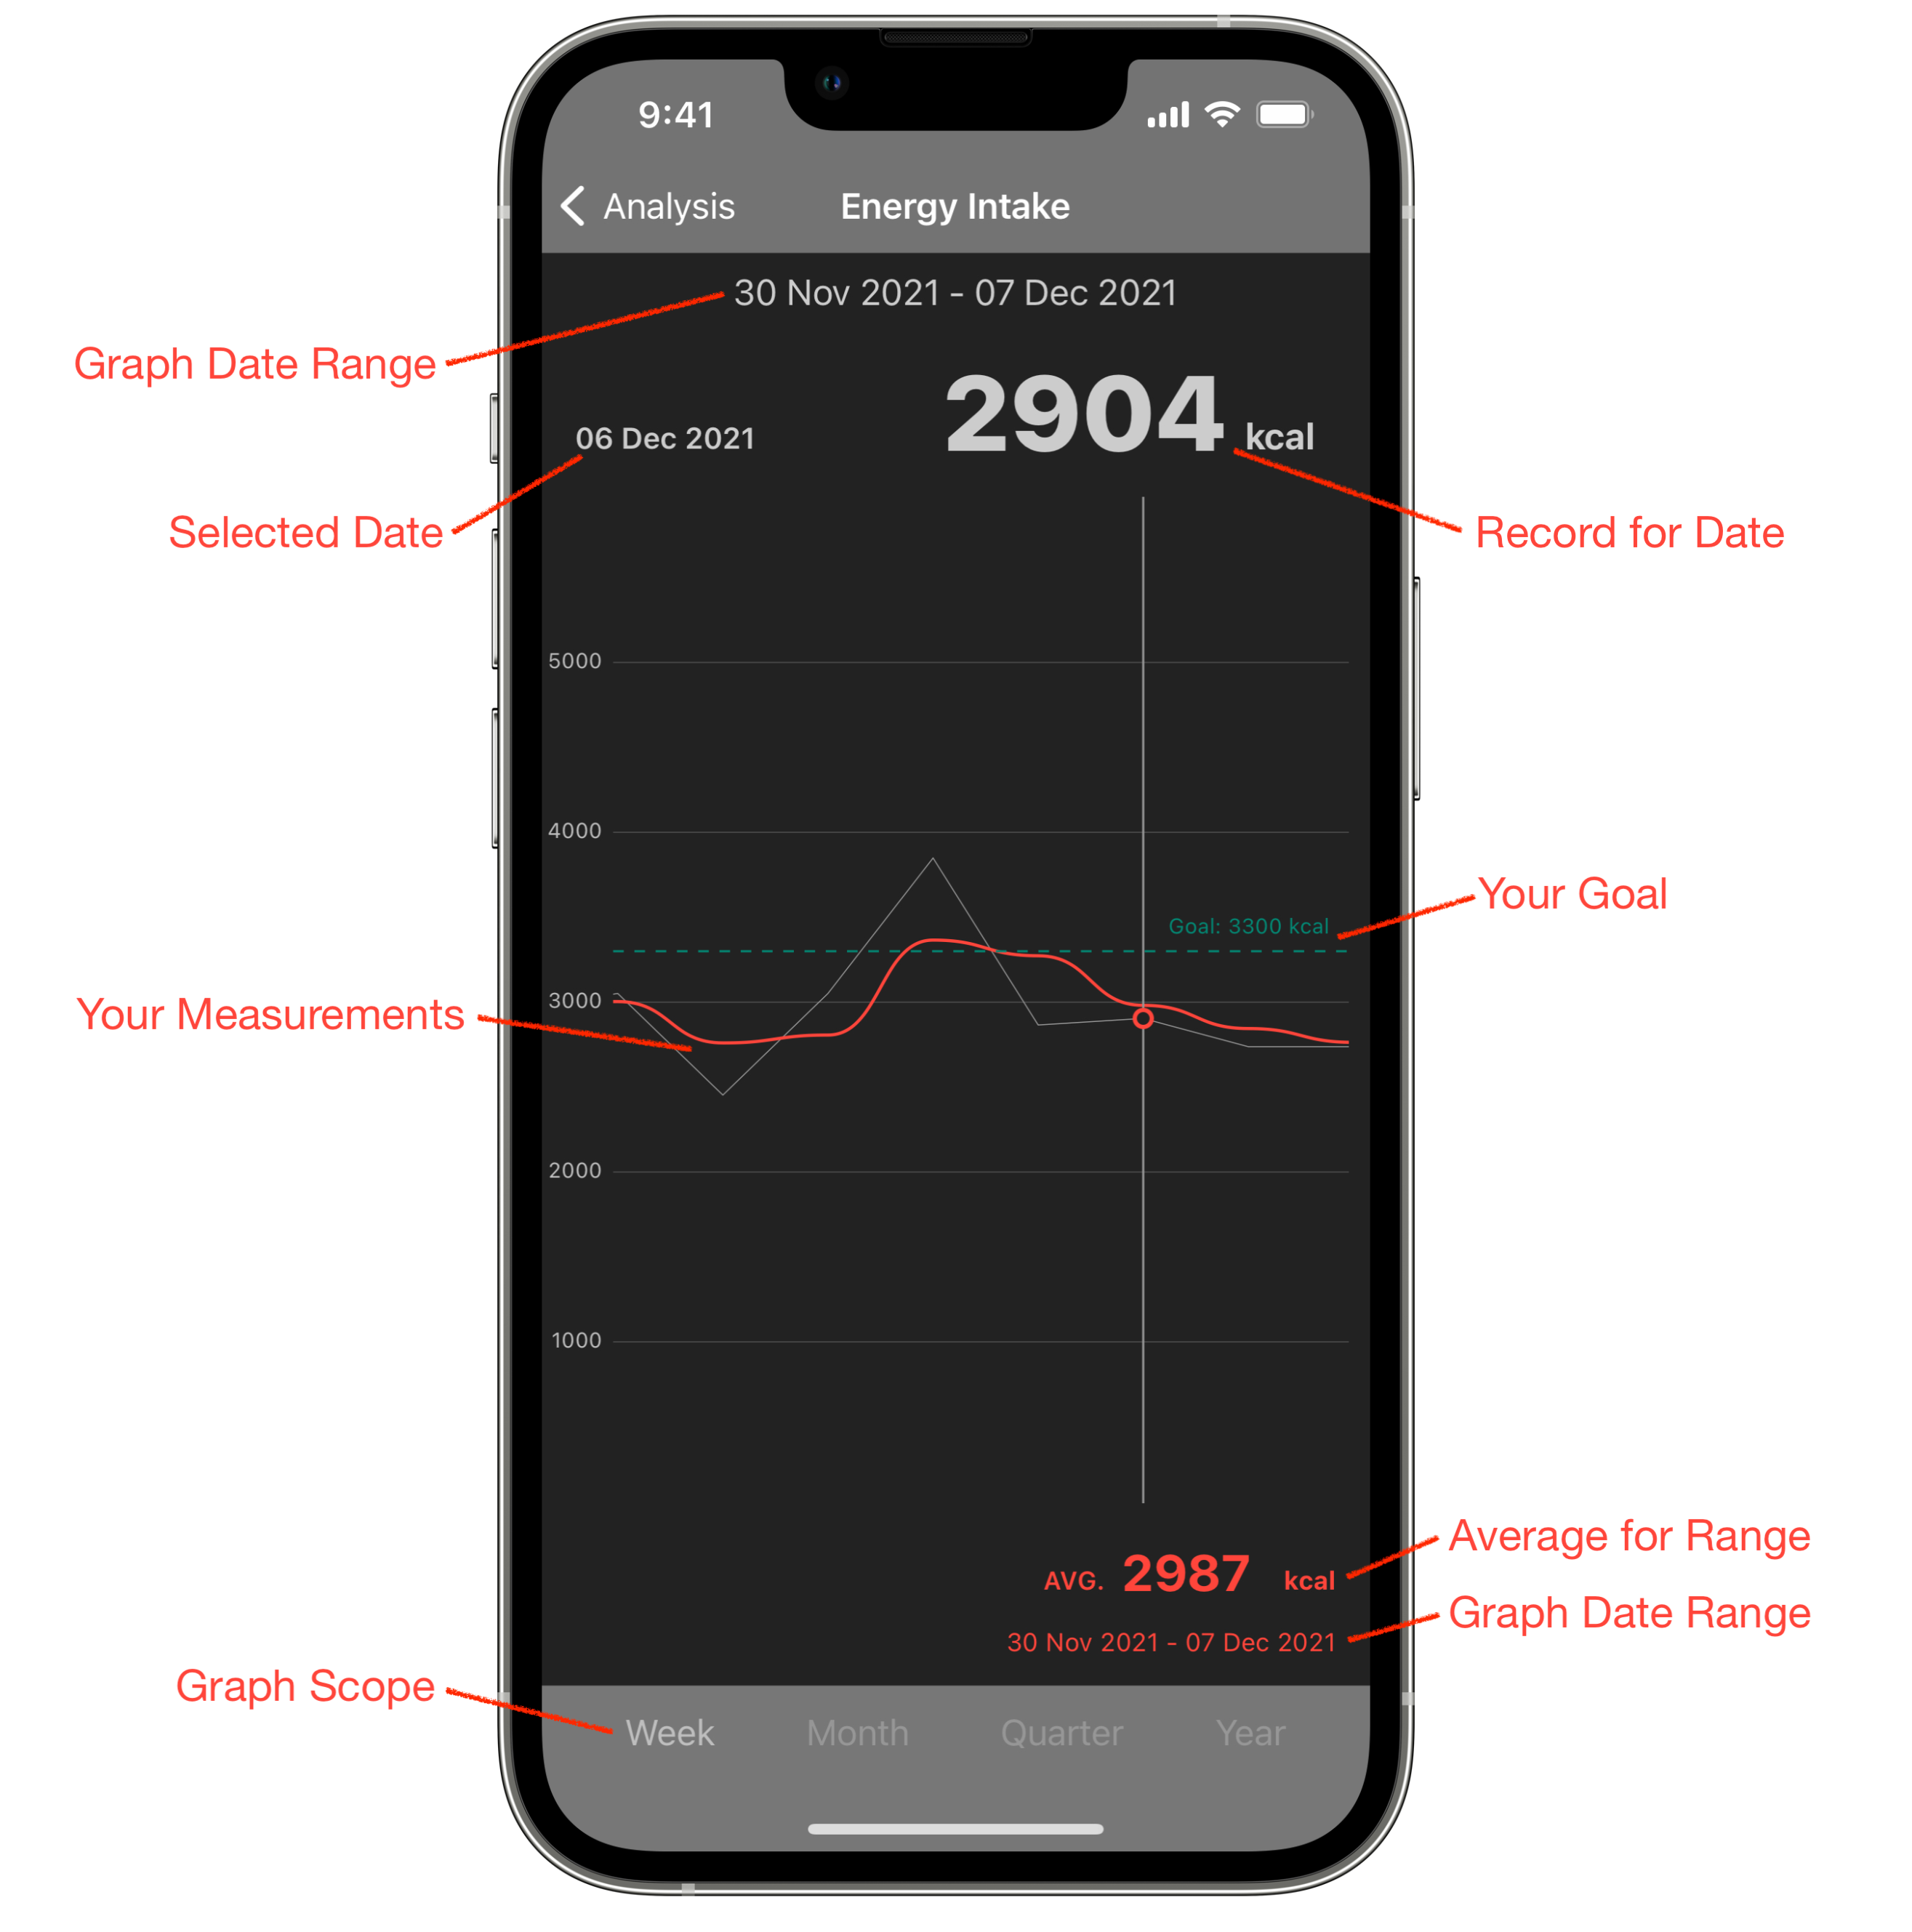
- Graph Date Range - The date range for the current graph is shown at the top and also at the bottom under the average label.
- Your Goal - If you have set a goal for these measurements, it is shown with a label and green dashed line. In the example, a goal of consuming 3300 kcal per day has been set. You can then easily compare this to the actual consumed kcals.
- Your Measurements - Your actual measurements are shown on the straight grey line. The orange/red line is the trend line.
- Average for Range - The average for range label shows the average of measurements between the dates on the graph. So in the example screenshot, the target goal is 3300 kcal per day and the average consumed is 2987 kcal per day between the dates of 30th November to 7th of December. So the person, on average, is undereating by around 313 kcal per day.
- Selected Date - To see the measurement recorded for a point on your graph, touch on the grey line. You will then get a vertical line and labels for the selected point. The selected date is shown on the left, in this example, 6th December.
- Record for Date - Shows the measurement for the selected point. In this example, the user consumed 2904 kcal on the 6th of December.
Your profile lets you define information about you. This information is used for goal setting, planning and tracking, especially around nutrient goals. The main screen lets you set information about your bodyweight, energy and macronutrient goals. Additional goal screens let you define your goals and set the metrics to track progress against those goals.
Main Screen
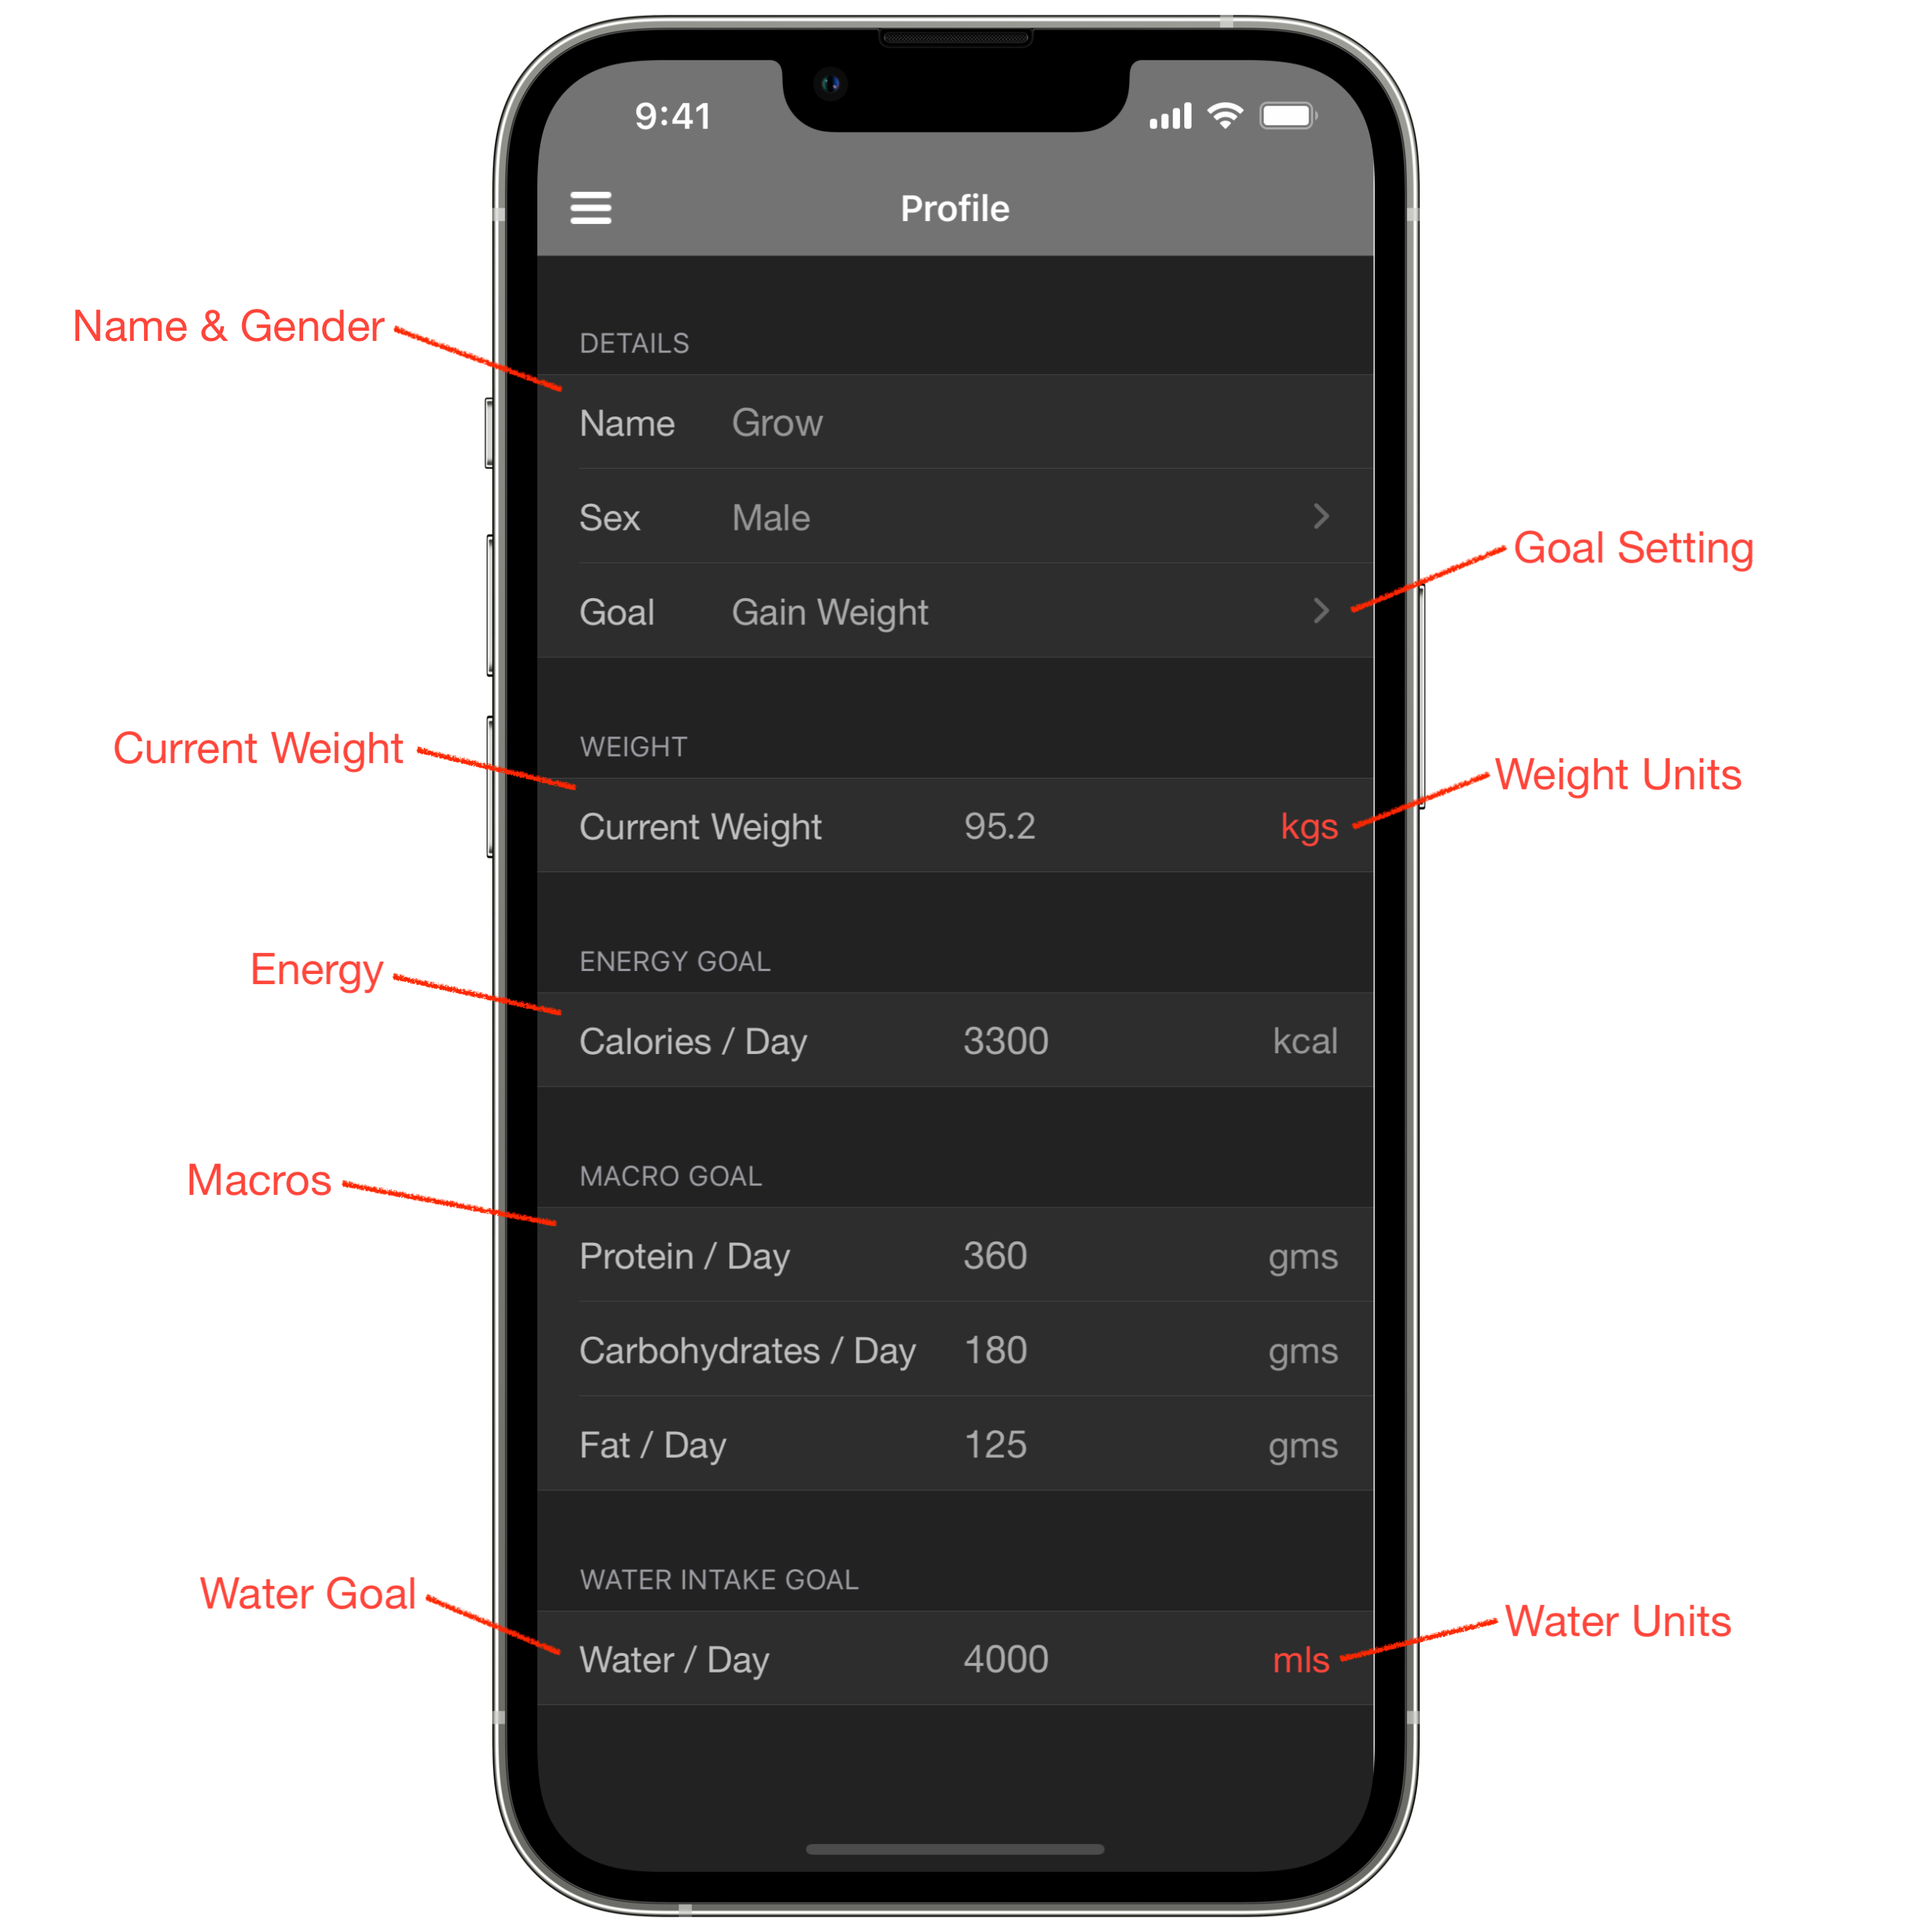
- Name & Gender - In the details section you can set your name and gender. Both are optional. Name just personalises your dashboard for you, and gender has no actual use at this time, except as amusement 😉
- Goal Setting - Touching the goal row will take you to the goal setting screens discussed below. Once set your chosen goal will show up here.
- Current Weight - Current weight lists the last weight entered into Grow. Most recent weight can be added to Grow multiple ways:
- Entered directly here in your profile.
- Pulled in automatically from Apple Health. When Grow opens it will check your Apple Health app in the background and pull in any new weights. If there is a bodyweight newer than the one last recorded in Grow, it will save this as your new weight and it will show up here.
- Created in a body tracking record. You can create a new weight for yourself if you create a new body tracking record. It will automatically show up here.
- Created in a check-in. You can create a new weight for yourself if you create a new check-in. It will automatically show up here.
- Weight Units - By touching on the weight units label (kg or lb), units will swap between metric and imperial. When switching it will also automatically recalculate and convert kg to lb and vice versa. Note the colour of the weight units label compared to other labels. Anywhere in Grow you see orange/red units, you can touch these to swap between metric and imperial units.
- Energy - Energy goal is the amount of food energy you plan to consume each day, tracked in either calories or kilojoules. To switch between the two, change the energy units setting in Settings.
- Macros - Lists your goals for the three main macronutrients: protein, carbohydrates and fat. Units of measurements are set at grams as this is one of the few measurements consistently used around the world.
- Water Goal - The water intake goal is how many millilitres or fluid ounces of water you are aiming to drink each day. This can be tracked from your Timeline.
- Water Units - Like weight units, touch the water units label to switch between millilitres and fluid ounces.
Goal Setting & Weight Goals
After selecting the goal setting row in your Profile, you will be able to set your goal. There are currently six goals and their associated metrics to let you track progress and to display in your Dashboard.
- Gain Weight - For those trying to gain weight, such as bodybuilders looking to put on lean mass.
- Lose Weight - For those trying to lose weight, whether it's just to lose those few extra pounds put on over Christmas or losing for some other goal.
- Maintain Weight - Some of us are happy where we are at and just want to go to the gym for health reasons and so we burn some extra calories so we can enjoy some extra food or drink. If you want to just make sure you aren't gaining weight, this goal will fit.
- Improve Fitness - If you are looking at improving your fitness levels.
- Prepare for a Competition - This goal is for those looking at competing in a bodybuilding or other fitness competition, but could also be those preparing for a sporting competition.
- Prepare for a Photo Shoot - Some people just want to get to that level where they can get that photo shoot they always wanted. This one's for you.
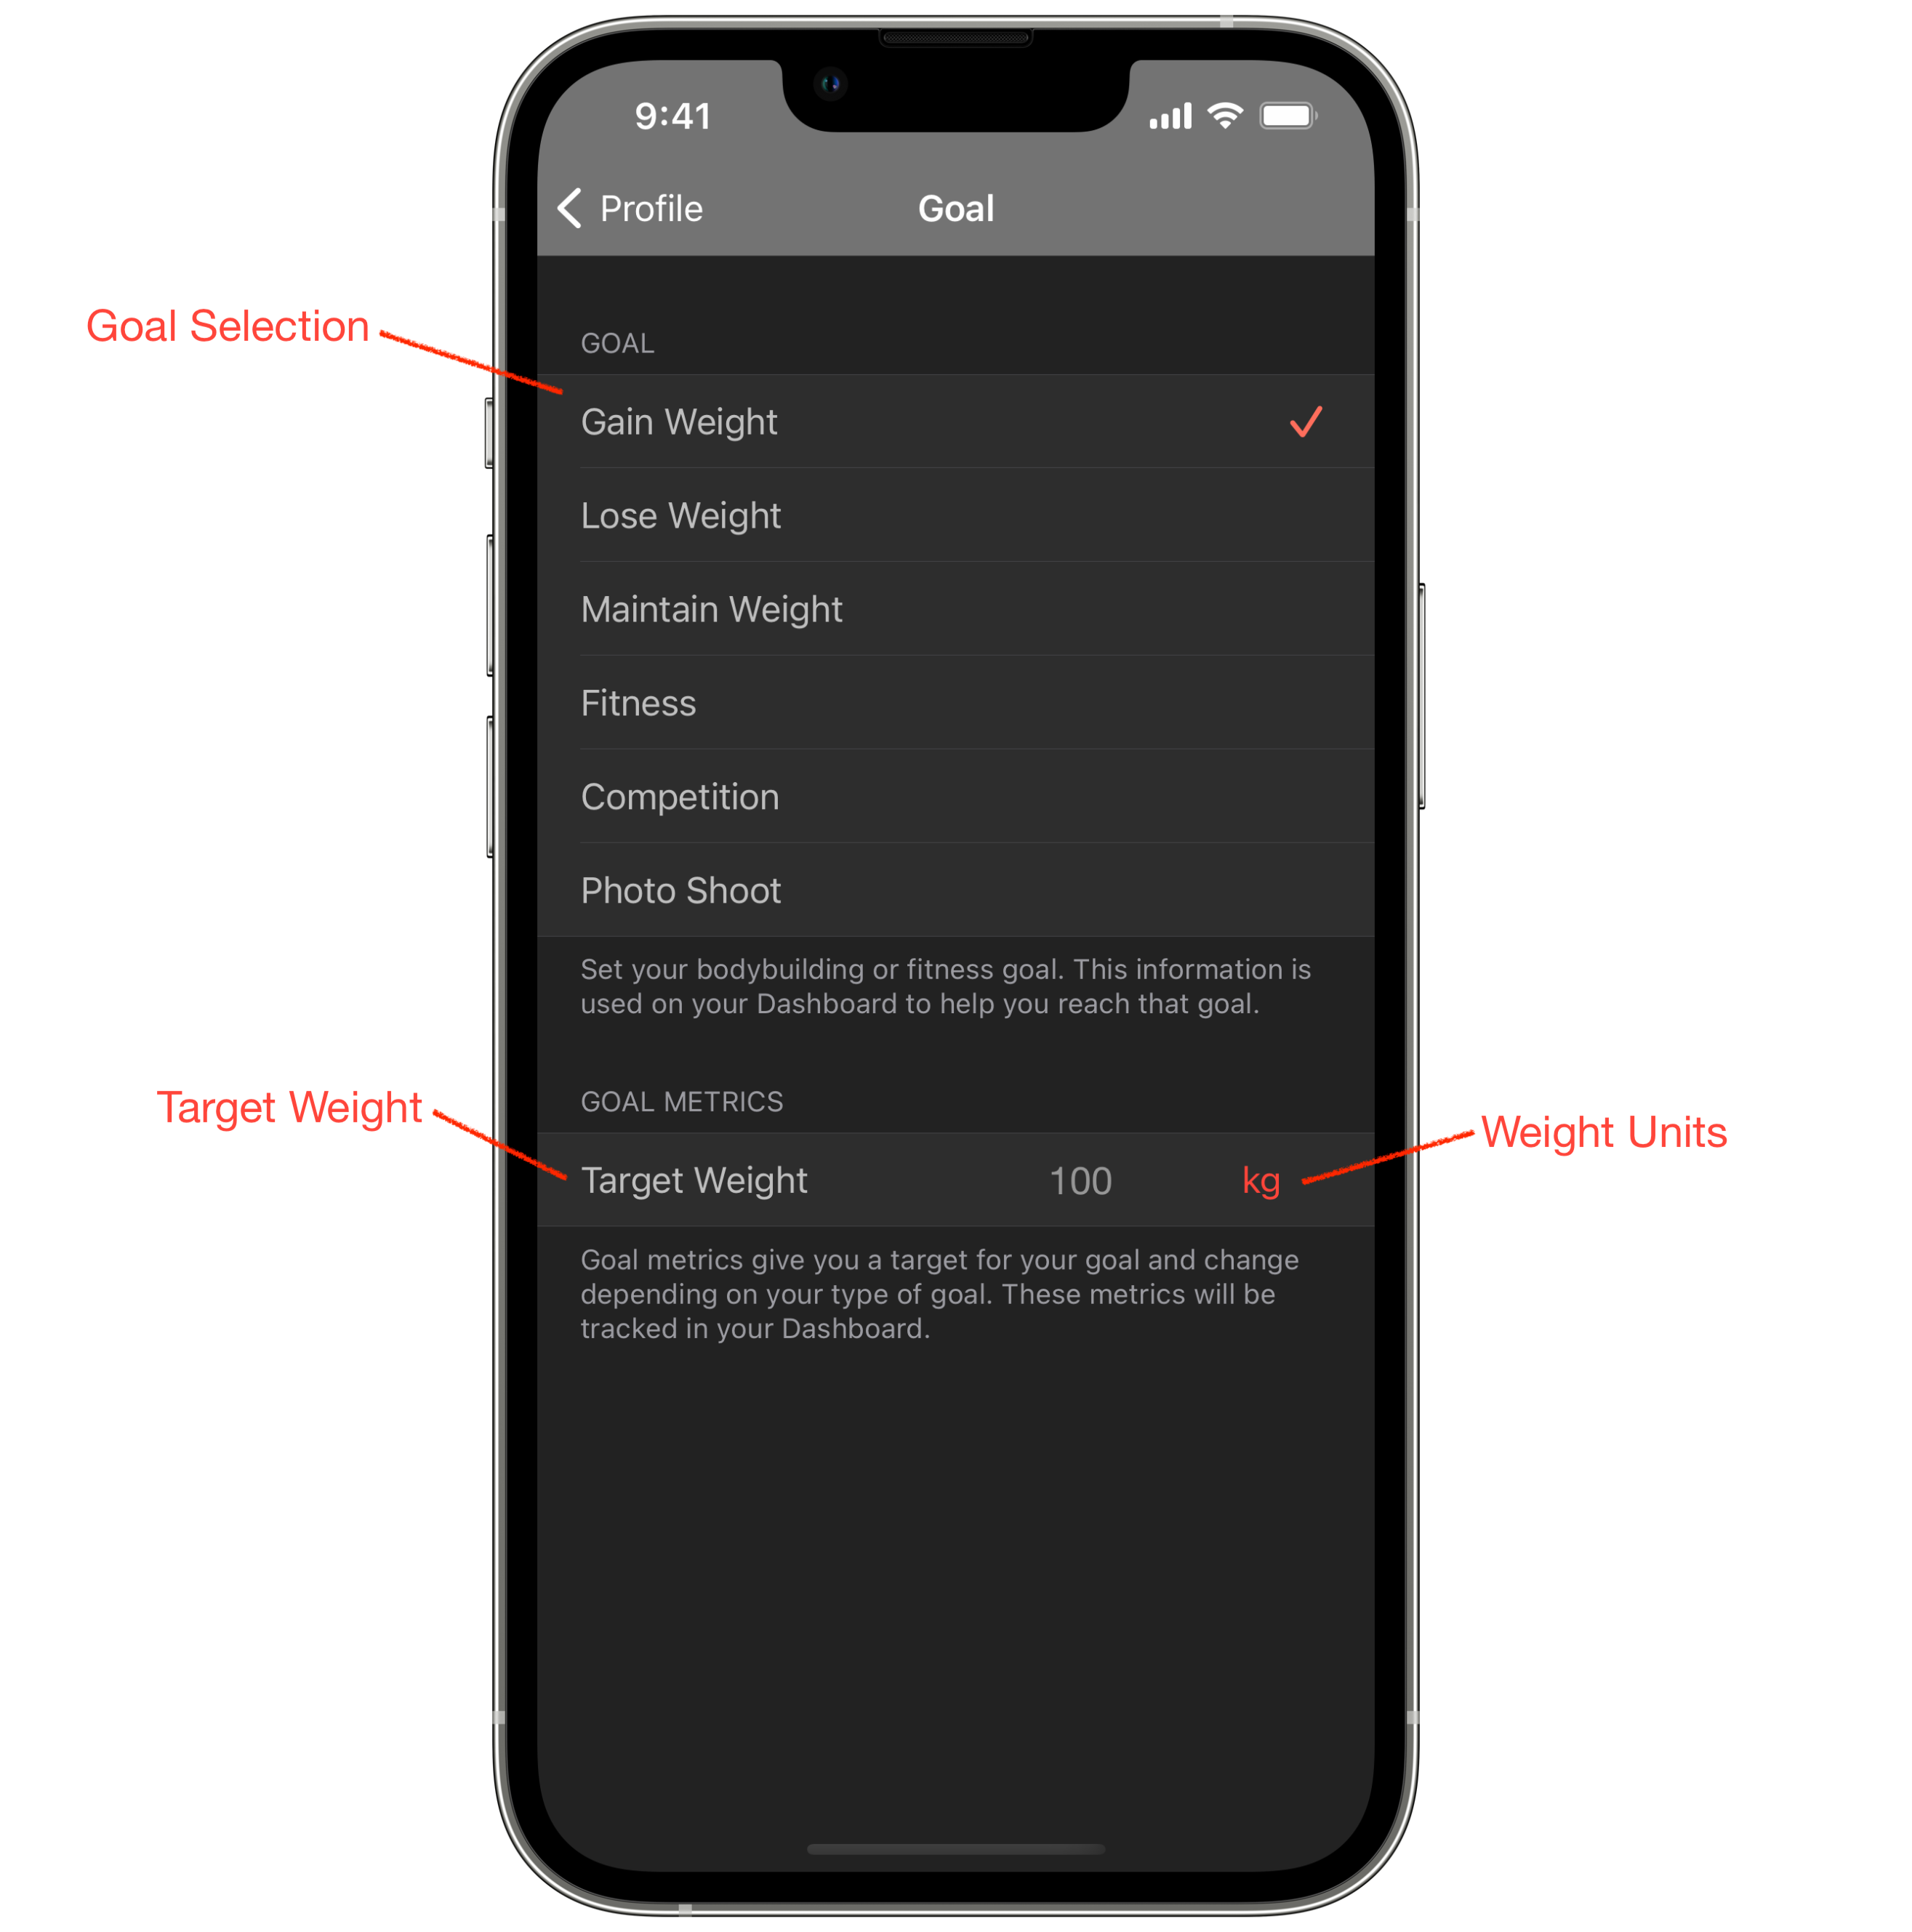
- Goal Selection - Select the goal you want to set from the list. A checkmark will be set next to your chosen goal and the goal metrics will change depending on your type of goal.
- Target Weight - Target weight is used for all three weight related goals: gaining, losing and maintaining. Set your target weight here.
- Weight Units - Touch the weight units label to switch between metric and imperial weights, ie. kilograms and pounds.
Fitness Goal
The fitness goal provides two metrics to help you improve your fitness, targeting a specific number of workouts per week and how much cardio you are targeting each week.
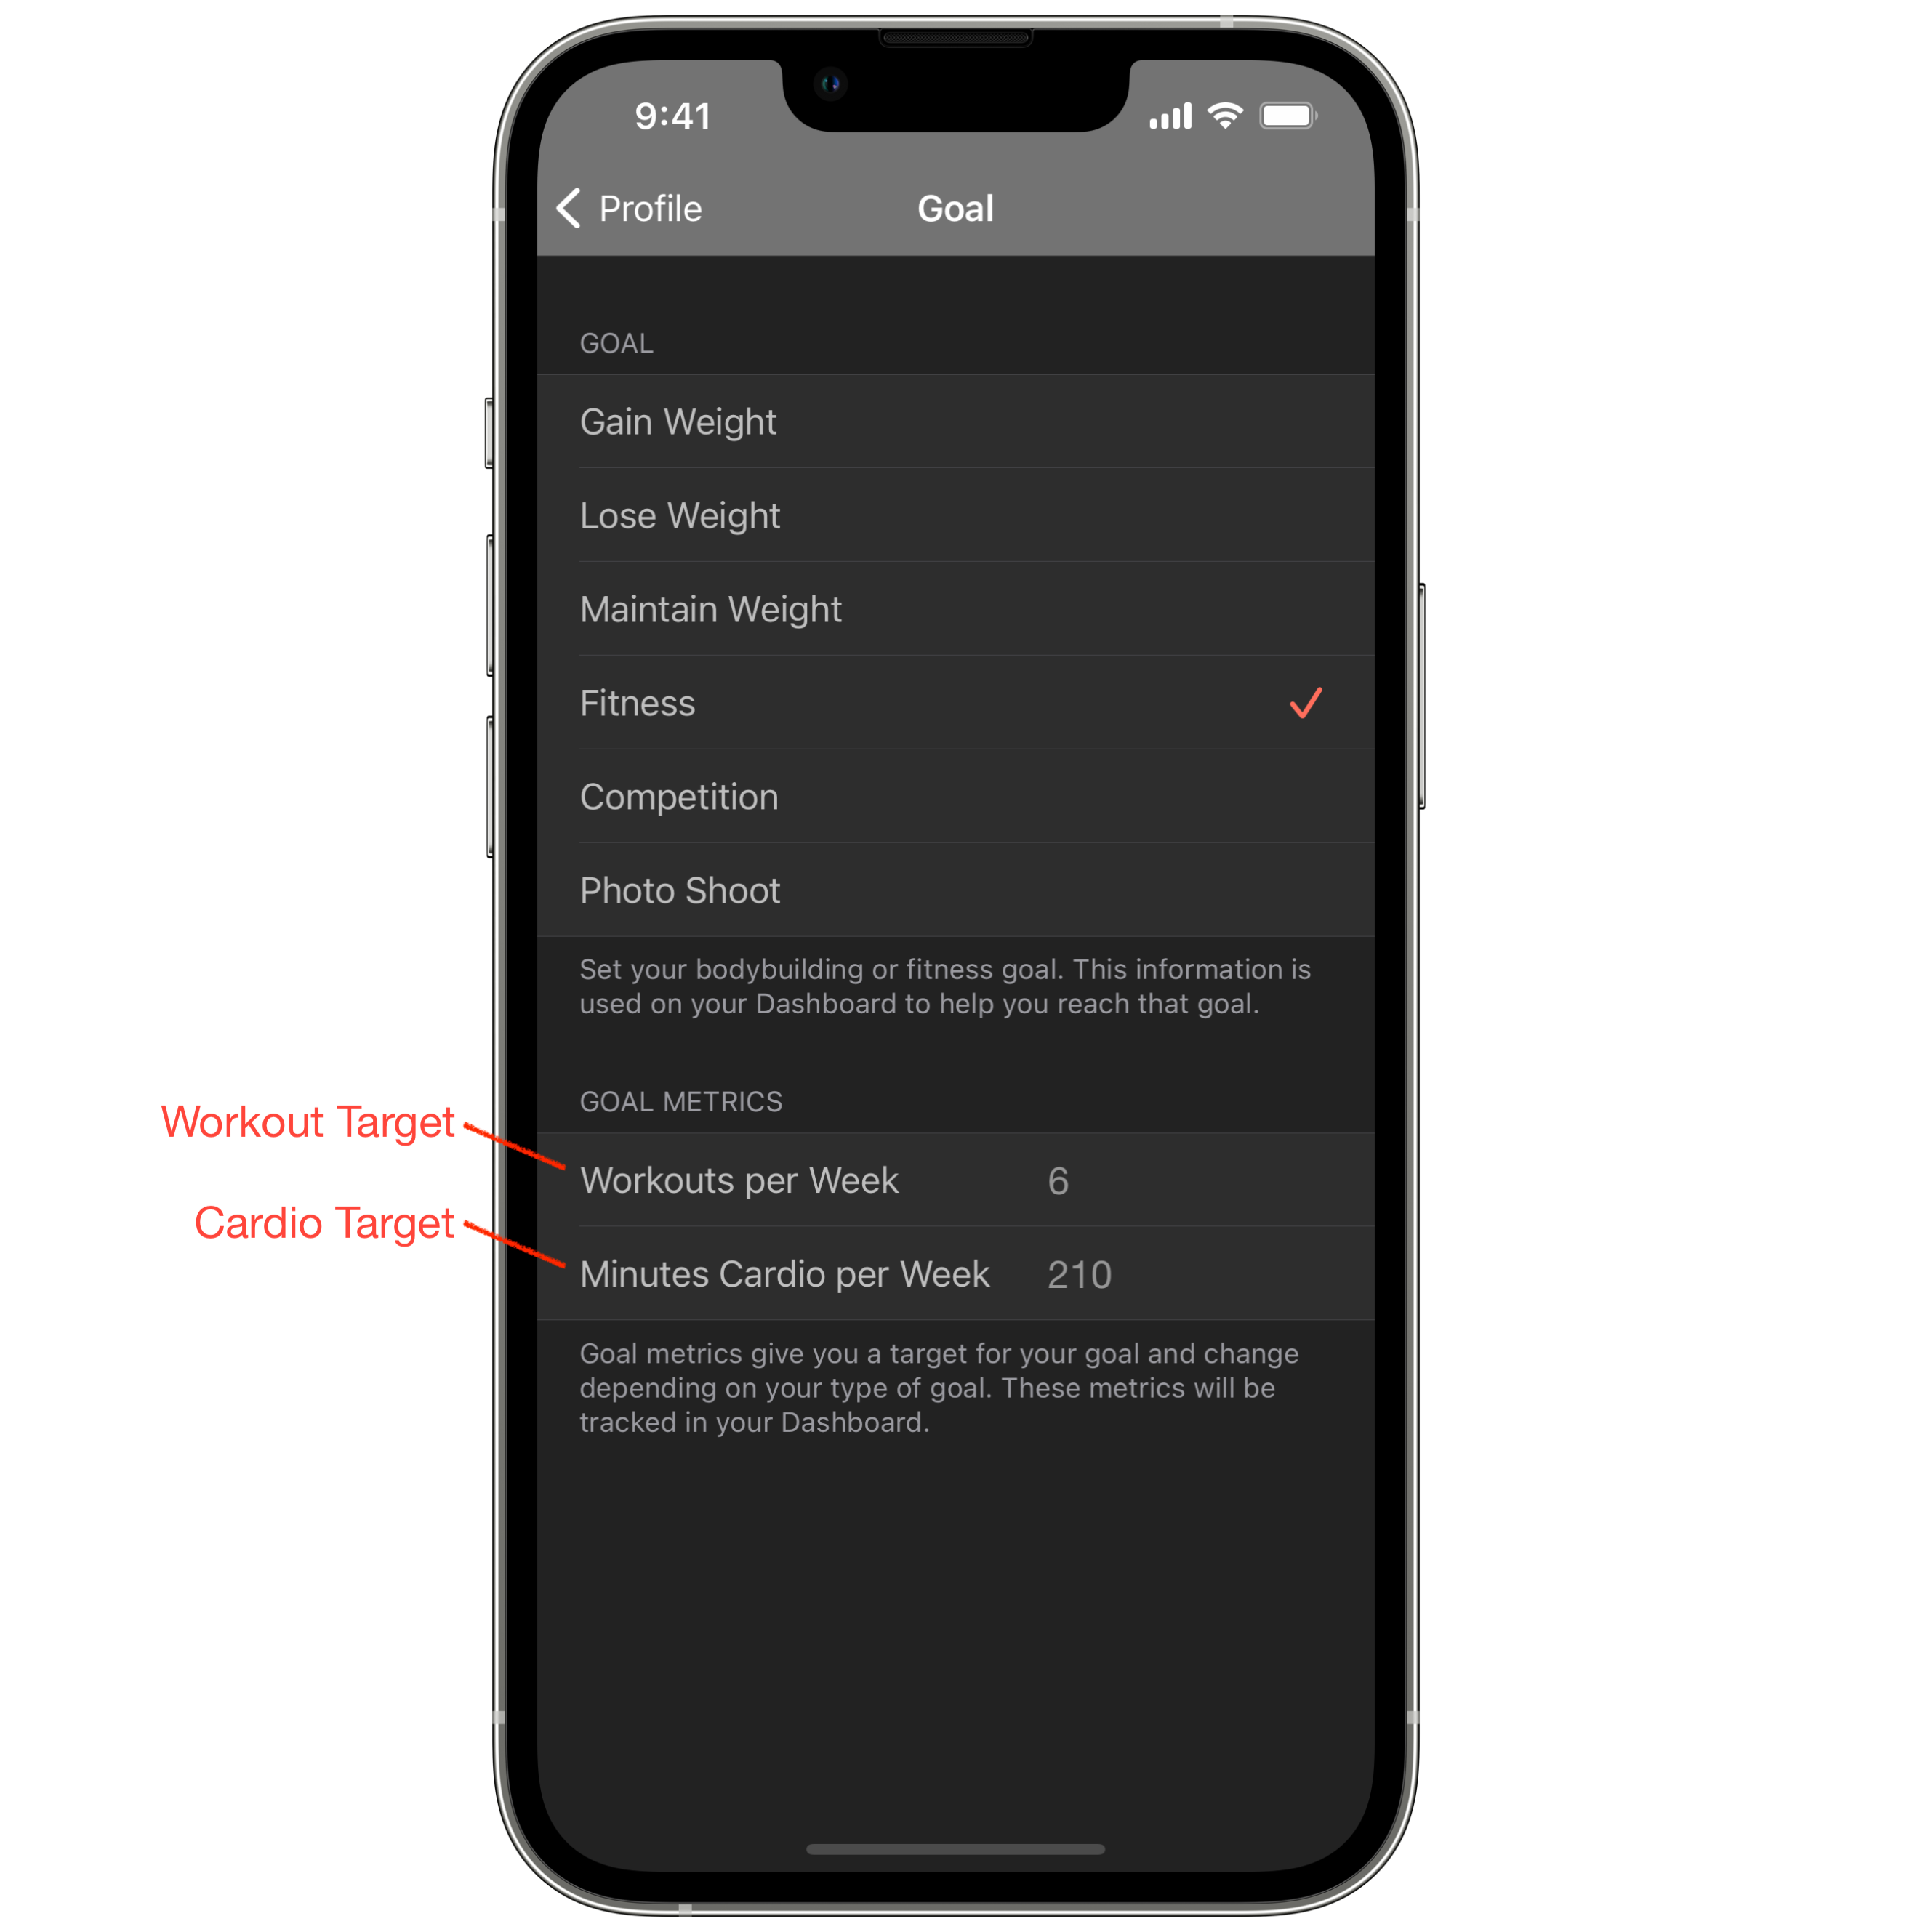
- Workout Target - Enter the number of workouts you are aiming to complete each week.
- Cardio Target - Enter the number of minutes of cardio you are aiming to complete each week.
Date Goals
Grow has two date related goals, goals that have a target of completion by a set date. These are preparing for a competition and preparing for a photo shoot. Both have set days they need to be completed by.
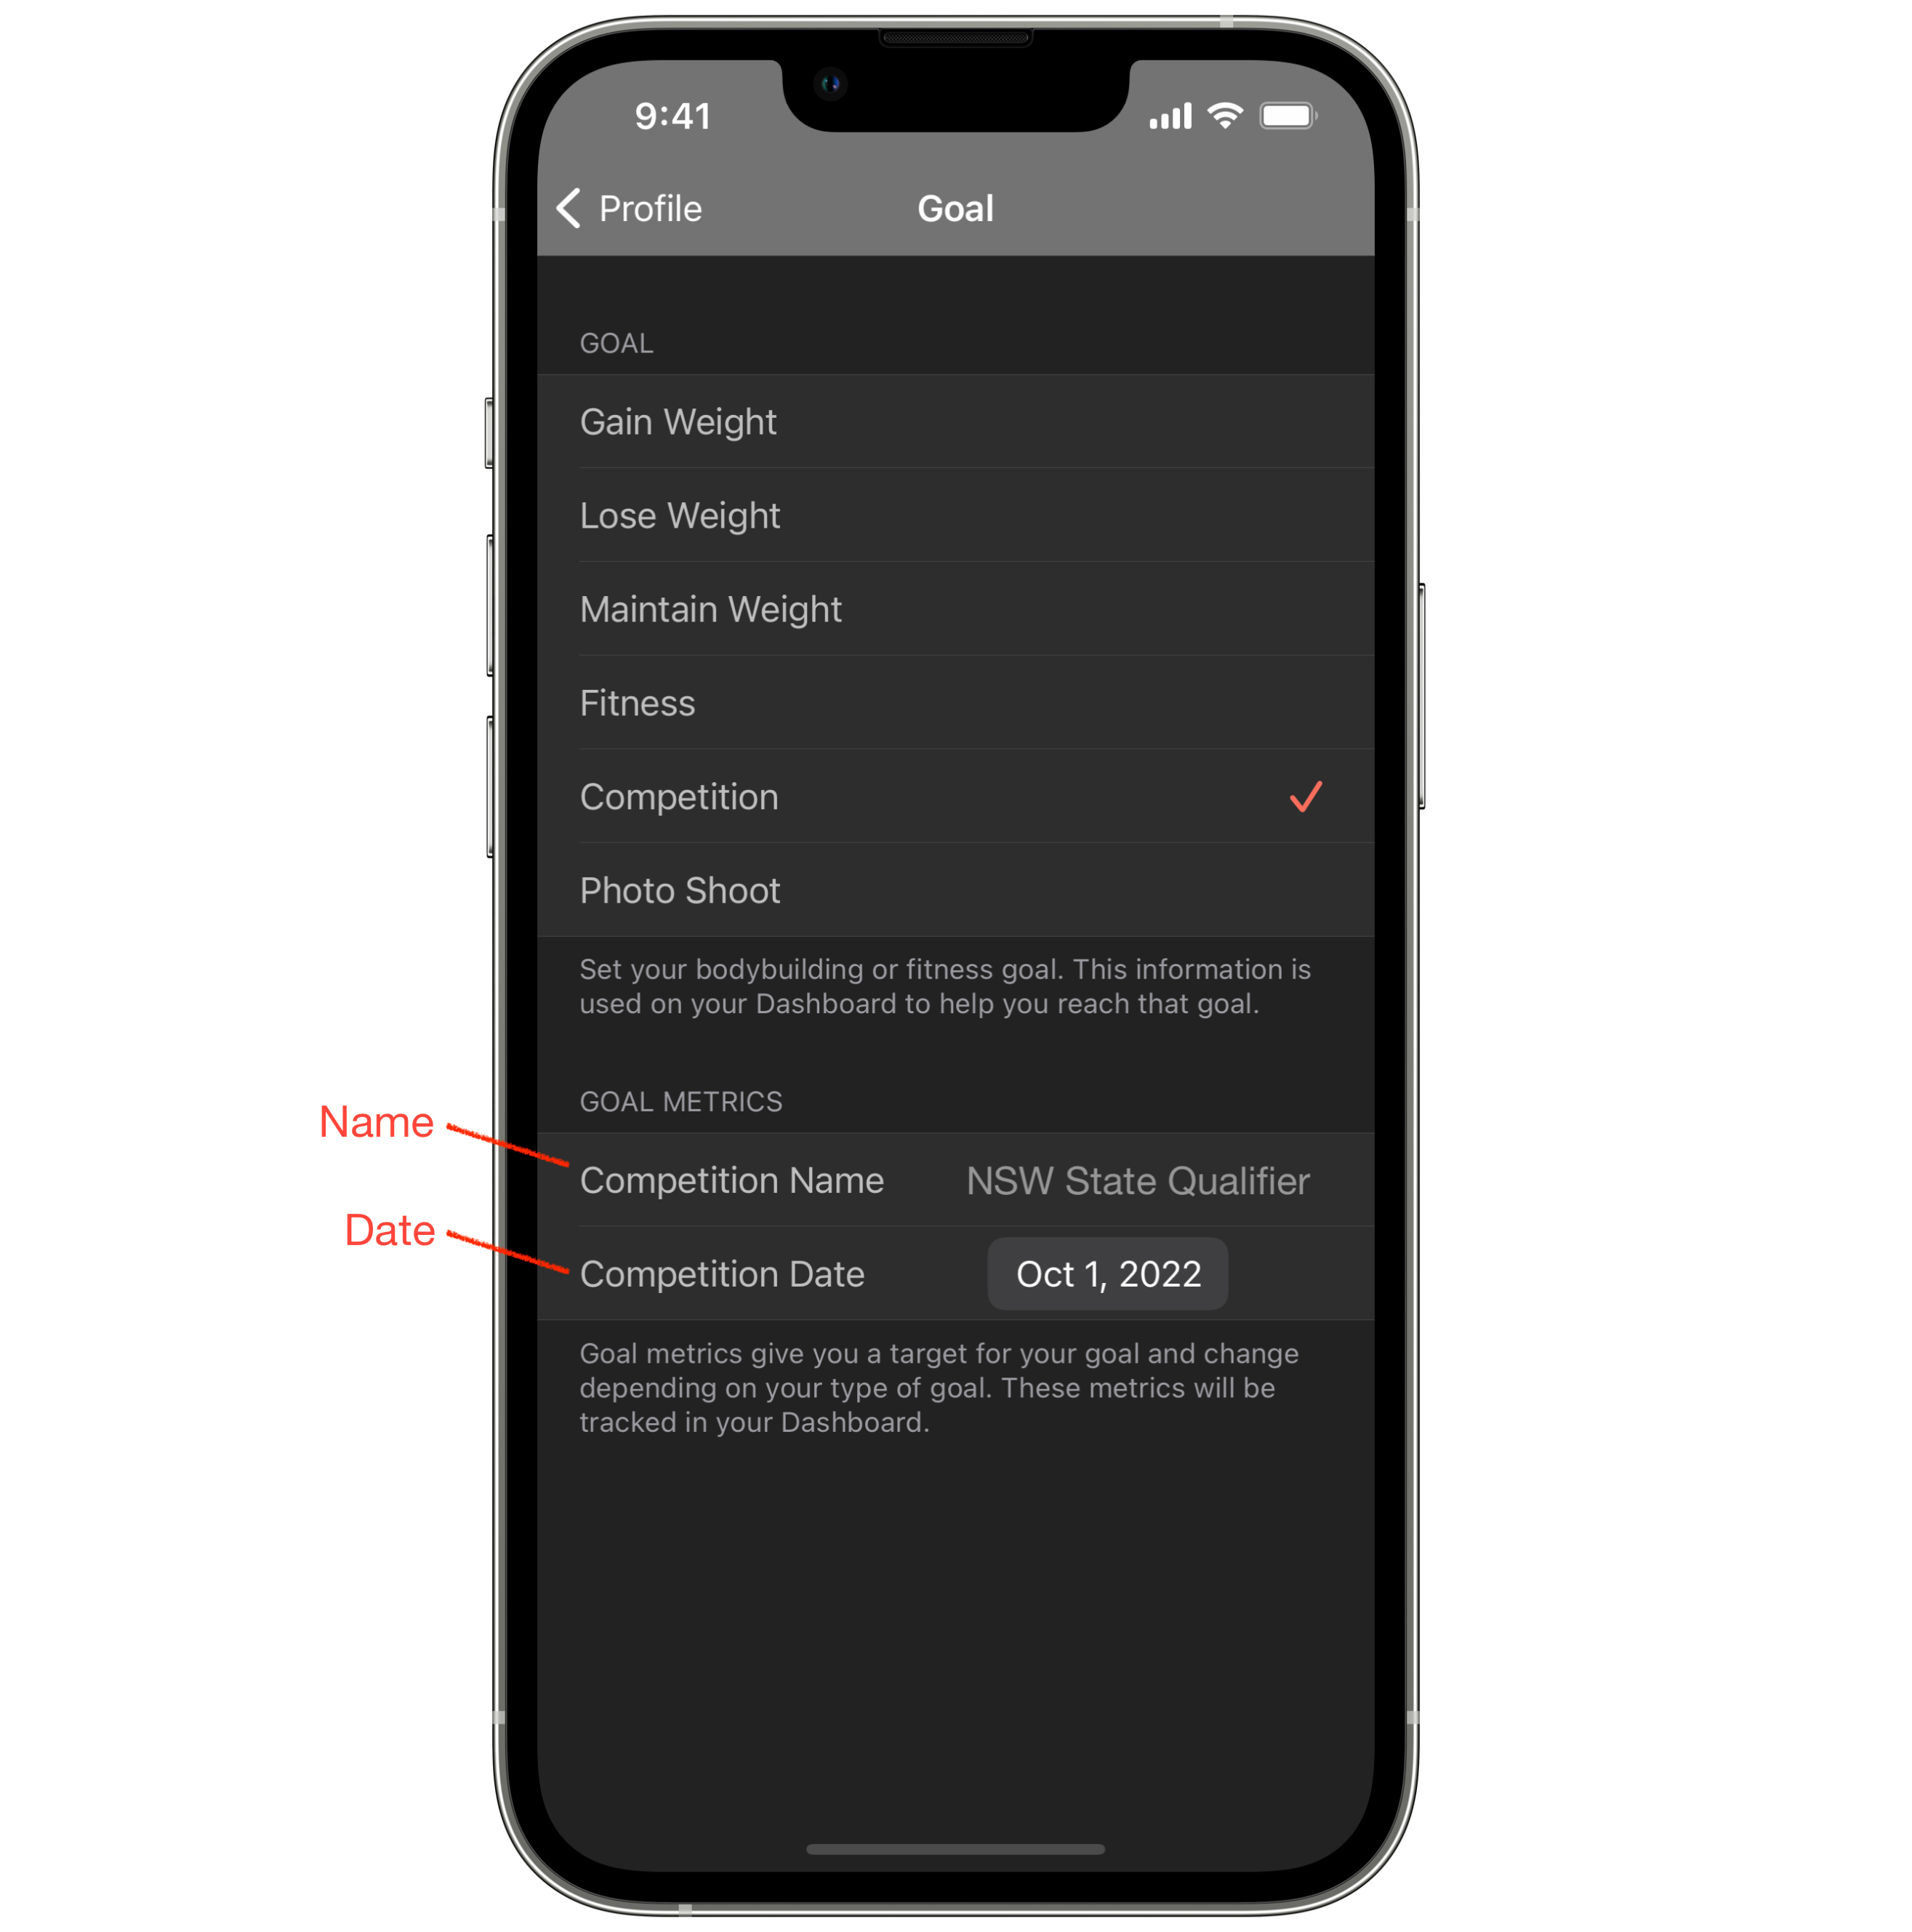
- Name - Only the competition goal has a name. This is to define the name of the competition which will show up in your Dashboard. Enter the name here.
- Date - The date of the competition or photo shoot. Enter it here. Your Dashboard will give you a countdown of how many days you are away from your goal.
Settings allows you to configure Grow specifically for you. You have control over the interface, the data you see, weight and measurement units and Grow also lets you import and export data. Let's run through what each setting does.
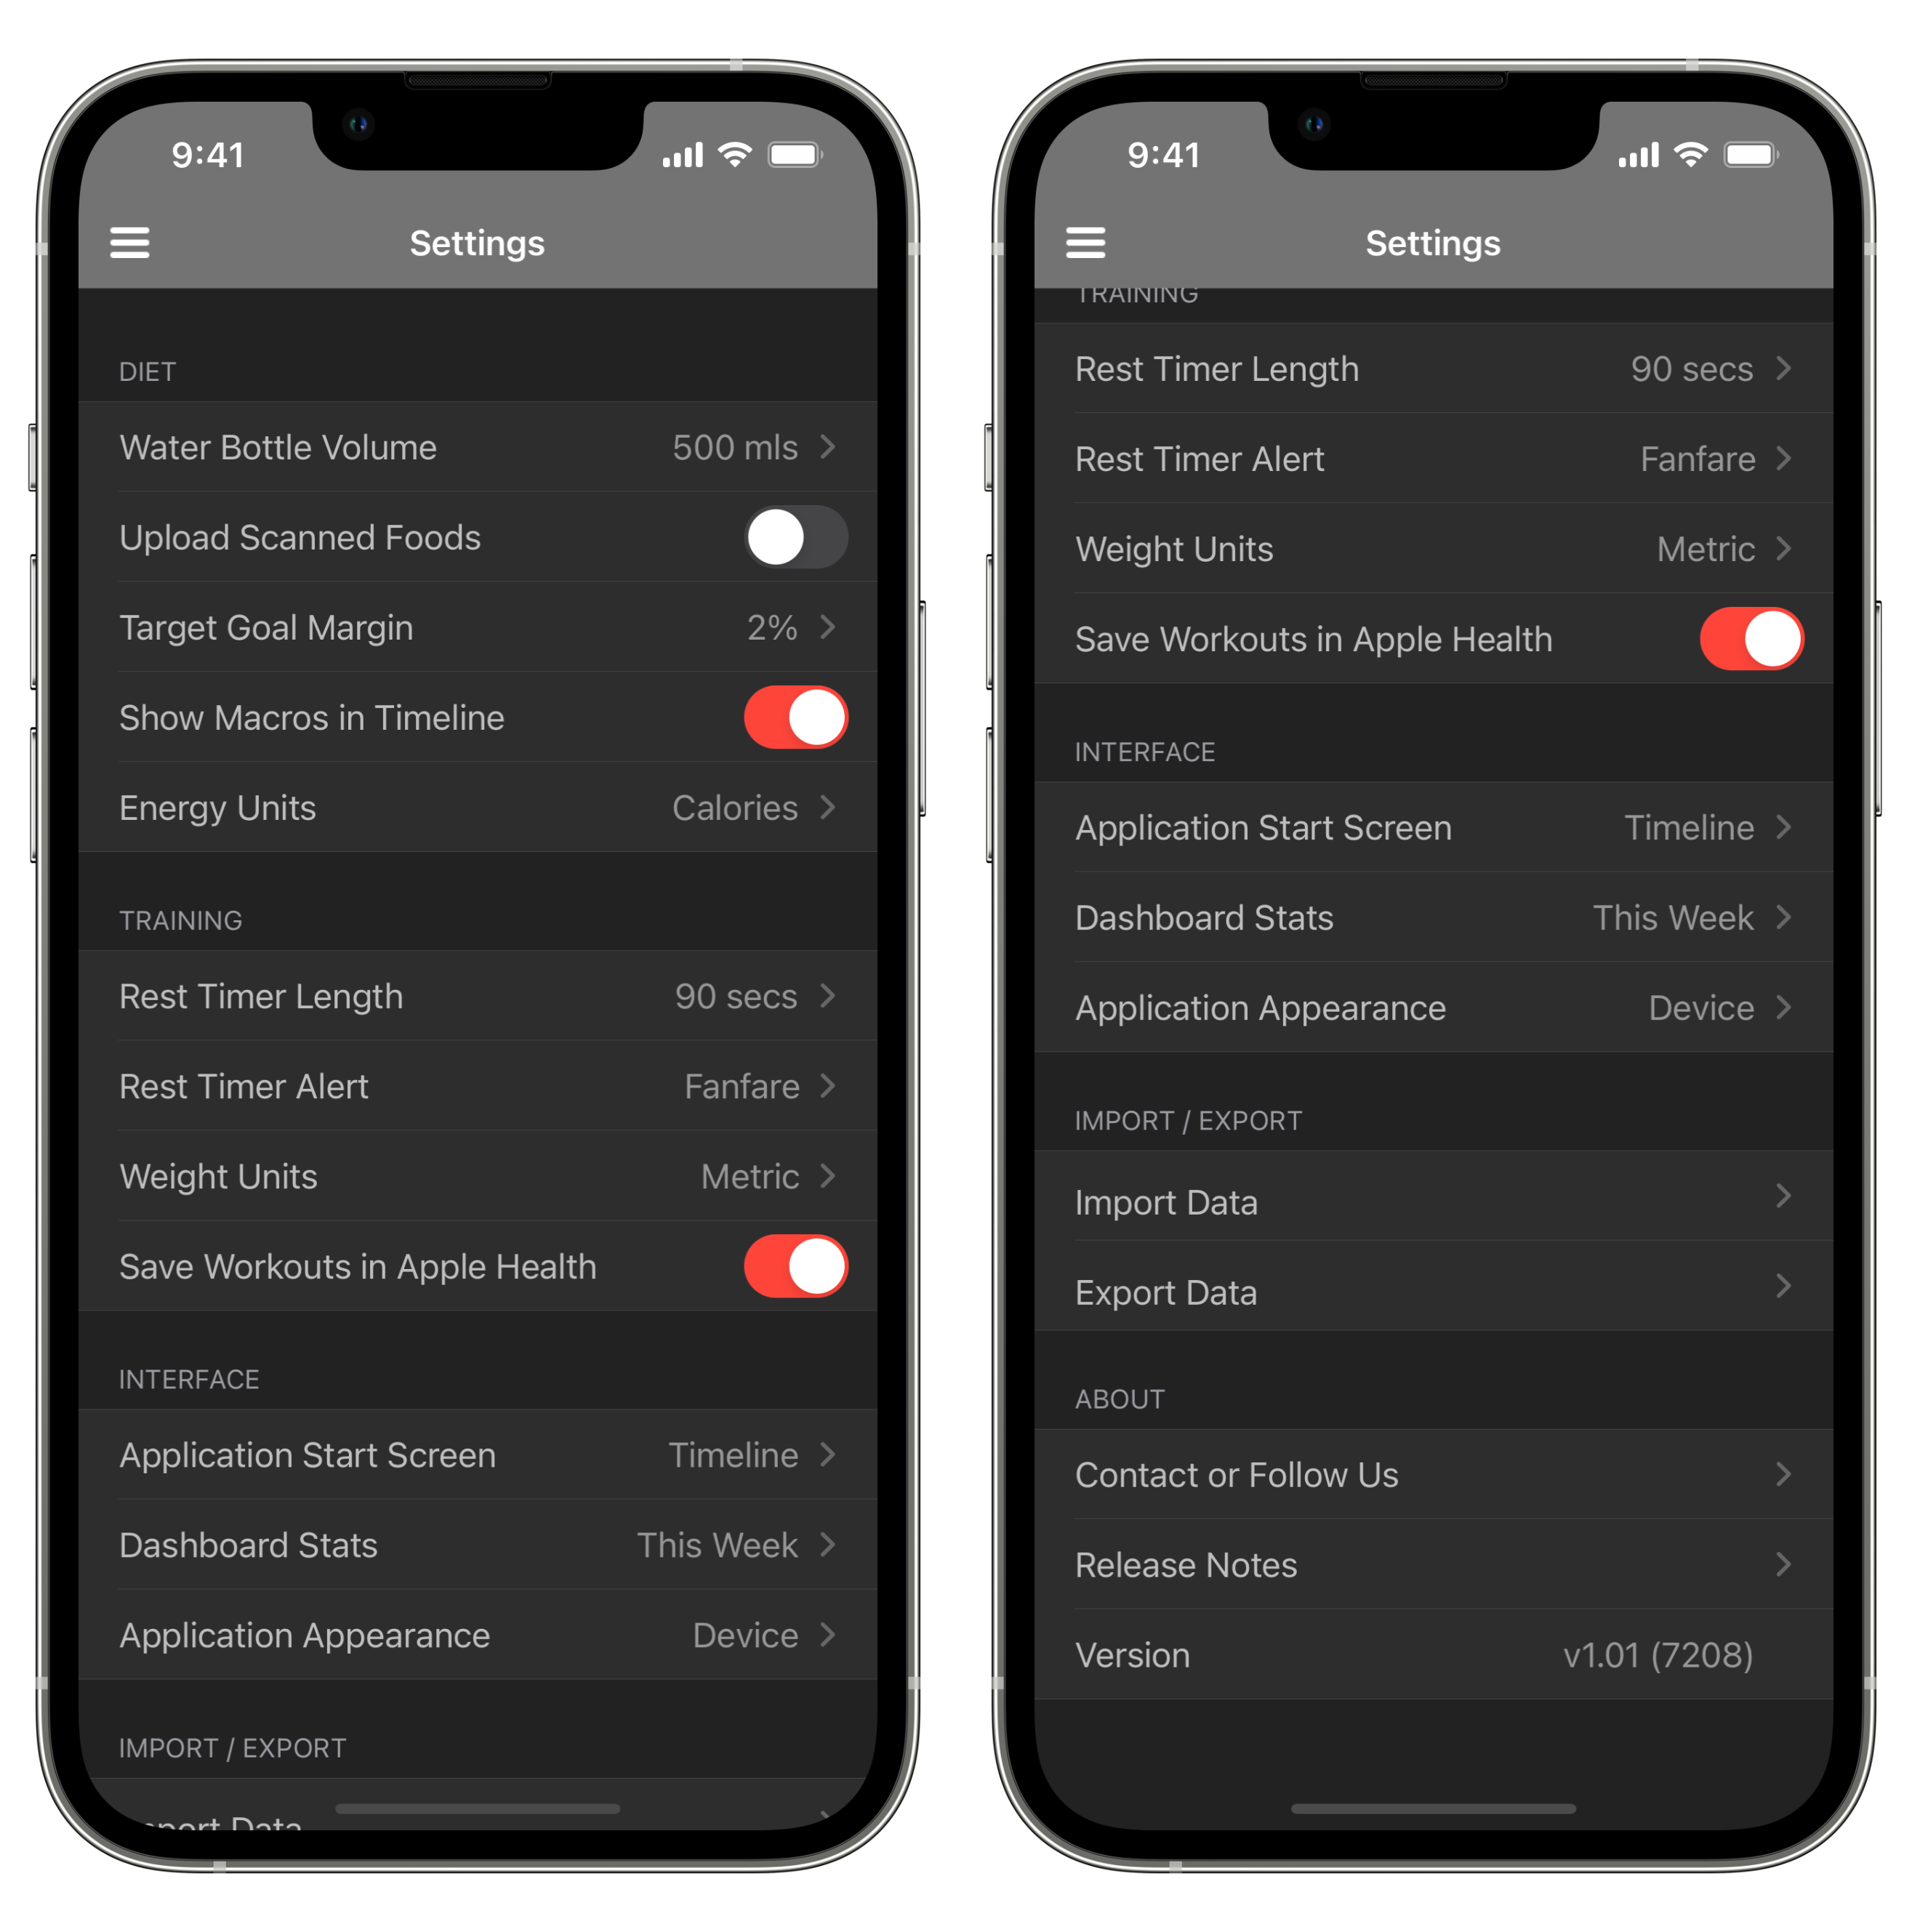
- Water Bottle Volume - To make water intake tracking easier, you can set your water bottle volume. So for example, if you have a water bottle you drink from all day that is 750 mls, you can set this to 750 mls and mark off each time you drink a bottle. Makes it easier than having to increment a counter each time.
- Upload Scanned Foods - Grow lets you scan in food using its barcode. To do this Grow uses the open source OpenFoodFacts online database. This database relies on people such as yourself adding to it over time. If set to on, when you scan a food and it doesn't exist in OpenFoodFacts, if you then enter the data yourself it will upload that data to the database. This helps others when they scan food so I recommend turning it on. Its off by default. Only the food information is uploaded. No information about you or your iPhone is uploaded.
- Target Goal Margin - In the timeline you will see progress lines for energy and macros. This setting tells Grow when to turn that bar red when you go over your targets. So for example, if set it to 2% and your goal was 100 gms of protein, it won't turn red until you go 2% past your goal ie. 102 gms, so you have a small buffer. This is purely a visual aid for you to help planning.
- Show Macros in Timeline - Next to meals in the timeline are the macros for the meal. You can turn these off here if you want a less cluttered timeline.
- Energy Units - Set tyour default energy units here, either calories or kilojoules. This sets the default across the app but you can still set these individually in foods. This setting will affect all charts, progress bars and reports, such as the top of timeline and your dashboard.
- Rest Timer Length - Grow provides a rest timer for workouts that you can use to make sure you don't rest too long between sets. The default is 90 seconds but can be set to whatever you want.
- Rest Timer Alert - This is the alert sound played when your time is up.
- Weight Units - This is the default weight units used in Grow, metric or imperial ie. kilograms or pounds. You can still set exercises and other tracking areas individually, but like energy units, it affects things like your dashboard and analysis reports.
- Save Workouts in Apple Health - Choose whether to save workout information in Apple Health. If you use an Apple Watch or other fitness tracker to track workouts I advise turning this off or you will have duplicates. All that is saved in Apple Health is the type of workout based on your exercise choice and the length. This is a limitation of what Apple allows an app to save to Apple Health so other data can't be saved at this time. Even workout length isn't counted towards activity rings, you need a separate device like an Apple Watch.
- Application Start Screen - You can choose which screen to show first when you start Grow, either your timeline or dashboard. When starting out, I recommend your timeline until you start to get everything planned. Once you are ready you can swap to Dashboard and run your day from there.
- Dashboard Stats - Dashboard statistics can be set to show either statistics from "This Week" ie. the week so far starting Monday, or "Last 7 Days" which is the seven days prior to today.
- Application Appearance - Choose either dark mode, light mode or device, which uses your device settings to choose the mode.
- Import Data - Allows you to import data into Grow. This is discussed more indepth on the Import and Export tab.
- Export Data - Allows you to export data out of Grow. This is discussed more indepth on the Import and Export tab.
- Contact or Follow Us - Links to the Grow website, social media accounts and also where you can send an email to the developer. If you have suggestions or requests, support requests or any questions in general, please contact us.
- Release Notes - Current and previous release notes for Grow.
- Version - Current version number. If you have support requests always include the version.
A critical part to any program is nutrition. To help plan and stay on track, Grow lets you track the foods that you eat. Foods are created and saved in My Inventory making them easy to add to your meals. Each food in My Inventory holds the following information which helps you plan your diet and track it.
- Name - The name of the food so you can easily find it in My Inventory and identify it in meals.
- Brand - The brand of the food, if it has one. Always add brands if you can as the same food in different brands can have dramatic differences in energy and/or macros.
- Category - The category the food fits into, for example, "meat" or "fruit and vegetables". This lets you filter by types of food when searching.
- Serving - If the food has a serving size on its nutritional label, use the serving name here. For example, a loaf of bread may have a serving size of "2 Slices" so you would use that name here.
- Serving Size - If a serving size is provided on a nutritional label, use the serving size here, for example, "65 grams". The nutrition label will usually tell you the nutritional content for "100 gms" as well. Where possible I advise using the serving size. This way you can add servings to meals or the same food by weight. Grow will automatically work out the weight of food by the provided serving size so you dont need to enter the 100 grams value as well.
- Energy - Energy the food provides, in either calories or kilojoules.
- Protein - Protein content in grams.
- Carbohydrates, Total - Total carbohydrate content in grams.
- Carbohydrates, Sugar - Sugar content in grams.
- Fat, Total - Total fat content in grams.
- Fat, Saturated - Saturated fat content in grams.
- Fibre - Fibre content content in grams.
Grow supports four main ways to import and create foods:
- Import from Built-In Database - Grow has a built-in database of foods that have been hand curated by the developer to ensure they are all accurate and correct. You can import these during app onboarding or at any time from My Inventory or Settings.
- Import from CSV - If you have a list of foods in an Excel or other spreadsheet you can import them. So if you want to take foods from another app or from and online source, you can. This is also an excellent method of sharing foods with friends or clients. You can export your own foods from Grow, pass to someone else and they can import them.
- Scan from Barcode - Grow uses the open source OpenFoodFacts database so you can scan barcodes to enter foods faster.
- Enter Manually - Finally you can enter foods manually. Great for entering direct from nutrition labels or the many online sites for looking up foods in your specific country.
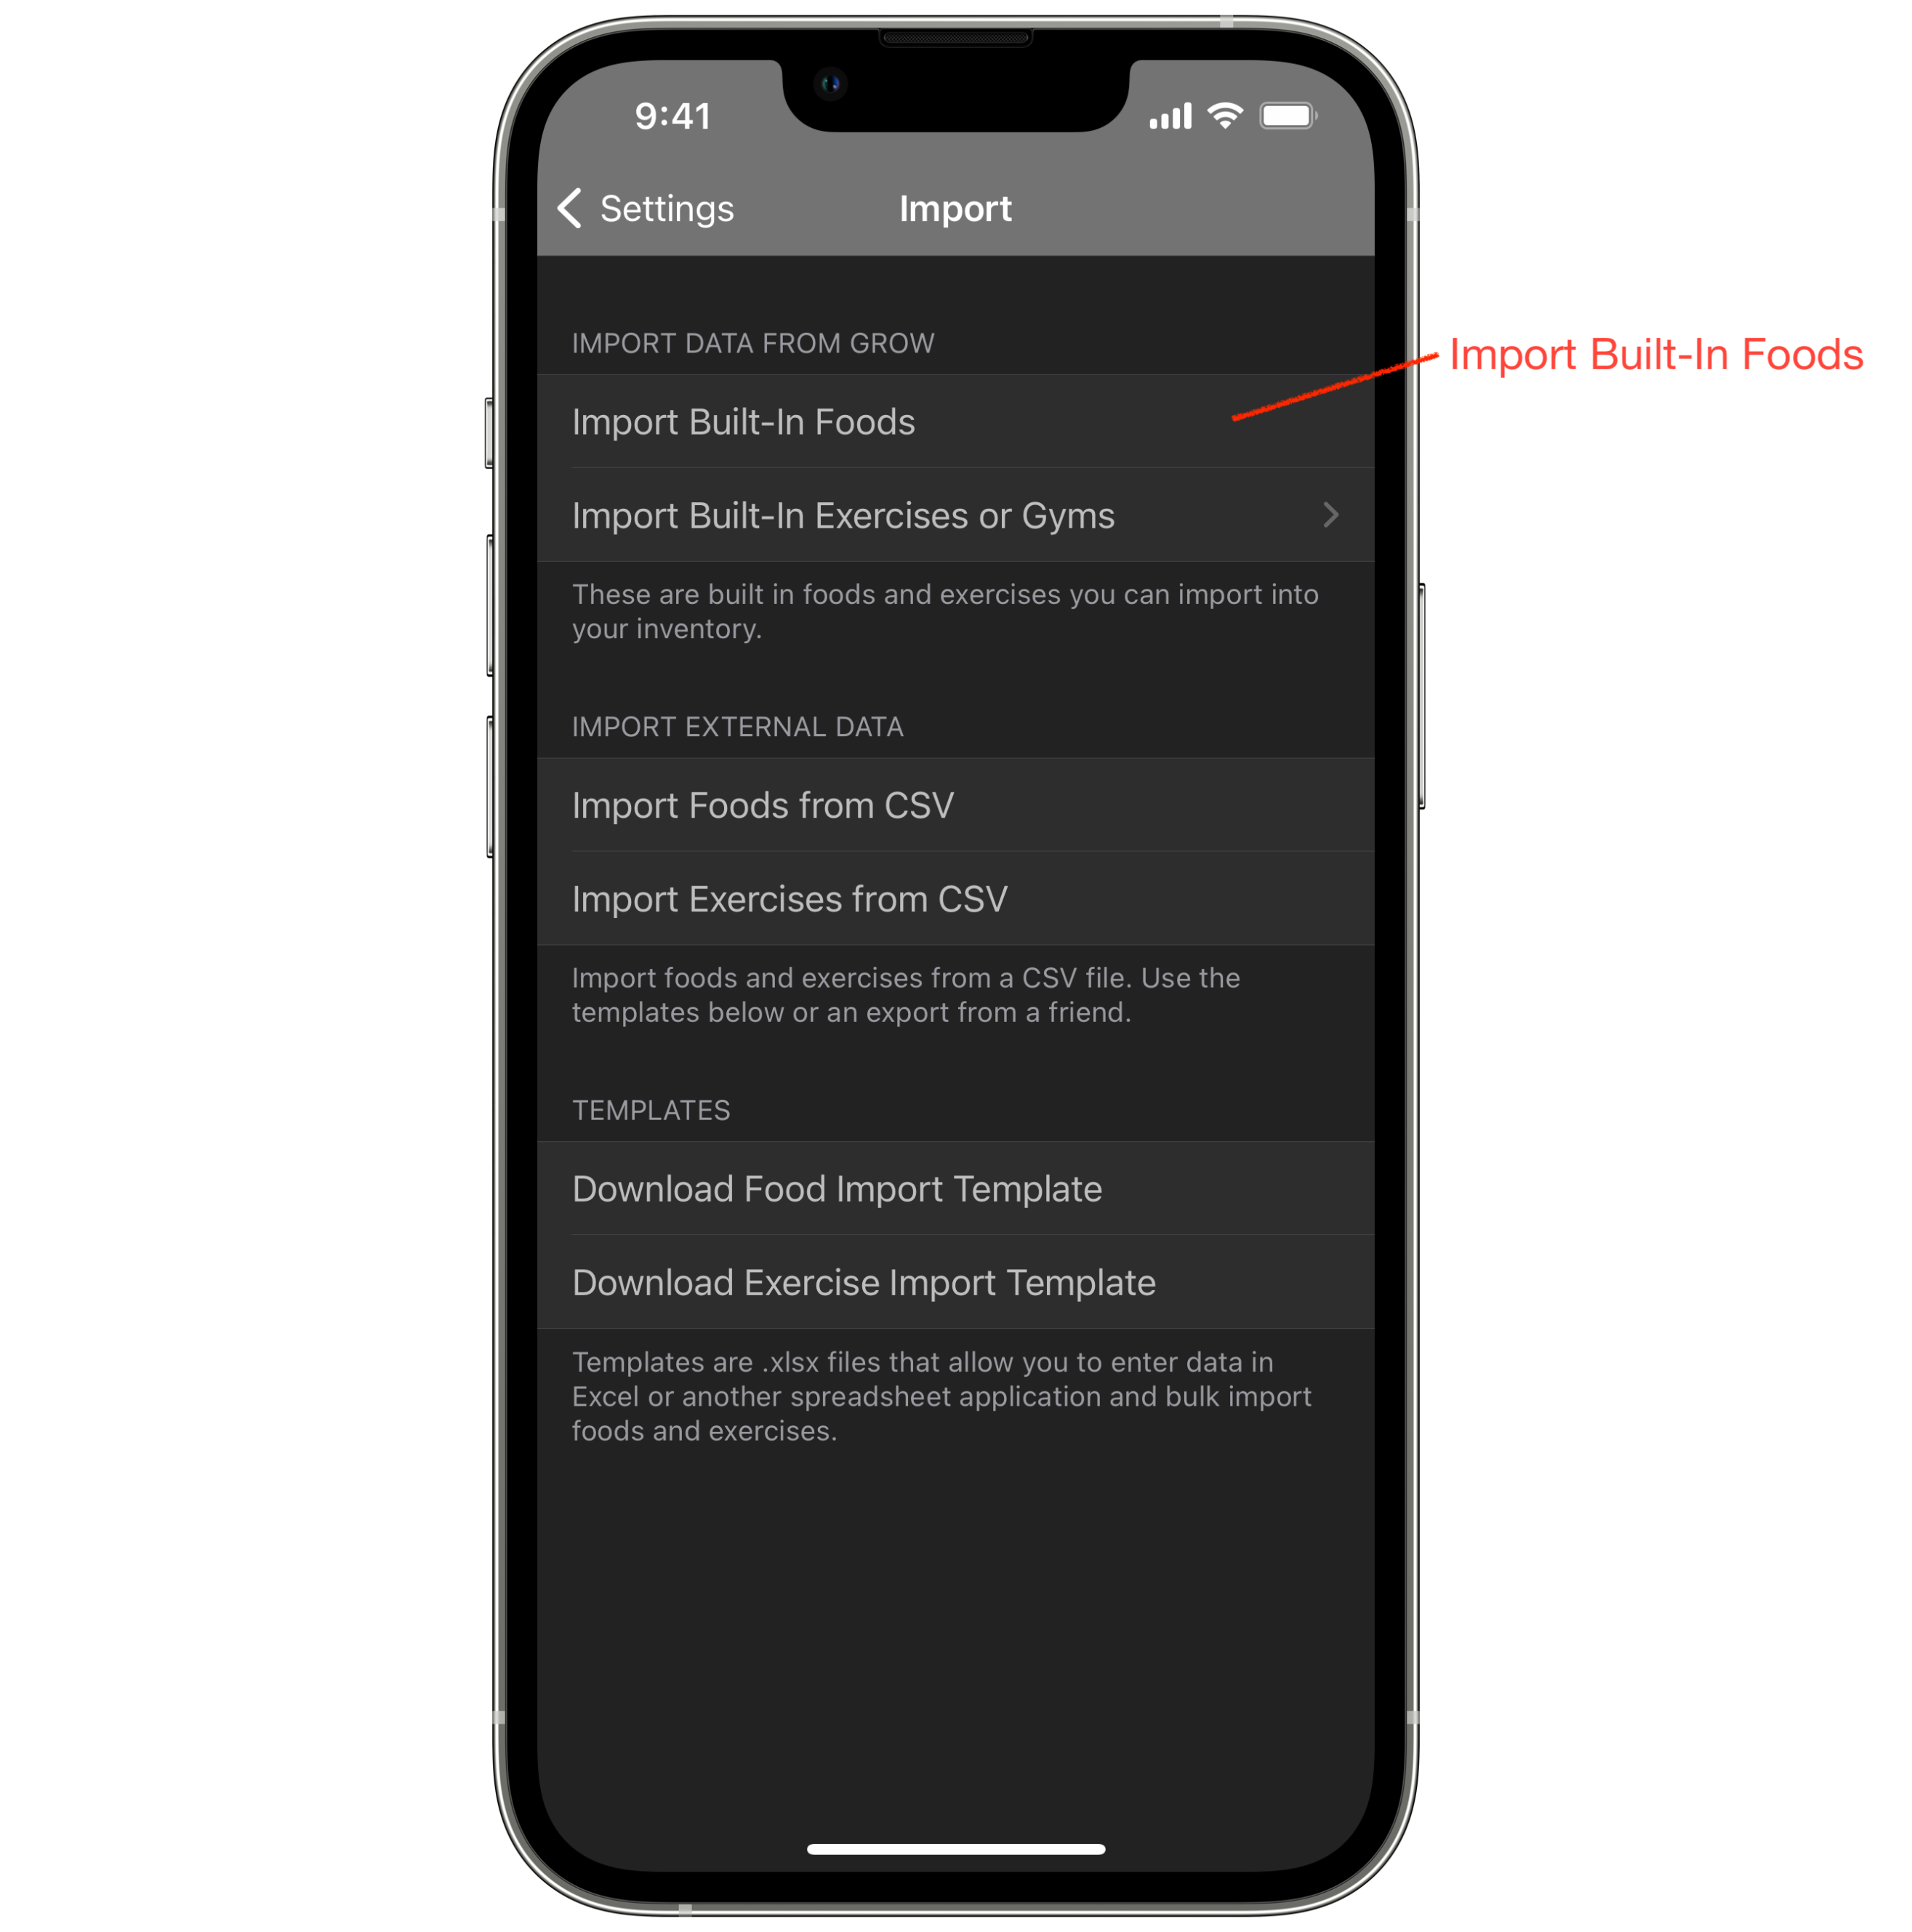
Import from Built-In Database
Grow provides a built in database of food to get you started. Aiming to make your life as easy as possible and not clutter the app with things you don't need, the foods section in My Inventory is empty when you download Grow and you will fill it with only the foods you need when you first start the app. You will be presented with the database of foods and you select which foods you want to import into My Inventory. You can always go back later and import more if needed. This way you just have what you need and not a database of thousands of foods you will never use.
To import built-in foods, go to Grow's Settings, then to Import Data. From the Import screen select "Import Built-In Foods" marked in red below.
You will be presented with a list of all available foods Grow has and can select all or individually choose which foods you want to import. Each food shows name, brand (if it has one), serving size or 100gms, how many calories or kilojoules per serving.
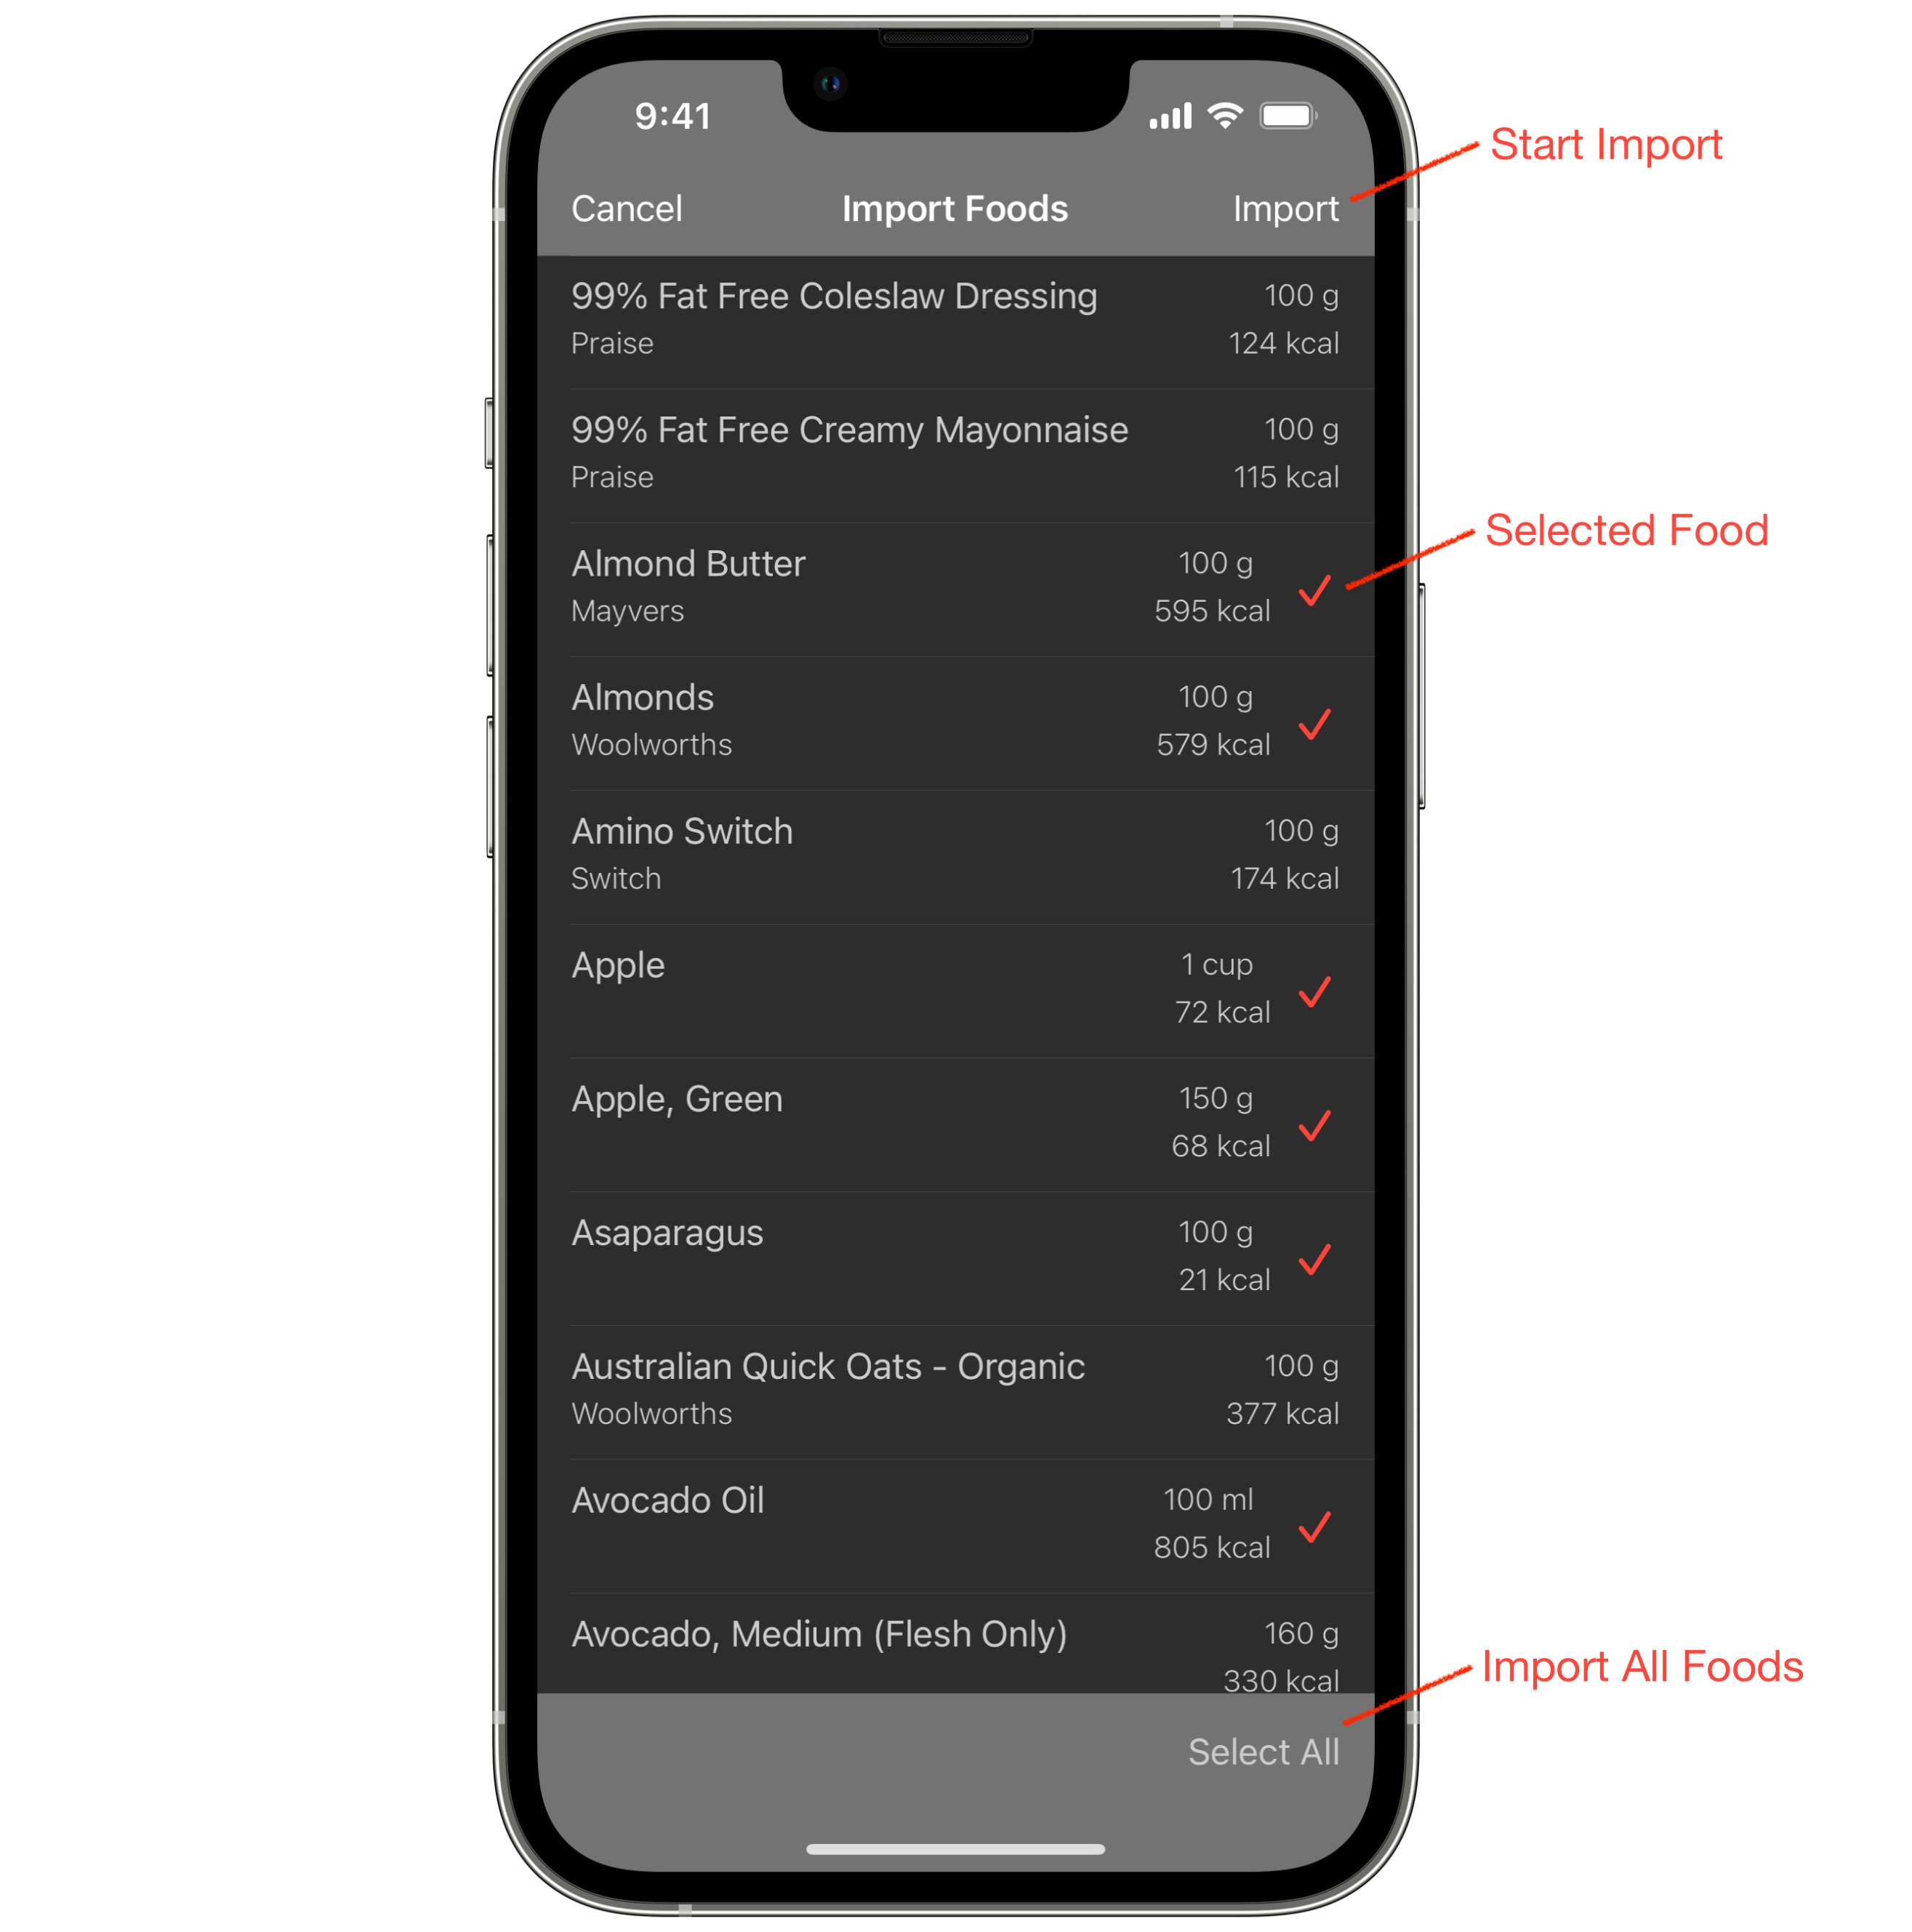
- Start Import - Once you have selected the foods you want to add to My Inventory, the import button top right will start the import.
- Selected Food - Foods selected for import will have a checkmark next to them.
- Select All - The Select All button will select all foods for import.
Import from CSV
If you have foods in an Excel spreadsheet you can import it into Grow. So if you are using another app or you have been tracking your nutrition manually in a spreadsheet, you can add foods this way. A couple of things to note. The spreadsheet must be saved as a CSV file. Any spreadsheet program will do this, such as Excel or Apple Numbers. You also need to have the data layed out in a specific way so Grow can import it correctly. On the import page you can download the template to use. It is provided in a zip file along with a text file that explains what each field is. It's very easy to use. To import a CSV file go to Grow's Settings, then to Import Data. Select "Import Foods from CSV" marked in red below and you will be asked to select your CSV file. You can select a file from iCloud, other cloud service you have set up on your iPhone, or from a file saved in Files on your iPhone. Once selected Grow will import the file and let you know how many foods were created.
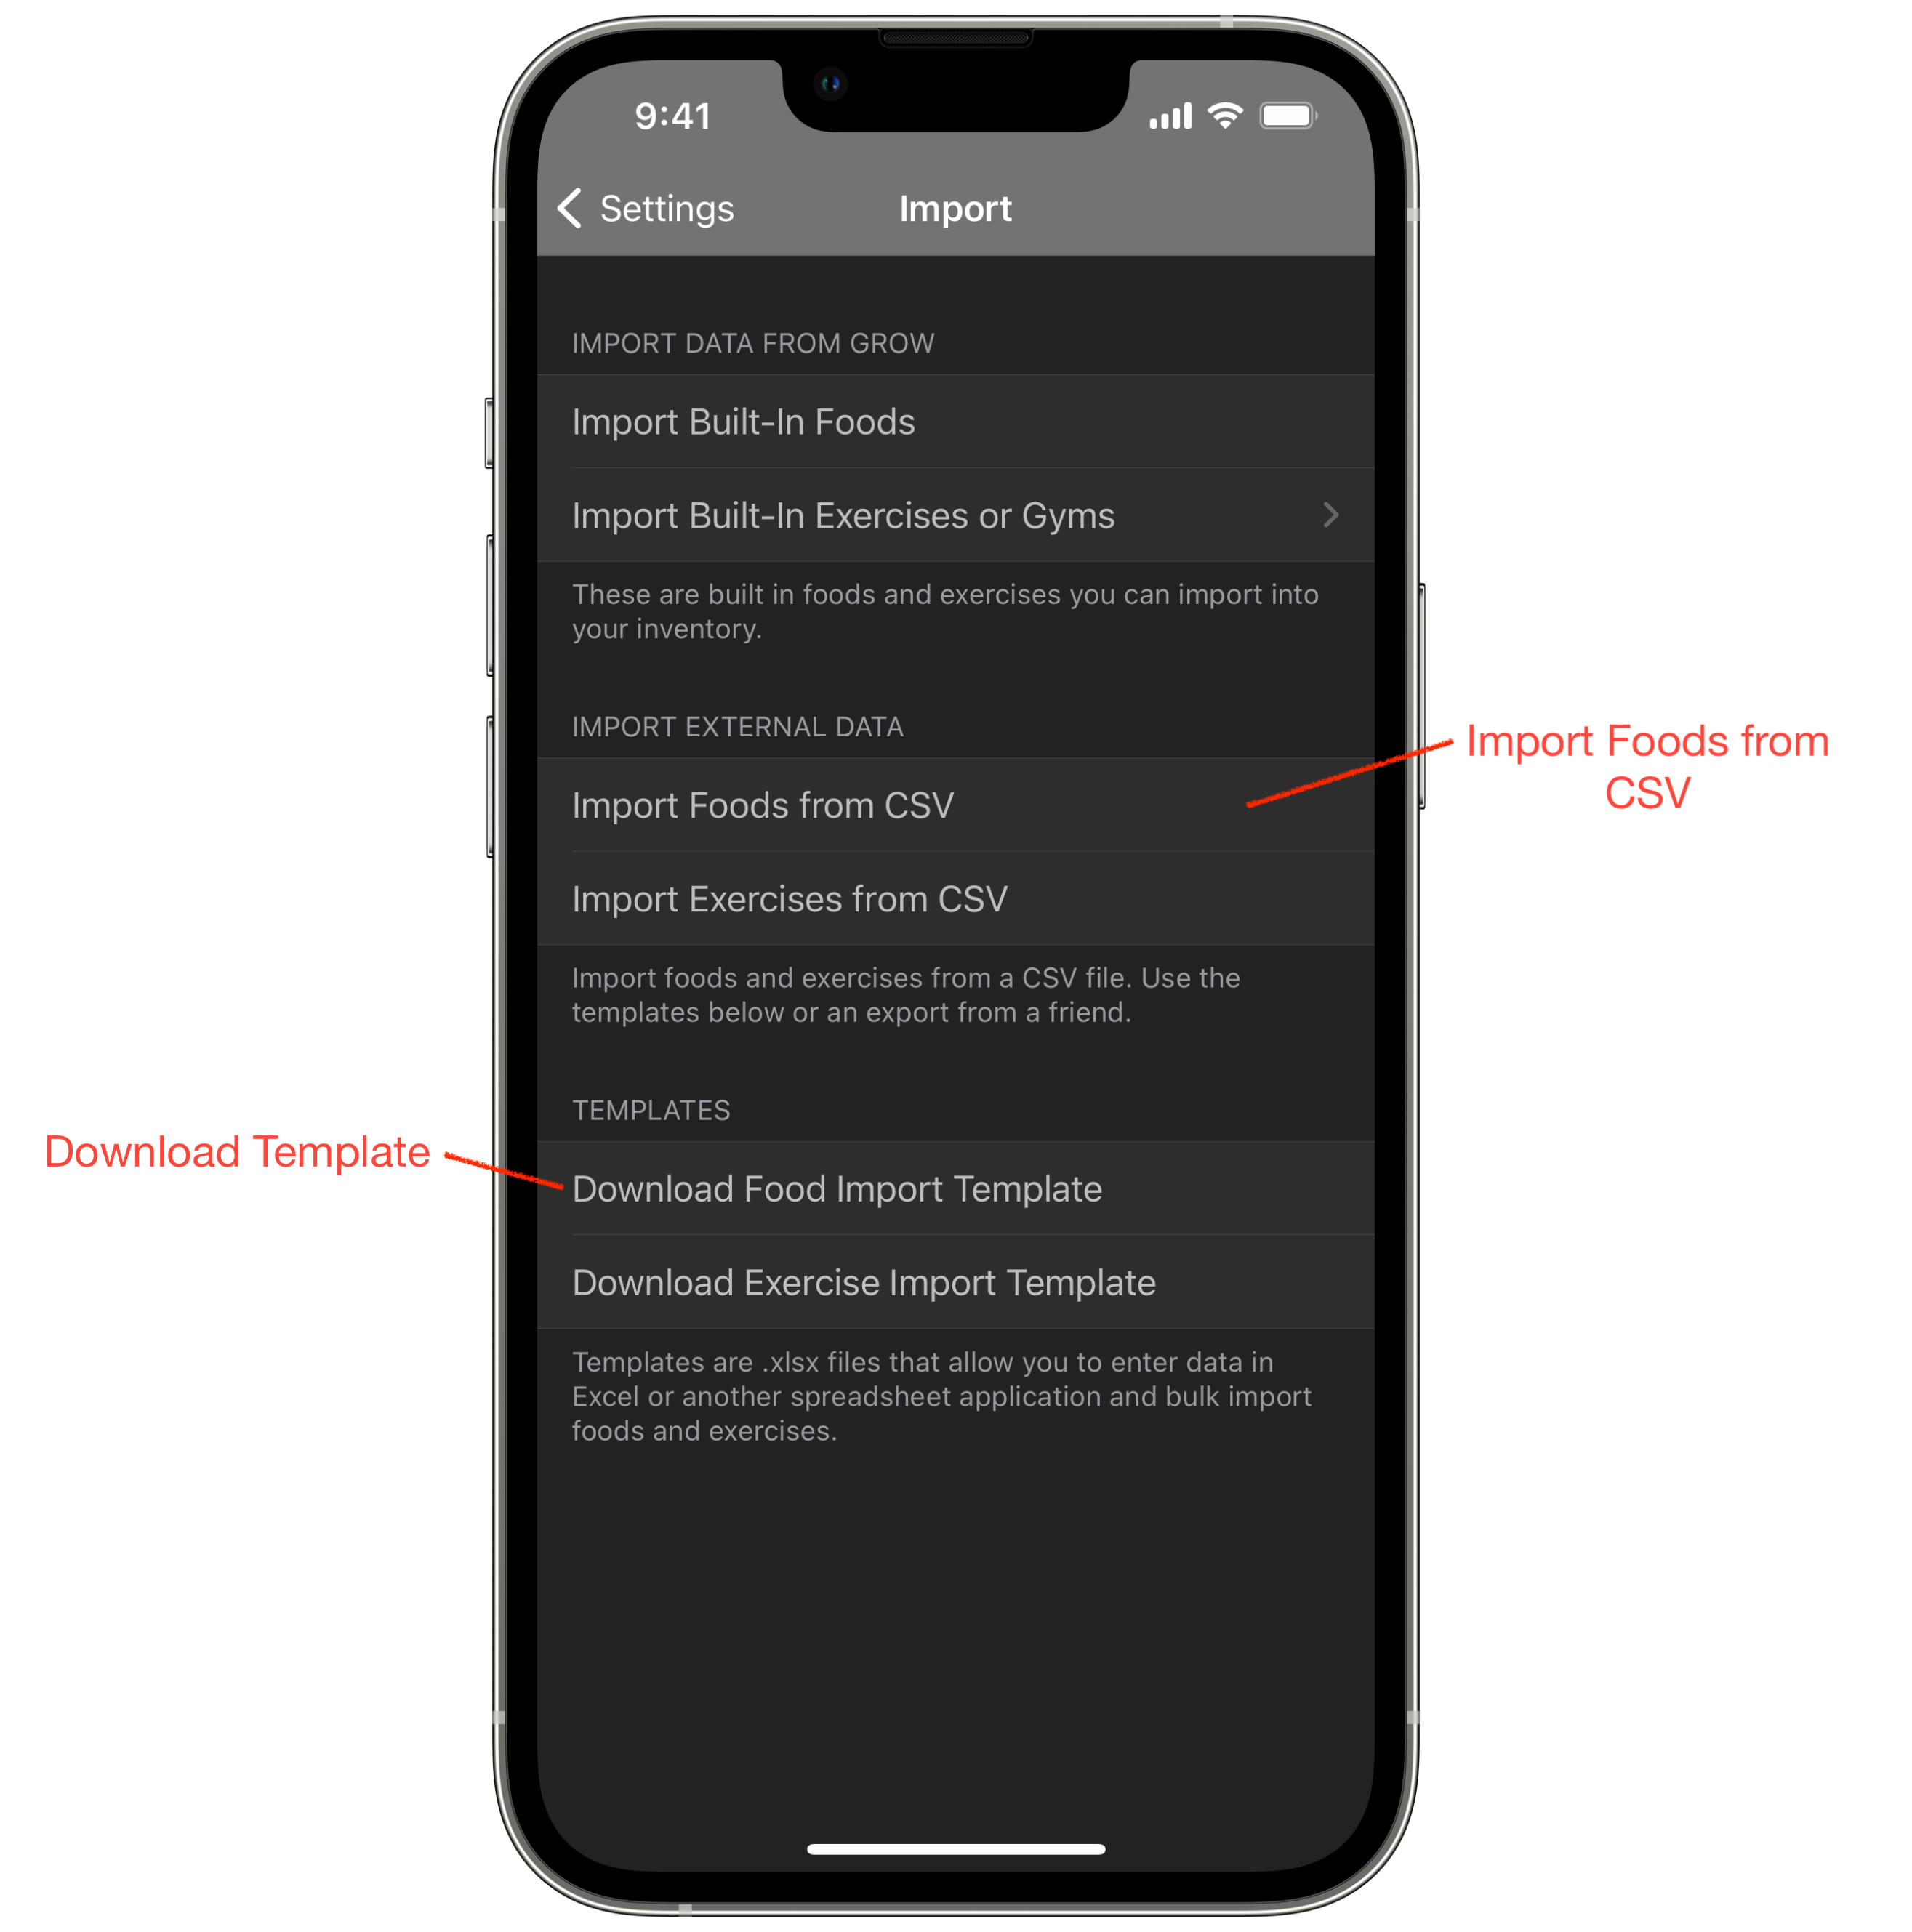
- Import Foods from CSV - Will open up a file chooser so you can select your CSV file for importing.
- Download Template - Will download a template containing a template spreadsheet and a text file explaining how to use the template and what all the fields mean.
Scan from Barcode
Foods can be scanned in from My Inventory by touching the barcode button on the bottom right of the screen.
The first time you attempt to scan a barcode, your iPhone will request access to your Camera as it needs the camera to scan the barcode. Hold your camera over the barcode. Grow will scan the barcode, look up OpenFoodFacts and if a food exists, will create a new food and populate the data for you. If the food does not exist you will be asked to enter the details manually. If you have turned on "Upload Scanned Foods" in Settings when you enter the food details it will upload the data to OpenFoodFacts. I highly suggest turning this on so the next Grow user that scans the same food won't have to enter it manually. The more of us that contribute the easier our food additions will be.
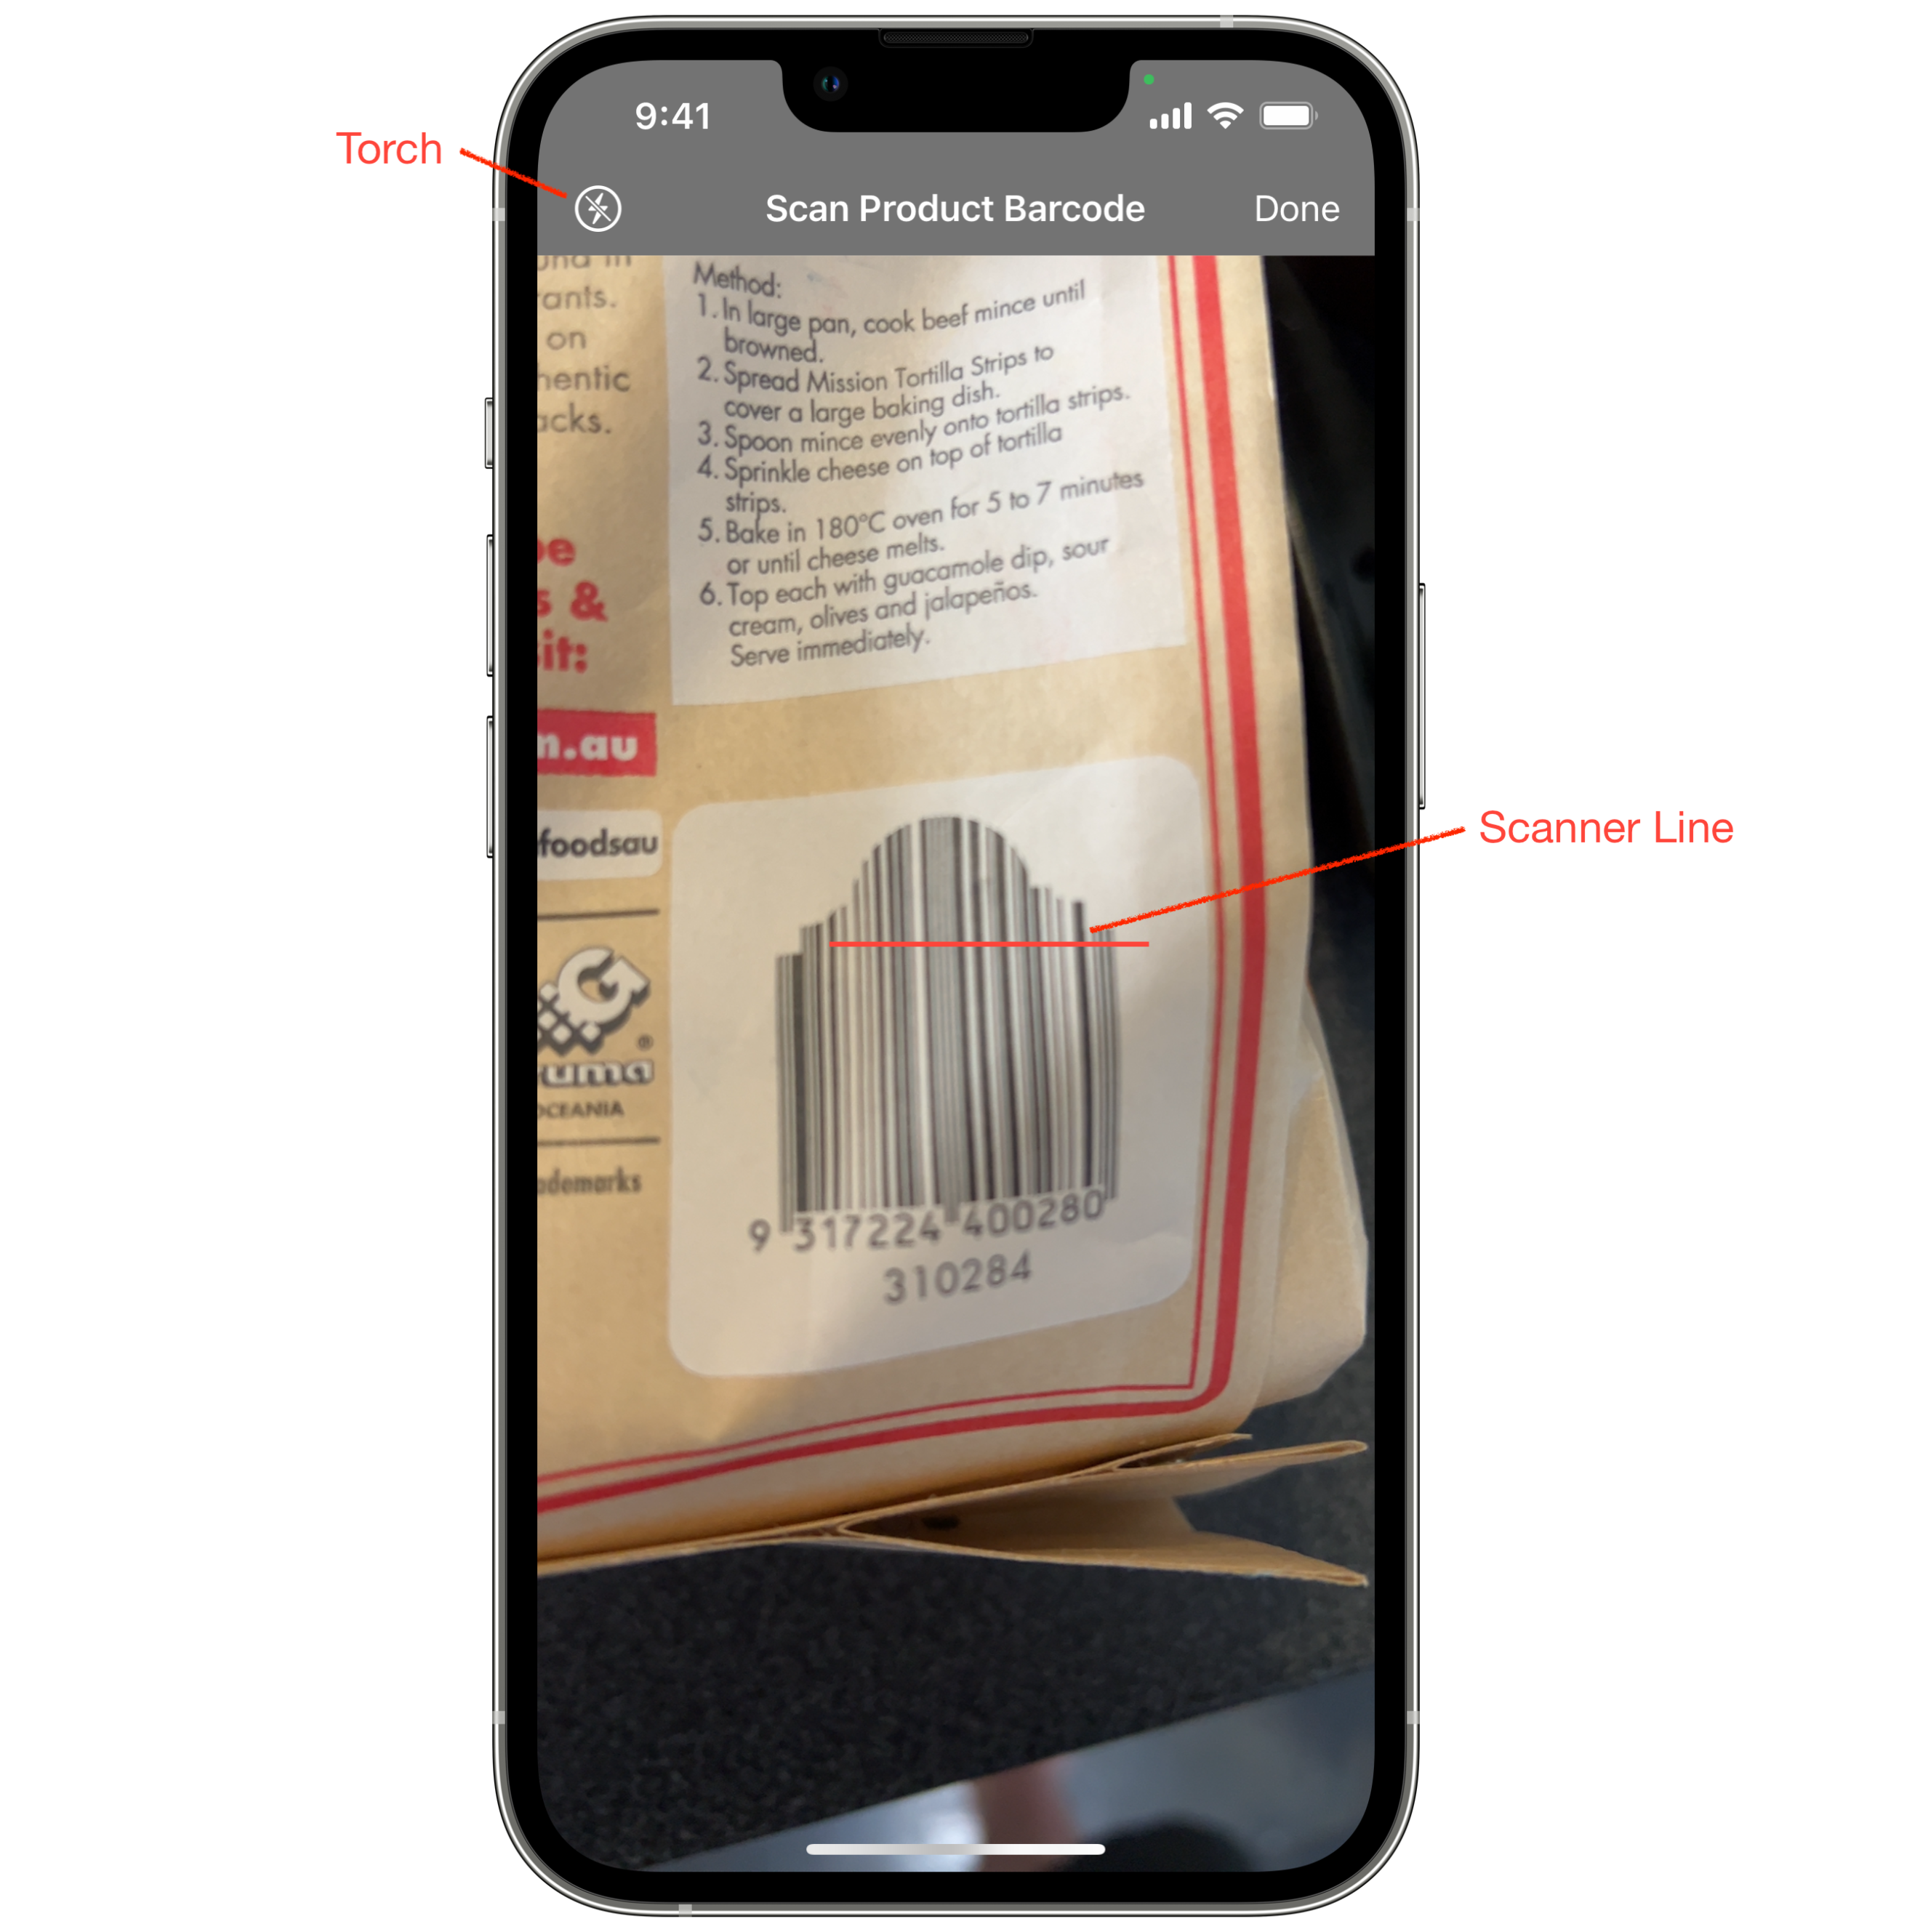
- Torch - You can use the torch button to turn on your camera's flash as a torch to light up the barcode in dimly lit areas. The torch is set quite low to reduce reflection from packages but will be enough to view the barcode.
- Scanner Line - You will see Grow run a red scanner line over the barcode when it is scanning so you know its working.
Once scanned, if a food is found you will be presented with a new food populated from the data in OpenFoodFacts, like the screenshot below. Please note that OpenFoodFacts is an open source database that relies on contributions of food data by people like you. As such, you will find foods that have been entered incorrectly or are missing data. Grow works on the premise of making sure you have only the data you need but ensuring that data is accurate. Therefore foods are not downloaded and added automatically as you could end up with incorrect data in My Inventory that impacts your goals. The imported food is first presented to you to check. I highly advise checking what has been entered against the nutrition label you scanned. You can then either save or cancel the food creation. If the data is incorrect, you can change any field in the food in front of you and save it with the correct data.

Enter Manually
The final method for entering food is manually. You can create a new food any time from My Inventory by selecting the plus/add button at the bottom of the screen. You will be presented with an empty food ready for filling in. Just a couple of things to note.
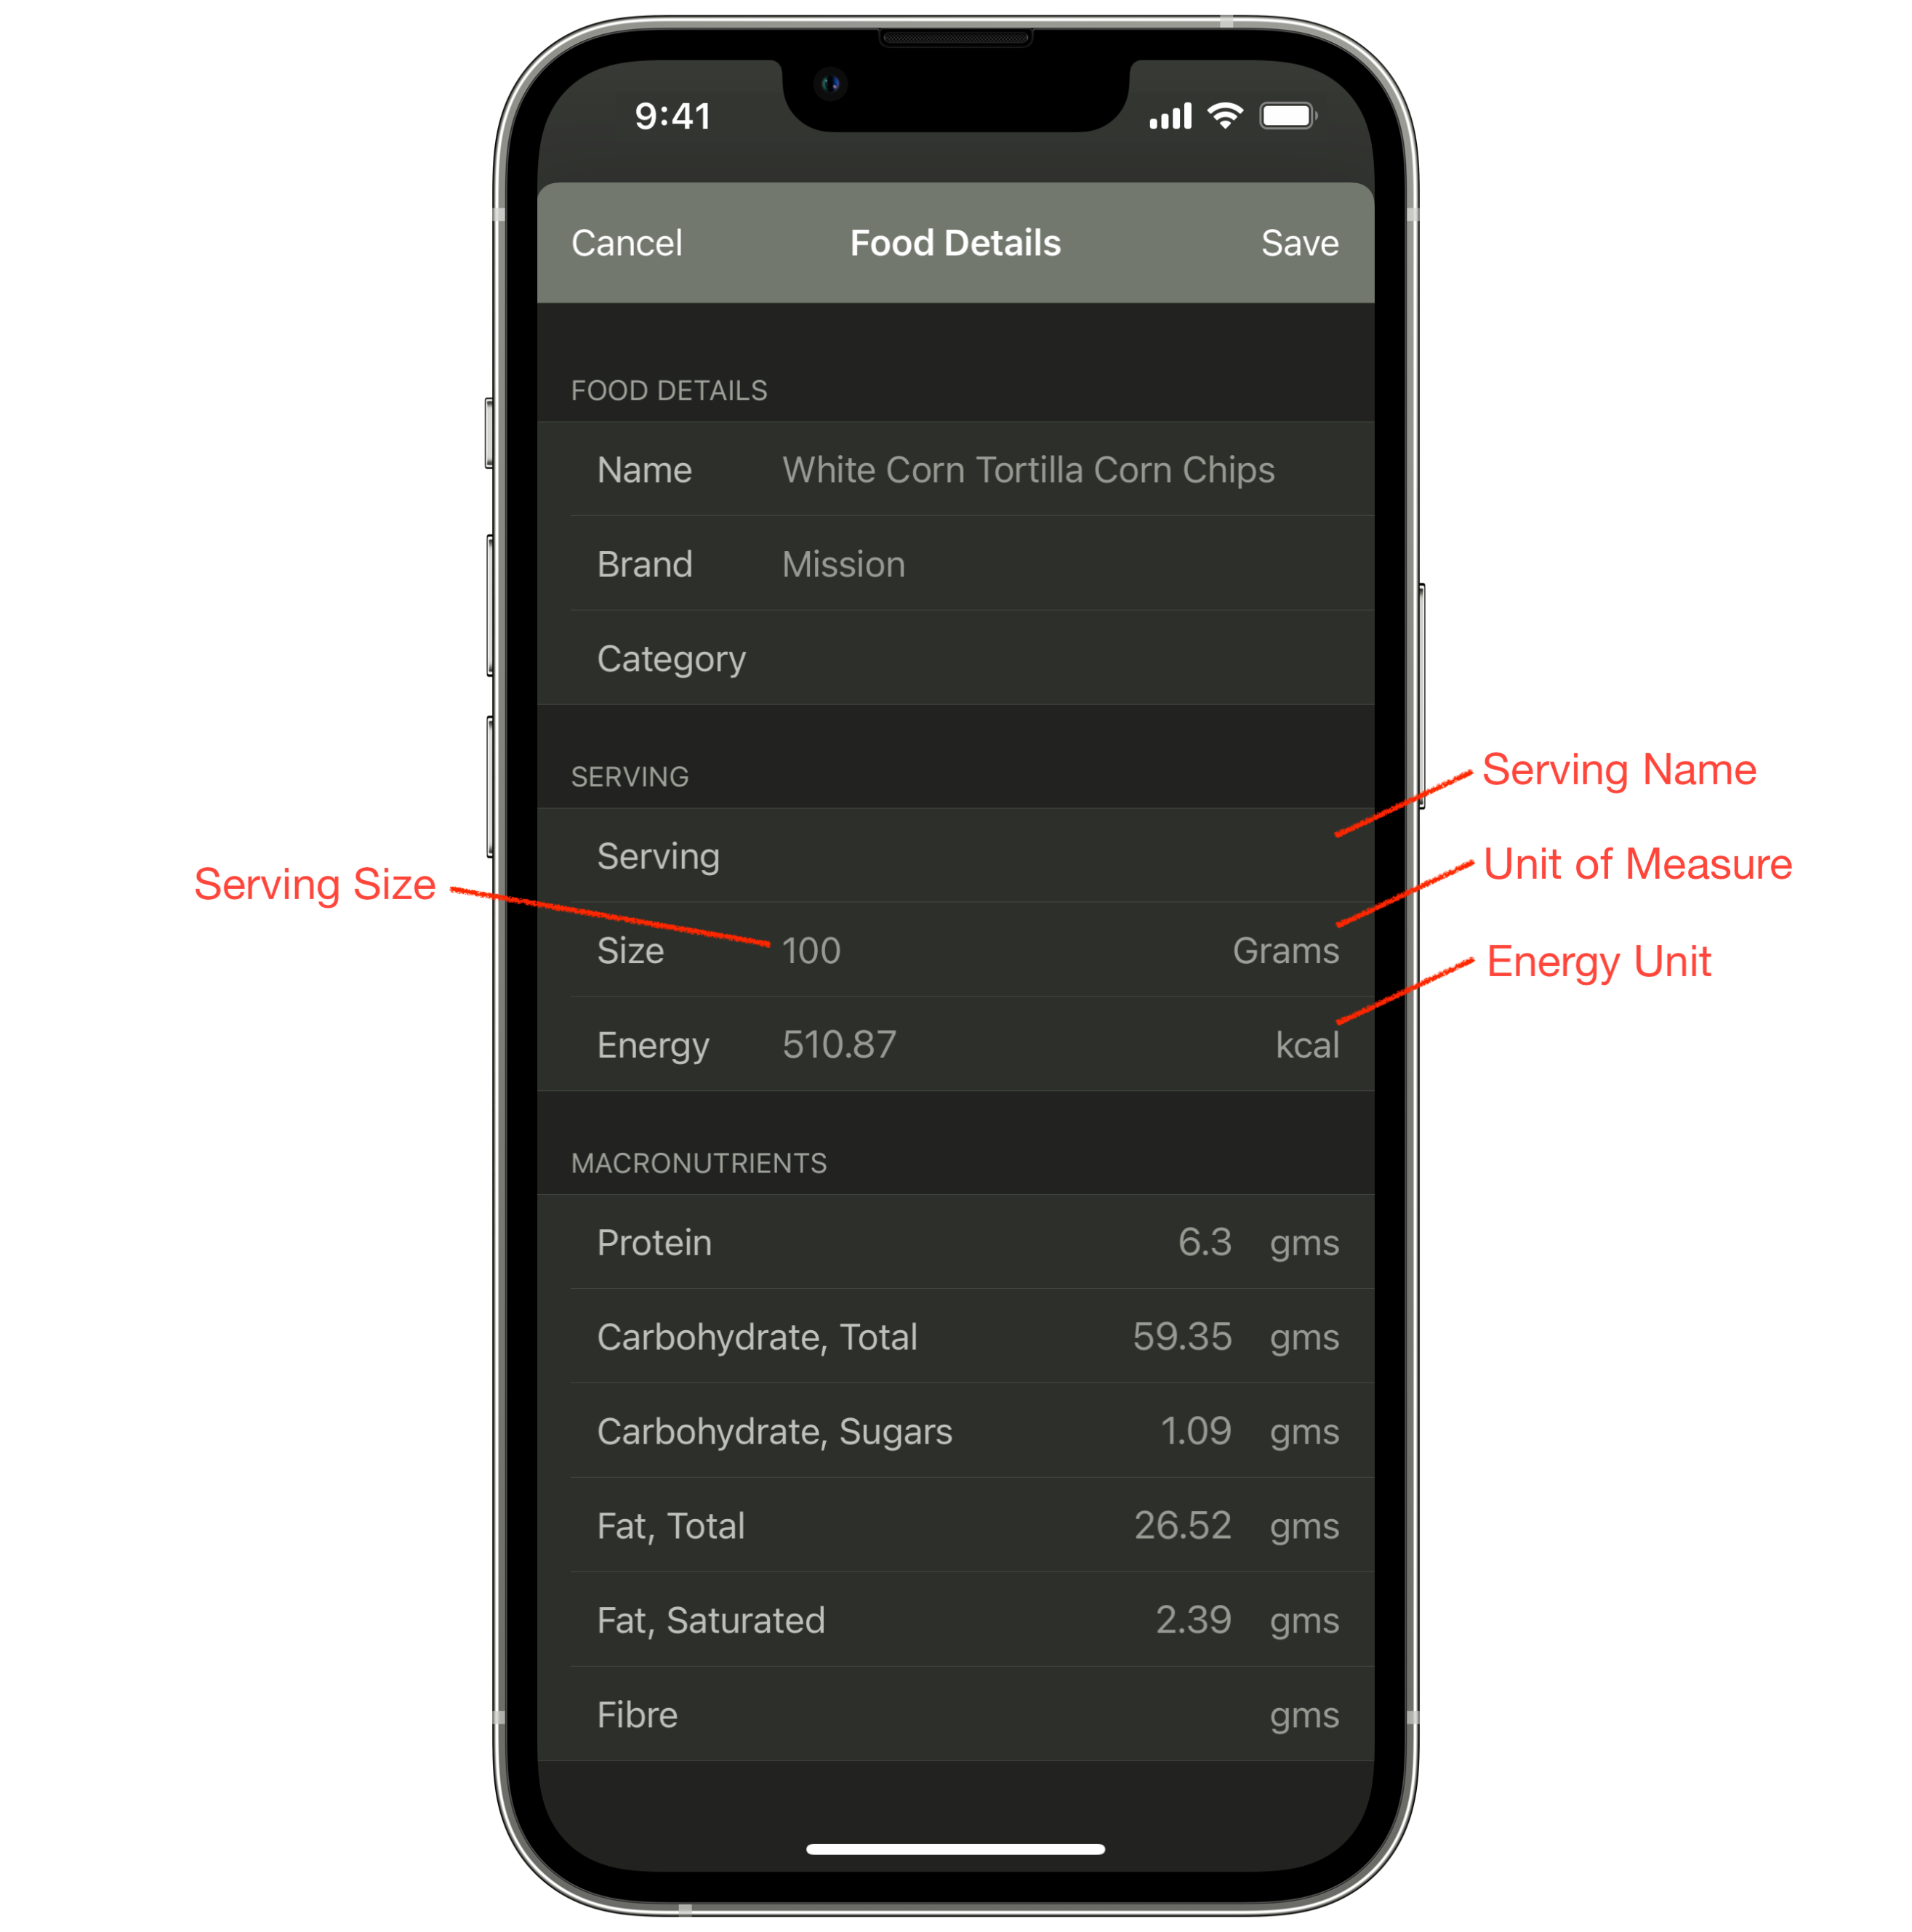
- Serving Name - The Serving label is the serving name. As discussed above, use a serving if possible as this will then let you add foods as servings or as weight. If you choose to use 100 grams or another weight like the screenshot above, you will not be able to add a serving, only weight.
- Serving Size - This is the size of the serving if using a serving, or if using weight, the weight goes here.
- Unit of Measure - The unit of measure is the units used for serving size or weight. In the example above grams are used but for a liquid food it could be millilitres or fluid ounces. If you touch the unit of measure label you will be presented with various units to choose from.
- Energy Unit - By default all new foods are set to the energy units chosen in Settings, so either calories or kilojoules. As a lot of foods only show one or the other, and it may not be what you track your food in, touching the energy unit label will switch from calories to kilojoules and vice versa. When switching it will also convert the energy to the other energy unit. This will save you a lot of time with conversions. So for example, if you track all your food in calories but the nutrition label only shows kilojoules, touch the energy unit label to change to kilojoules, enter the kilojoules from the nutrition label, and touch the energy unit label to switch back to calories. The kilojoules you entered will be converted to calories and saved as calories for you. No more calculators!